
 الإنجليزية
 中文简体
中文简体 Русский
 Español
 Português
 Türkçe
 العربية
 Deutsch
 Polski
 Italiano
 Français
 한국어
한국어 ไทย
ไทย Tiếng Việt
 日本語
日本語





























آلة اختبار الشد
مستخدم المالكين
قابل للتطبيق LISUN الموديلات: PULL-10T،PULL-2000KG、PULL-200KG、PULL-20T،PULL-30T،PULL-5000KG،PULL-500KG、PULL-60T
1. فهم أساسي للمعدات
1.1 المعلمات الرئيسية
1.1.1 تصنيف النموذج
| المواصفات/أرقام الطراز | PULL-30T | ...... | PULL-2000KG | PULL-500KG | سحب - 200 كجم |
| Maximum Tensile Force | 30 طن متري | كجم 2000 | كجم 500 | كجم 200 | |
| عدد المشاركات | عمود مزدوج | وظيفة واحدة | |||
| Effective width of the test | 400 mm (or customizable according to customer requirements) | سماكة 150 ملم | |||
| وحدات القوة | N, KN, Kgf, and Lbf can be freely converted | ||||
| Travel (including fixtures) | 800 mm (or customized to customer specifications) | ||||
| اختبار السرعة | Range: 0.001–500 mm/min (stepless speed control) | ||||
| نطاق التطبيق | Can test the mechanical properties—such as tensile strength, elongation, tear strength, peel strength, shear strength, and adhesive strength—of materials including plastics, hardware, welded parts, electronic components, rubber, and fabrics. | ||||
Note: This manual uses a dual-column testing machine as an example; the operation of a single-column testing machine is the same as that of the dual-column model.
1.1.2 تركيبات
The equipment comes standard with a set of tension clamps. If you need other types of clamps, they can be purchased separately. See Figure 1-1.
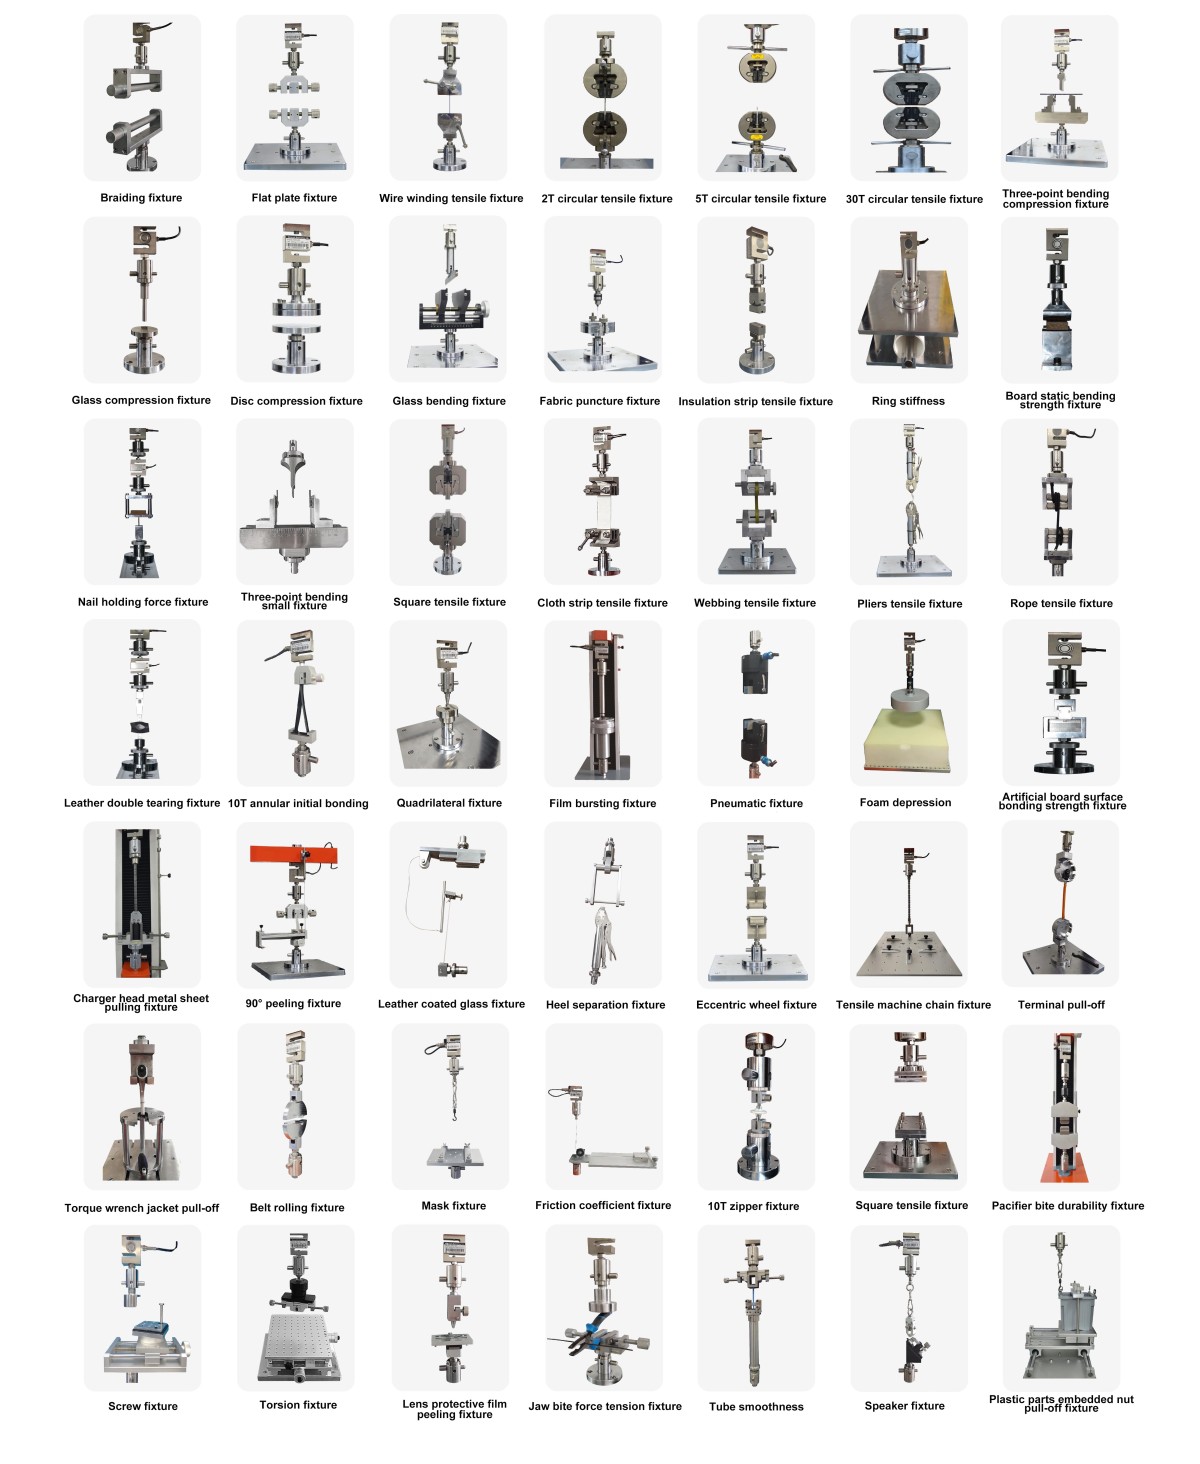
الرقم 1-1
1.2 التحقق من تكوين المعدات
1.2.1 التفريغ
When unpacking the device, handle it gently to avoid scratching the outer casing with sharp tools. After unpacking, first inspect the exterior of the device to ensure there is no obvious deformation or dents, and that the buttons are not damaged or loose. If you notice any abnormalities with the device or its accessories, do not turn it on. Please contact us immediately.
1.2.2 الوحدة الرئيسية والملحقات
| رقم الهاتف | ملاحظات |
| ① | PULL Series Tensile Tester Main Unit |
| ② | السلطة الحبل |
| ③ | RS-232 Communication Cable |
| ④ | Computers and Related Accessories |
1.2.3 تنزيل المستندات الإلكترونية
لقد أرسلنا بالفعل روابط تحميل دليل المستخدم الإلكتروني وبطاقة الضمان وغيرها من المستندات عبر البريد الإلكتروني عند الشحن. يُرجى تحميلها في أقرب وقت ممكن. إذا لم يصلك البريد الإلكتروني، يمكنك التواصل معنا لطلب روابط التحميل مرة أخرى.
2. احتياطات السلامة
2.1 السلامة الكهربائية
Before connecting the power cord, verify that the supply voltage is AC 220 V ±10% and the frequency is 50 Hz or 60 Hz;
You must use a three-prong outlet with a protective ground, with a protective ground resistance of ≤4Ω. It is strictly prohibited to cut or disconnect the protective ground wire; doing so poses a risk of electric shock.
2.2 السلامة البيئية
لا تستخدم في البيئات التي تحتوي على مواد قابلة للاشتعال أو متفجرة، أو تداخل كهرومغناطيسي قوي، أو درجات حرارة ورطوبة عالية، أو مستويات غبار مفرطة؛
بيئة التشغيل: درجة الحرارة من 5 درجة مئوية إلى 35 درجة مئوية، الرطوبة النسبية ≤ 65% RH.
2.3 إجراءات التشغيل
Improper operation may result in personal injury, equipment damage, or compromised test accuracy. Please read this manual and strictly follow the standard testing procedures;
انزعي المجوهرات قبل إجراء العملية، واربطي الشعر الطويل للخلف، ولا ترتدي ملابس فضفاضة؛
أثناء الاختبار، اتخذ الاحتياطات اللازمة لمنع تطاير شظايا عينة الاختبار وتسببها في الإصابة؛
During the test, do not extend your hands or tools into the fixture’s stroke;
Operators must not leave their posts without authorization while the equipment is in operation; in the event of an abnormality, immediately activate the emergency stop;
لا تقم بإجراء اختبارات تتجاوز سعة التحميل أو حد الشوط، ولا تستخدم تجهيزات تالفة أو غير قياسية.
2.4 أخرى
بالنسبة للأمور غير المشمولة في هذا الدليل، يرجى توخي الحذر أو الاتصال بنا.
3. نظرة عامة على المعدات والأسلاك
3.1 Front View of the Testing Machine
انظر الشكل 3-1.
| رقم الهاتف | ملاحظات |
| ① | مفتاح الطاقة |
| ② | One set of standard tension clamps |
| ③ | زر التوقف فى حالة الطوارئ |
| ④ | لوحة التحكم |
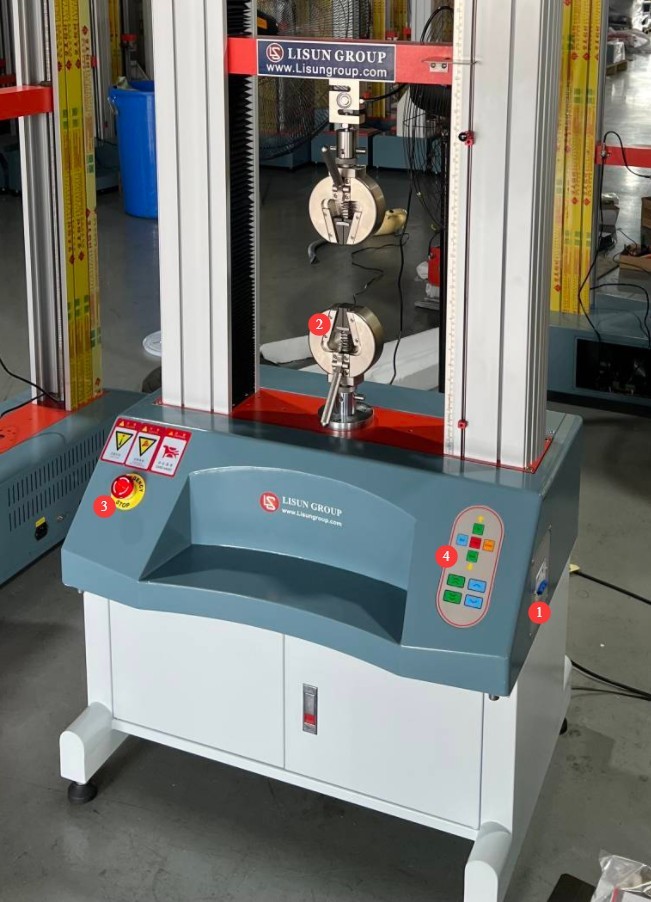
الرقم 3-1
3.2 Rear View of the Testing Machine and Wiring
انظر الشكل 3-2.
| رقم الهاتف | ملاحظات |
| ① | Connect the power cord to connect the device to an appropriate power source |
| ② | قم بتوصيل RS232 communication cable, with the other end connected to the corresponding computer. |
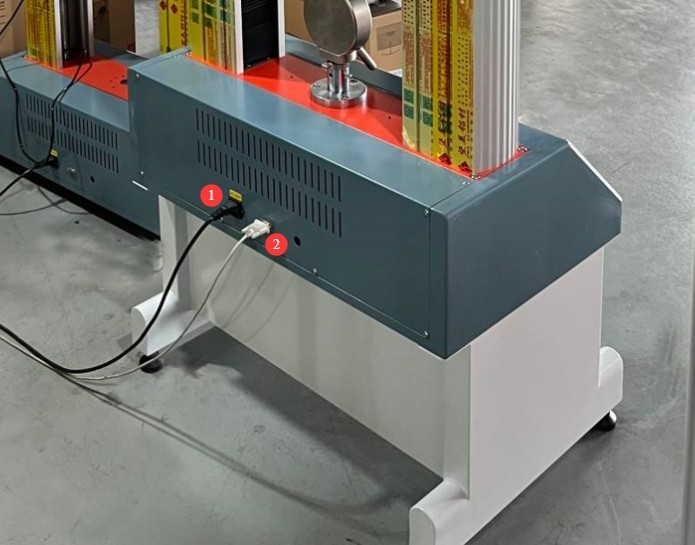
الرقم 3-2
4. Tensile Test Procedure
4.1 تحضير العينة
4.1.1 Specimen Preparation and Measurement
Take the standard tensile test setup as an example. Use a dumbbell cutter to cut the test specimen and measure its dimensions.
See Figure 4-1 for the specimen width.
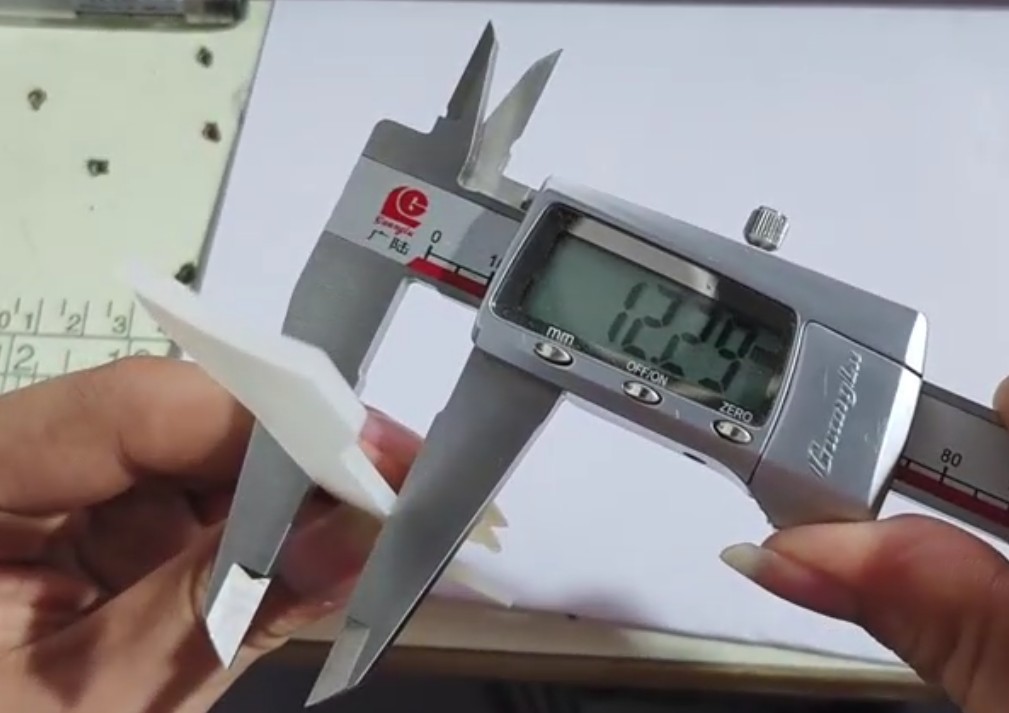
الرقم 4-1
See Figure 4-2 for the specimen thickness.
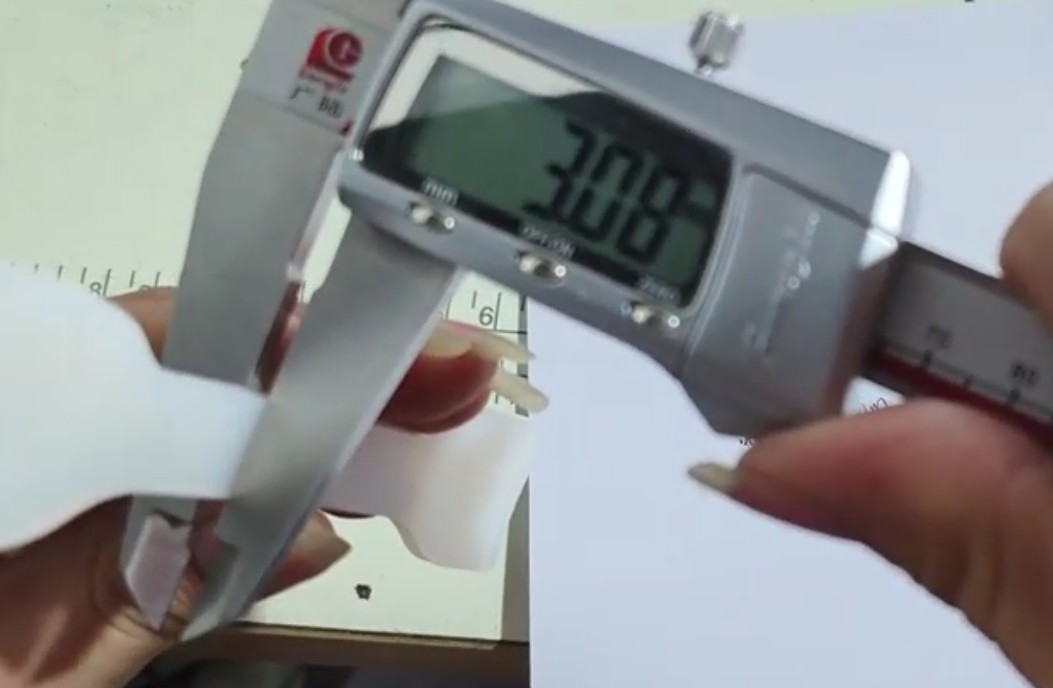
الرقم 4-2
Specimen gauge length; see Figure 4-3.
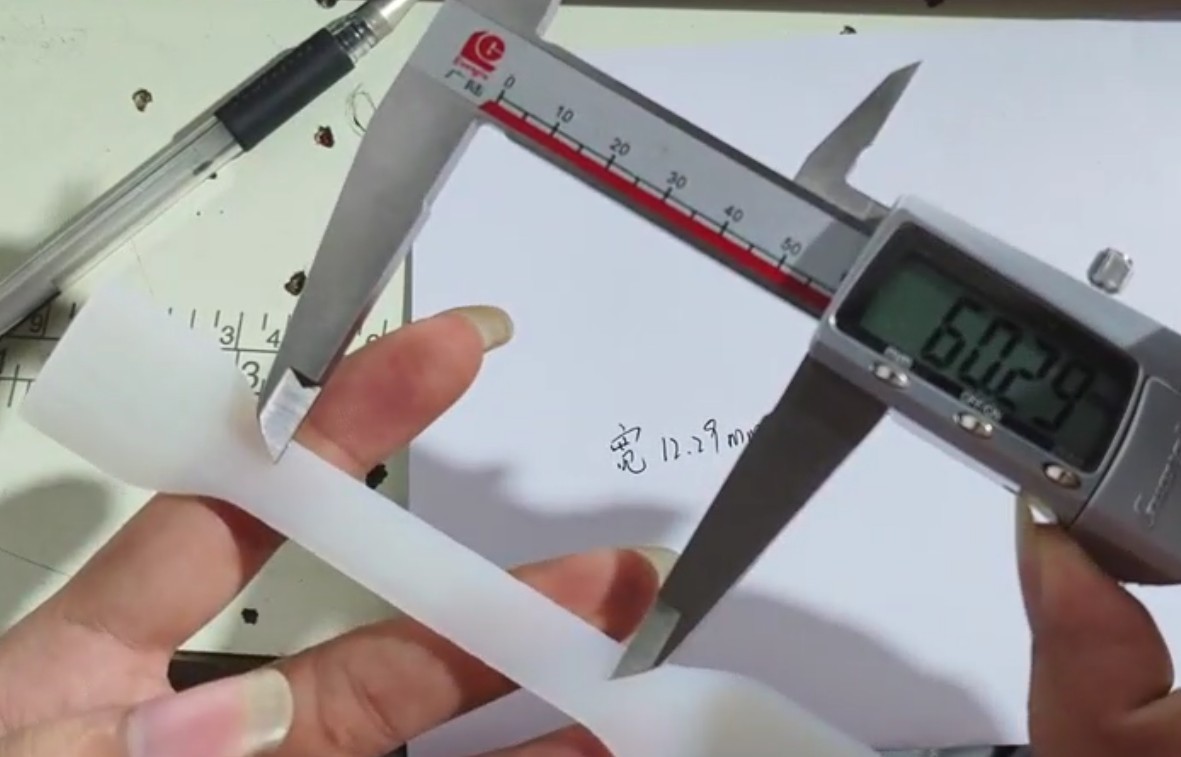
الرقم 4-3
4.1.2 Installation and Securing of Test Specimens
The five buttons in the upper half of the equipment control panel (Up, Down, Run, Stop, Clear) (Figure 4-4) have the same functions as the five buttons in the upper right half of the software (Up, Down, Start Test, Stop, Clear) (Figure 4-5).
The four buttons on the lower half of the equipment control panel (Fig. 4-4) have the same functions as the corresponding buttons on the right side of the software (Inch Up, Inch Down) (Fig. 4-5).
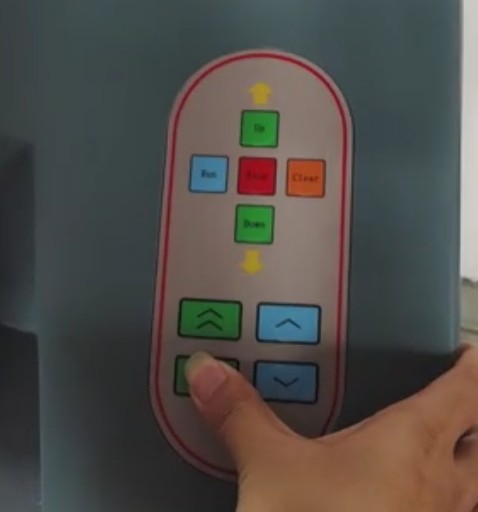
الرقم 4-4
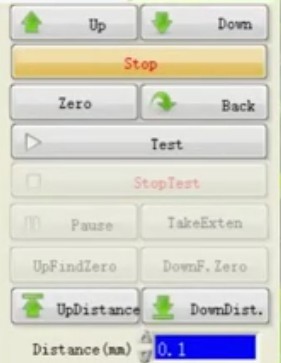
الأشكال من 4 إلى 5
Use the jog function to move the fixture to the appropriate position, install the specimen, and secure it with the fixture, as shown in Figures 4–6.
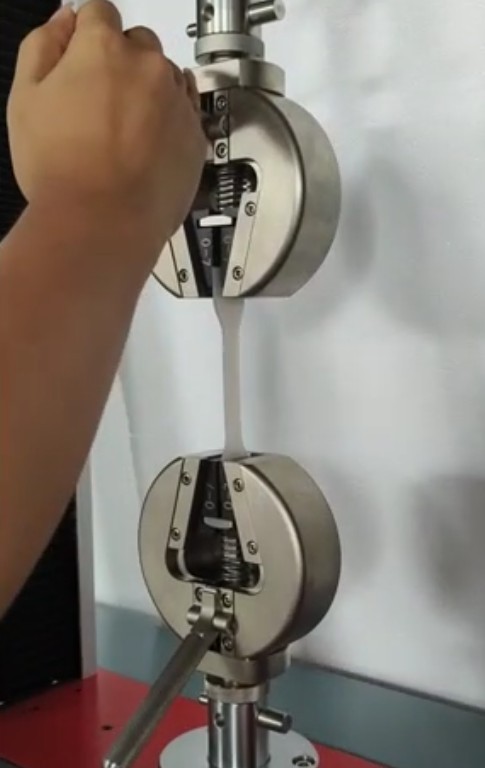
الأشكال من 4 إلى 6
4.2 تصحيح أخطاء البرامج
4.2.1 Edit Specimen Information
Click “Edit,” as shown in Figure 4-7.
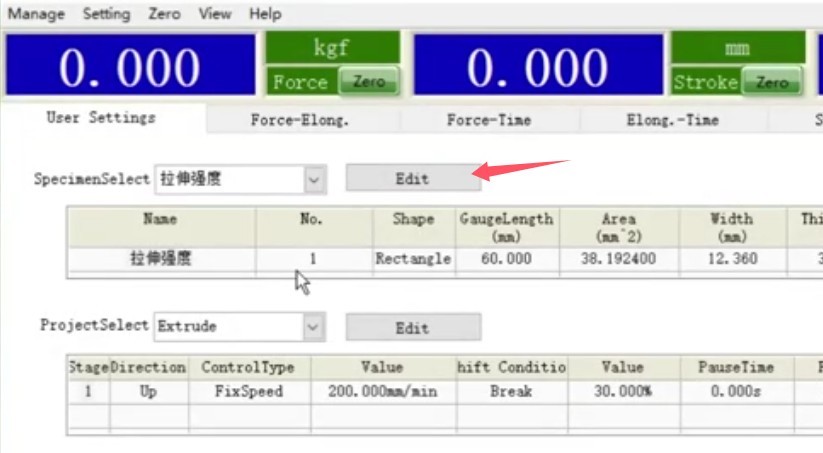
الأشكال من 4 إلى 7
Based on the actual specimen information in Section 4.1.1, select or enter the specimen shape, gage length, width, and thickness, as shown in Figure 4-8. Refer to industry standards; if you need to enter other information, such as area or fillet radius, simply enter it in the corresponding fields.
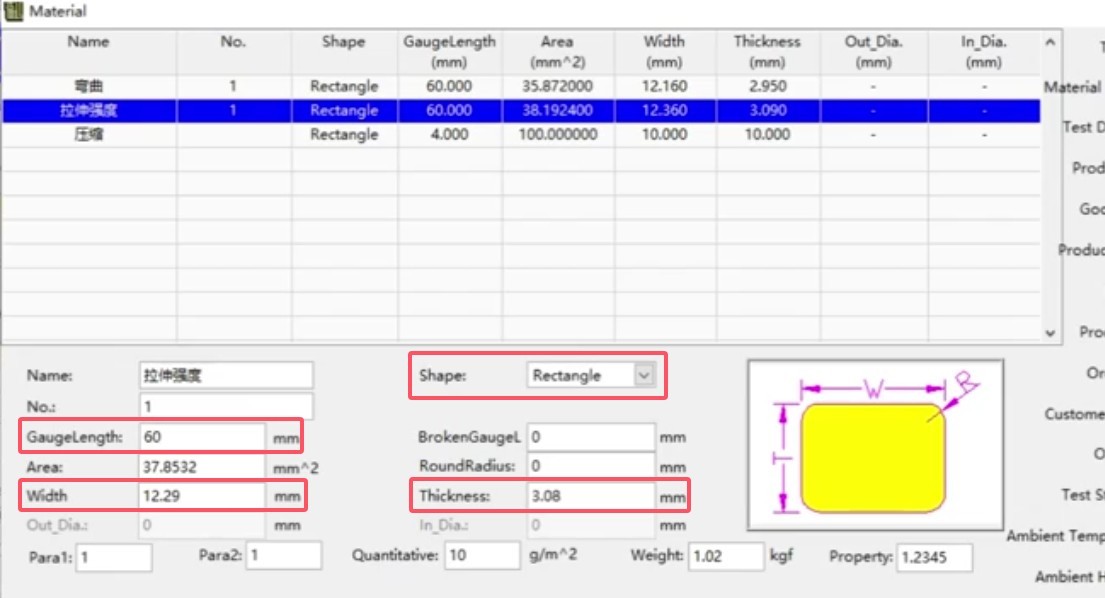
الرقم 4-8
4.2.2 Modifying Test Parameters
Click “Edit,” as shown in Figure 4-9.
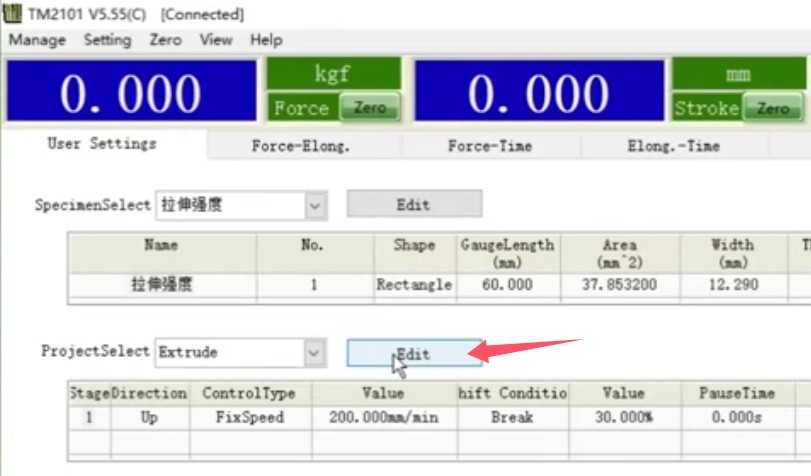
الرقم 4-9
Select “Tensile,” set the test direction to “Up,” set the test speed, and for the test termination condition, generally select “Failure”; you can also choose to have the test end automatically upon failure.
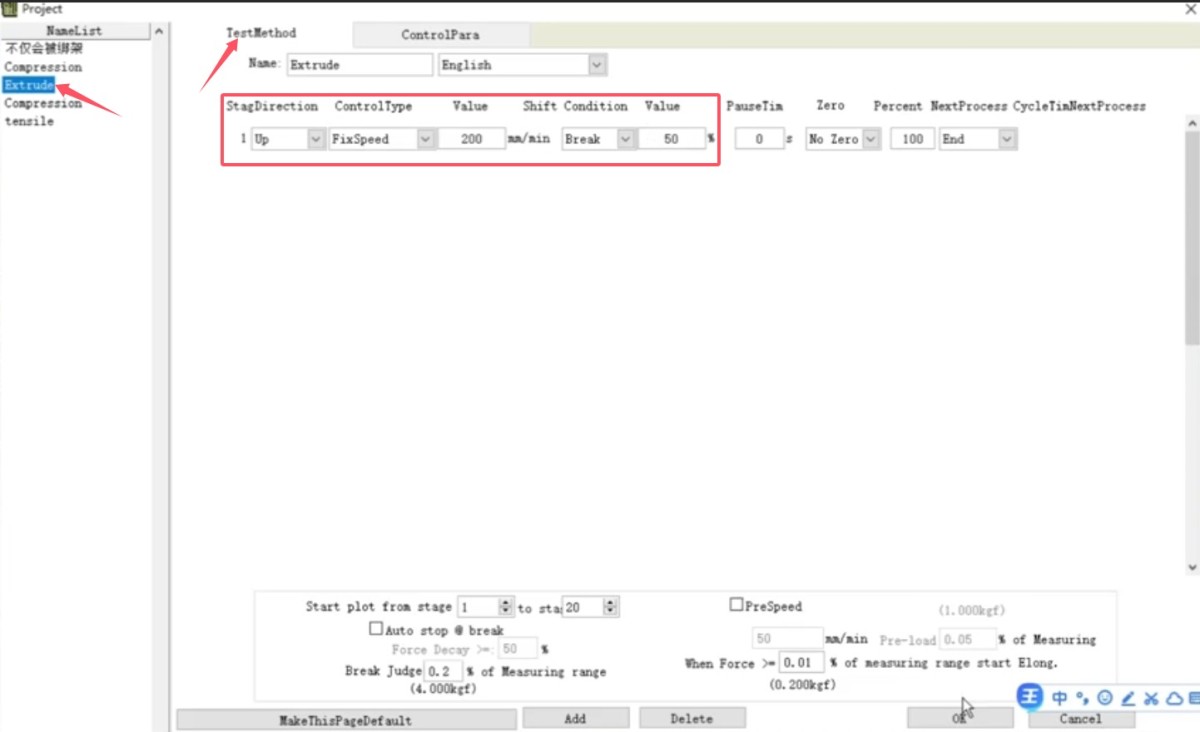
الرقم 4-10
4.3 Tensile Test Procedure
4.3.1 اختبار بدء التشغيل
Click “Start Test,” as shown in Figure 4-11.
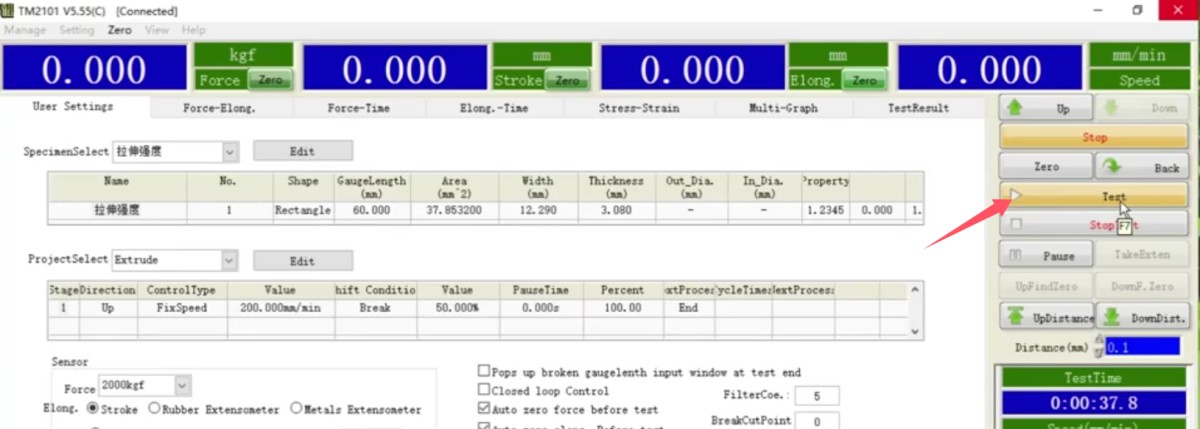
الرقم 4-11
4.3.2 نهاية الاختبار
The test ends automatically when the specimen breaks or the tensile stroke reaches its upper limit. Click “Save” to save the test data. Figure 4-12 shows the real-time data recording at the moment the specimen breaks.
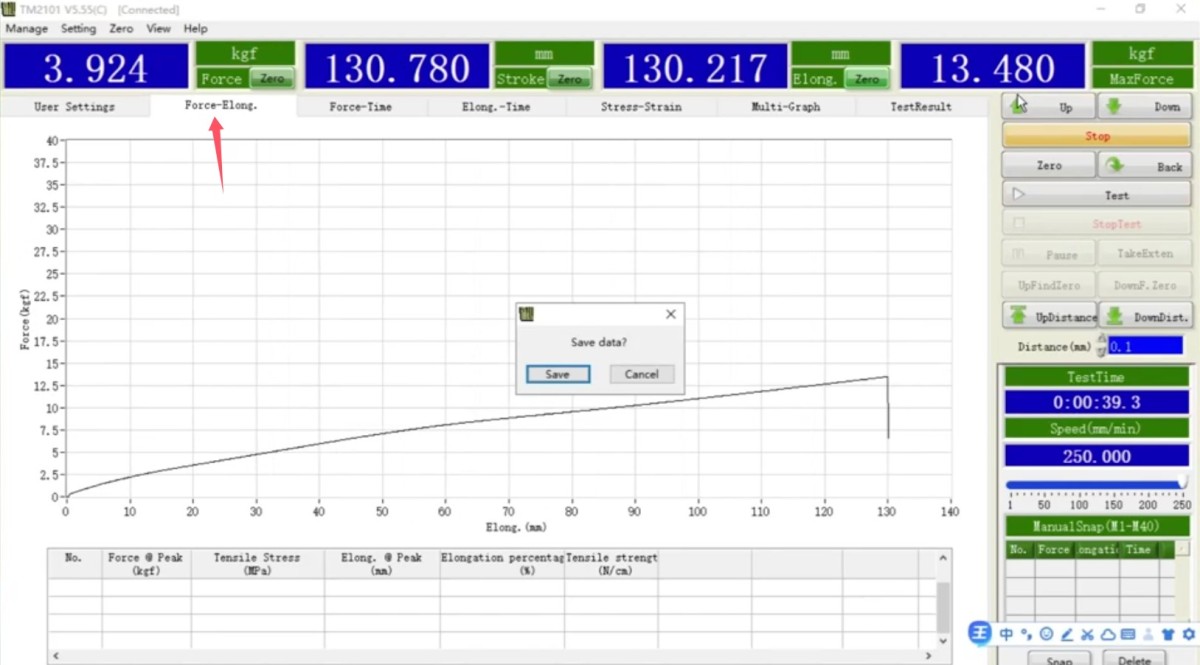
الرقم 4-12
4.4 تصدير بيانات الاختبار
To view and export tensile test data, see Figure 4-13.
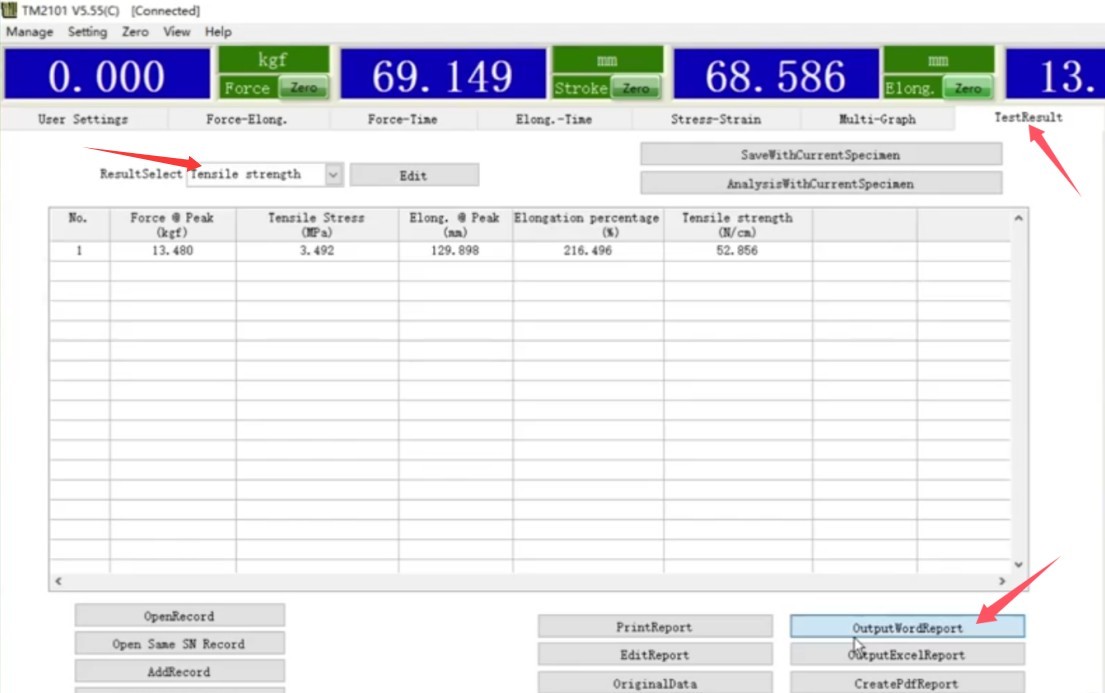
الرقم 4-13
5. إجراءات ما بعد الاختبار
5.1 Test Termination and Equipment Reset
Click “Return” in the software to return the fixture to its initial position; confirm that the equipment has come to a complete stop and is free of vibration and abnormal noises.
5.2 Cleaning of Specimens and Fixtures
Remove the broken specimen and store it separately; wipe the testing fixture with a clean cloth to remove debris and dust; check that the jaws of the fixture show no signs of wear or deformation.
5.3 Normal Shutdown Procedure
Close the software and shut down the computer’s operating system; turn off the device’s power switch; unplug the power cord (if the device will not be used for an extended period).
6. الصيانة الدورية والعناية بالمعدات
6.1 الصيانة الروتينية
Wipe down the machine, fixtures, and columns to keep the equipment clean; check that the power supply, communication cables, and emergency stop buttons are functioning properly; verify that the fixtures are secure and that the limit switches are not misaligned.
Apply special lubricating oil to the columns and drive screws to ensure smooth lubrication; check the clamping screws and crossbeam mounting screws, and retighten them.
6.2 مواصفات التخزين
6.2.1 متطلبات بيئة التخزين
درجة الحرارة: من 5 درجات مئوية إلى 35 درجة مئوية؛ الرطوبة النسبية: ≤65% رطوبة نسبية؛ بيئة جافة وخالية من الغبار والغازات المسببة للتآكل.
6.2.2 عمليات التخزين طويلة الأجل
قم بإيقاف تشغيل الطاقة وافصل جميع الكابلات؛ نظف الجهاز وقم بتغليفه بغشاء مقاوم للغبار؛ قم بتشغيل الطاقة لمدة 30 دقيقة كل شهر لمنع تلف المكونات بسبب الرطوبة.
6.3 متطلبات فترة المعايرة
لضمان دقة القياس وموثوقية تشغيل الجهاز، يُوصى بإرساله دوريًا إلى مختبر قياسات معتمد تابع لجهة خارجية لإجراء المعايرة. يُوصى بإجراء المعايرة كل 12 شهرًا. ويمكن للمستخدمين تحديد فترة المعايرة المناسبة بناءً على وتيرة الاستخدام والظروف البيئية ومتطلبات نظام الجودة.
7. استكشاف الأخطاء وإصلاحها وحل المشكلات الشائعة
| أعراض الخلل | الأسباب المحتملة | العملية |
| The device does not respond when powered on | The emergency stop knob has not been reset | Reset the emergency stop knob and try again. |
| The fixture does not move up or down | تم تشغيل مفتاح الحد | Check and Adjust the Limit Switches |
| يتم عرض قيم القوة والإزاحة بشكل غير صحيح | لم تتم إعادة التعيين إلى الصفر | انقر لإعادة التعيين والمحاولة مرة أخرى |
| The machine stops as soon as the specimen is loaded. | The fracture trigger threshold is too low | Retry after increasing the break trigger threshold |