
 الإنجليزية
 中文简体
中文简体 Русский
 Español
 Português
 Türkçe
 العربية
 Deutsch
 Polski
 Italiano
 Français
 한국어
한국어 ไทย
ไทย Tiếng Việt
 日本語
日本語





























جهاز اختبار عزم دوران الغدد الملولبة
مستخدم المالكين
قابل للتطبيق LISUN الموديلات: LWMF-1
1. فتح العلبة والتعرف الأساسي على المعدات
1.1 المواصفات الفنية الرئيسية
| LISUN الموديل | LWMF-1 | لومف-2 |
| تعليمات التشغيل | Electric Lift (Test Duration: Configurable from 0 to 59 minutes, 59 seconds) | التشغيل اليدوي |
| القرص قطر | سماكة 500 ملم | |
| لقط العينة | Chuck-type on both sides, fixed at the disc, with adjustable clamping at the other end | |
| Metal Rod Specifications | Φ6–21, 1 mm intervals | |
| الأوزان | 2.5 Nm, 3.75 Nm, 4.0 Nm, 5.0 Nm, 6.25 Nm, 7.5 Nm, 10.0 Nm | |
1.2 فتح العلبة والتحقق من المحتويات
1.2.1 فك التغليف والفحص البصري
When unpacking the device, handle it gently to avoid scratching the outer casing with sharp tools. After unpacking, first inspect the exterior of the device to ensure there are no visible deformations or dents and that the buttons are not damaged or loose.
إذا لاحظت أي تلف أو تشوه في الجهاز أو ملحقاته، فلا تقم بتشغيل الطاقة. يرجى الاتصال بنا فوراً.
1.2.2 الوحدة الرئيسية والملحقات
Main unit of the threaded seal cap test apparatus: 1 unit.
The standard accessories are as follows: ① Weights; ② Test rods; ③ Spare parts for the three-jaw chuck.
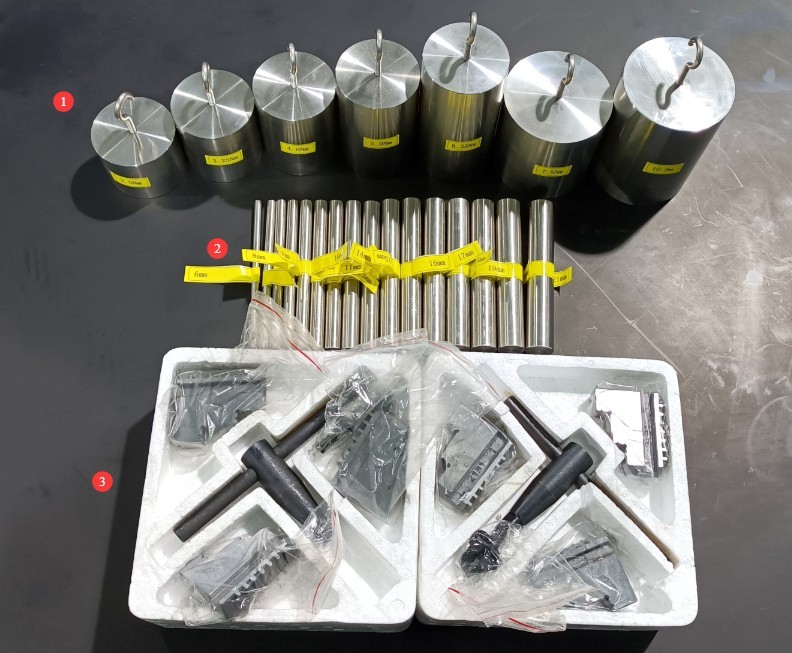
الشكل 1
تم إرسال روابط تحميل دليل المستخدم الرقمي وبطاقة الضمان وغيرها من المستندات إليكم عبر البريد الإلكتروني. يرجى تحميلها في أقرب وقت ممكن. إذا لم يصلكم البريد الإلكتروني، فلا تترددوا في التواصل معنا لطلب روابط التحميل مرة أخرى.
1.3 وصف هيكل المعدات
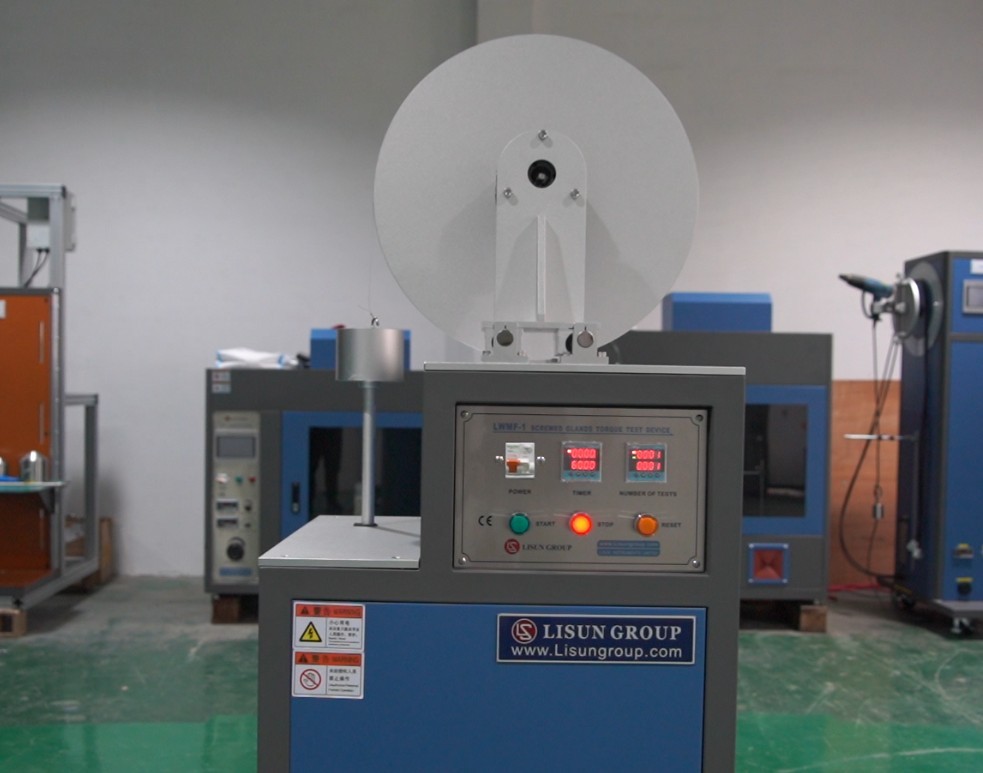
① 500 mm test disc; ② Two sets of three-jaw chucks for securing the threaded seal cap; ③ Electric lift table;④ Power switch; ⑤ Timer—the top line displays the current test duration, and the bottom line displays the set duration; ⑥ Test count setting—the top line displays the current test count, and the bottom line displays the set count; ⑦ Start test; ⑧ Stop test; ⑨ Reset button.
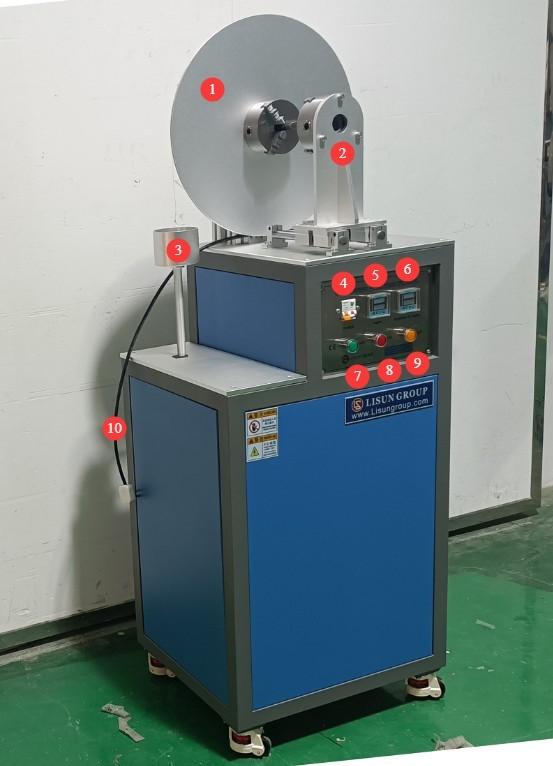
الشكل 2
2. احتياطات السلامة
2.1 السلامة الكهربائية
2.1.1 توصيل الطاقة
طاقة أحادية الطور 220 فولت؛ يجب أن تتوافق منافذ الطاقة مع معايير السلامة، وأن يكون لها تأريض مناسب، وأن يكون لها تيار مقنن يتطابق مع تصنيف طاقة الجهاز.
2.1.2 مواصفات التأريض
يجب تأريض الجهاز بشكل موثوق، بمقاومة تأريض لا تتجاوز 4 أوم. لا تستخدم أنابيب الغاز أو أنابيب المياه غير المعدنية أو السلك المحايد كبديل لسلك التأريض. بعد إتمام عملية التأريض، استخدم جهاز اختبار مقاومة التأريض لقياسها. لا يجوز توصيل الطاقة إلا بعد التأكد من أن المقاومة تفي بالمتطلبات، وذلك لتجنب الصدمات الكهربائية أو أعطال الجهاز أو أخطاء القياس الناتجة عن ضعف التأريض.
2.2 سلامة التشغيل
قبل توصيل الأسلاك أو فحص المعدات أو صيانتها، يجب عليك إيقاف تشغيل مفتاح الطاقة الخاص بالمعدات ومصدر الطاقة الرئيسي، والتأكد من عدم وجود جهد متبقٍ قبل المتابعة؛
تجنب تشغيل مفتاح الطاقة أو شاشة اللمس أو أزرار الجهاز بأيدٍ مبللة لتجنب خطر الصدمة الكهربائية؛
لا تضع أي أجسام غريبة (مثل الأدوات أو الورق) داخل خزانة التحكم الكهربائية لمنع الغبار أو الأجسام الغريبة من التسبب في حدوث دوائر قصر أو إتلاف المكونات؛
لا تقم بتوصيل أو فصل أسلاك الطاقة أو كابلات الإشارة أثناء تشغيل الجهاز لمنع حدوث دوائر قصر قد تتلف وحدة التحكم أو المكونات الكهربائية.
2.3 السلامة البيئية
The equipment should be placed in a dry environment free of corrosive gases and flammable or explosive materials.
The equipment must be installed in an air-conditioned room, where the ambient temperature is maintained between 5°C and 35°C and the relative humidity is ≤85%.
The distance between the equipment and walls, as well as surrounding structures (such as other testing equipment and shelving), must be at least 1000 mm to facilitate maintenance; at least 2000 mm of space must be left in front of the equipment to ensure smooth operation and keep the surrounding area free of obstructions;
يجب وضع الجهاز على سطح مستوٍ وثابت؛ ويمكن تعديل ارتفاع أرجل الجهاز.
2.4 أخرى
بالنسبة للأمور غير المشمولة في هذا الدليل، يرجى توخي الحذر أو الاتصال بنا.
3. الاستعدادات قبل الاختبار
3.1 Selection of Test Sticks
When installing the test probe, select a size that matches the inner diameter of the O-ring (slightly smaller and the nearest whole number) to prevent abnormal force transmission caused by the probe being too loose or too tight.
3.2 Selection of Weights
| المعايير المعمول بها | Test Rod Diameter (mm) | Metal Gland Torque (N·m) | Molded Plastic/Insulation Material Cap Torque (N·m) |
| غب / T شنومكس-شنومكس | <7 | 4.00 | 2.50 |
| > 7-14 | يونيو 25 | 3.25 | |
| > 14-20 | 7.50 | 5.00 | |
| > 20 | 10:00 | 7.50 | |
| غب / T شنومكس-شنومكس | ≤ 14 | يونيو 25 | 3.75 |
| > 14-20 | 7.50 | 5.00 | |
| > 20 | 10:00 | 7.50 | |
| غب / T شنومكس-شنومكس | ≤ 14 | يونيو 25 | 3.75 |
| > 14-20 | 7.50 | 5.00 | |
| > 20 | 10:00 | 7.50 | |
| غب / T شنومكس-شنومكس | ≤ 14 | يونيو 25 | 3.75 |
| > 14-20 | 7.50 | 5.00 | |
| > 20 | 10:00 | 7.50 |
4. Test Procedure for Threaded Sealing Gland
4.1 إعدادات معلمة الاختبار
Turn on the device. Set the test duration to 60 seconds in accordance with the standard requirements; set the number of tests to 1.
Note: The device’s factory settings have been configured according to the above requirements. Users may also reconfigure the settings to suit their own needs.
4.2 تثبيت العينة
Insert the test rod through the sample and tighten it securely to ensure there is no play.
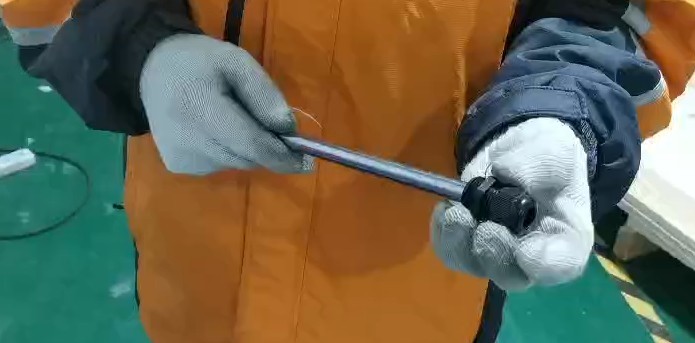
الشكل 3
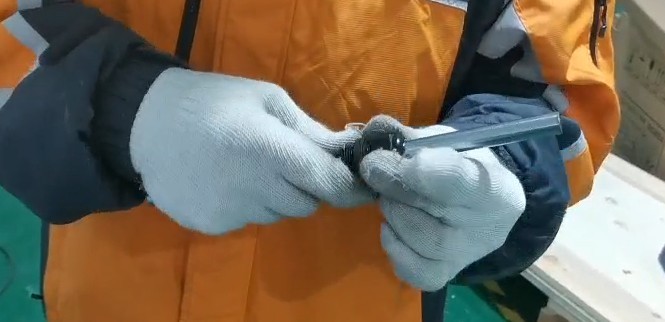
الشكل 4
Loosen the three-jaw chuck fixtures on both sides.
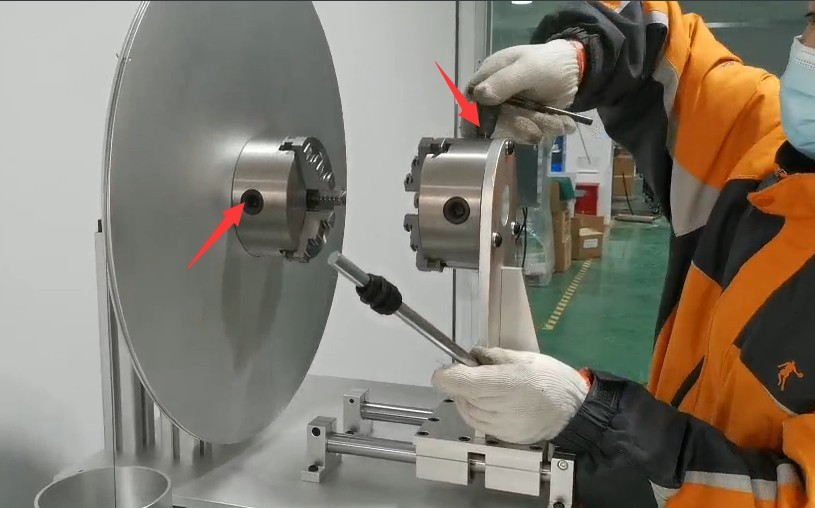
الشكل 5
Insert the test rod and the sample so that the two parts of the sample are secured in the clamps on either side, and then retighten the three-jaw chuck to ensure there is no play.
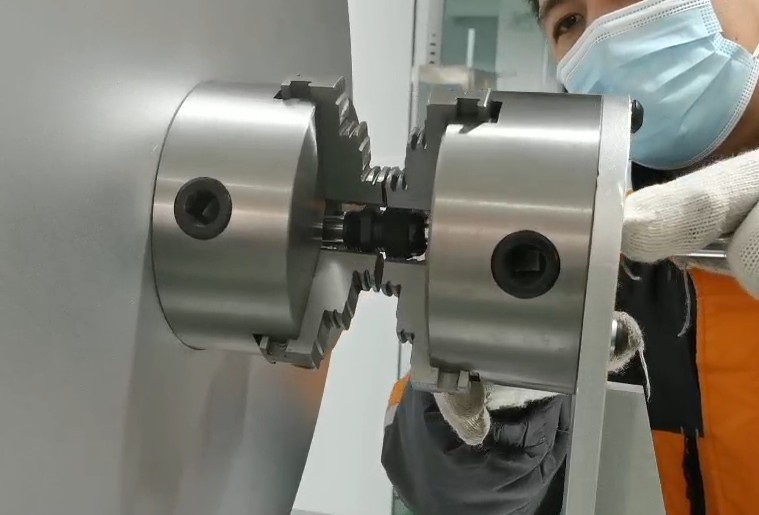
الشكل 6
4.3 Installation and Calibration of Weights
Hang the weights on the steel cable along the rail at the edge of the disc, and place them inside the lifting platform.
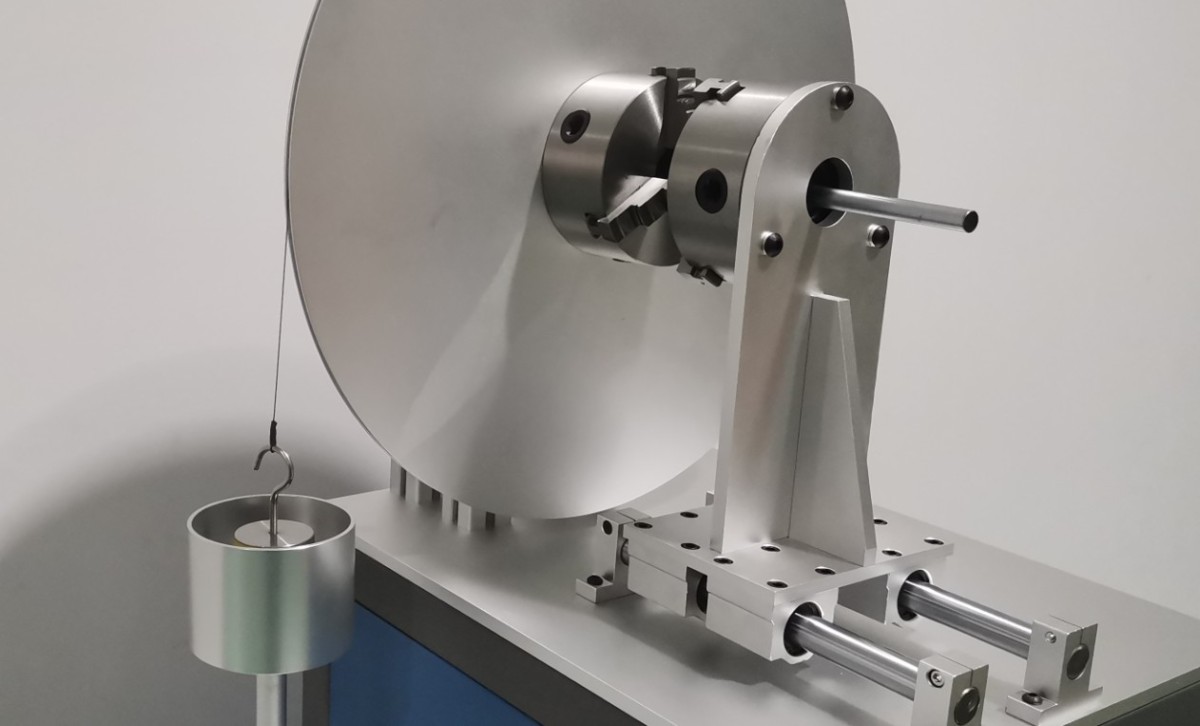
الشكل 7
Note: Make sure the weights are not suspended in mid-air, and keep the steel wire rope as taut as possible.
4.4 اختبار بدء التشغيل
Press the Reset button to clear the data from the previous test. Press the Start Test button, and the motorized lift will automatically lower; the torque generated by the weights and the disk will be applied to the sample, and the timer will begin counting.
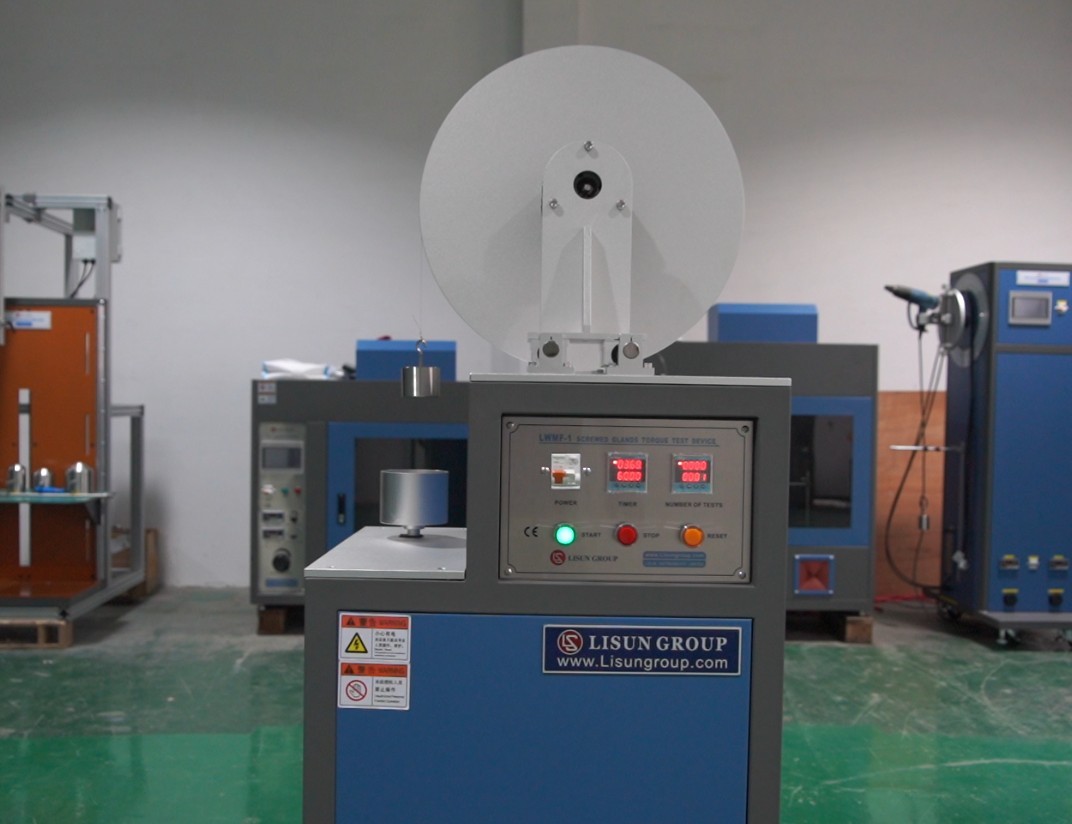
الشكل 8
One minute later, the test ended, the electric lift platform rose automatically, the “Stop Test” button lit up, and the current test count was displayed as 1.
الشكل 9
4.5 تقييم نتائج الاختبار
In accordance with the requirements of the relevant national standards, a product is deemed to meet the requirements if it satisfies the following conditions:
The threaded sealing gland shows no damage, such as cracks, deformation, or stripped threads;
The specimen housing must not have any damage that does not meet the requirements of the standard;
No abnormal loosening or detachment occurred during the test.
5. الصيانة اليومية للمعدات والعناية بها
5.1 التنظيف والصيانة
After the test is complete, wipe down the testing machine fixtures and other equipment with a dry cloth; do not use corrosive cleaning agents. Remove dust from the equipment’s terminal blocks to prevent poor contact.
5.2 التشحيم والصيانة
Apply lubricating oil to the sliding and rotating parts of the test apparatus to ensure smooth mechanical operation.
Weights and test rods should be coated with rust-preventive oil on a regular basis to prevent rust and extend their service life.
5.3 تخزين المعدات
5.3.1 متطلبات التخزين قصير الأجل
إذا تم استخدام المعدات بشكل يومي، فلا يلزم اتخاذ أي إجراء إضافي بعد اكتمال التنظيف عقب كل اختبار.
5.3.2 متطلبات التخزين طويل الأجل
إذا لم يتم استخدام الجهاز لفترة طويلة (أكثر من شهر واحد)، فيرجى فصل جميع الكابلات وتغطية الجهاز بغطاء واقٍ من الغبار لمنع تراكم الغبار.
ينبغي تشغيل الجهاز مرة واحدة شهريًا لمدة نصف ساعة فقط لمنع تلف المكونات الكهربائية (مثل المكثفات والموصلات).
6. استكشاف الأخطاء وإصلاحها وحل المشكلات الشائعة
6.1 Electrical System Malfunctions
6.1.1 Symptoms: The device will not power on; the display remains off.
Possible causes: Power is not connected, power cord is damaged, fuse is blown, power switch is faulty;
Troubleshooting: Check whether the power outlet is live, whether the power cord is damaged, and whether the plug is securely inserted. If the power switch is faulty and requires disassembly for internal repair, please contact LISUN خدمة الزبائن.
6.1.2 Symptom: Control panel buttons are unresponsive
Possible causes: Poor power connection, worn-out buttons, loose internal wiring;
Troubleshooting: Unplug the power cord, then plug it back in to restart the device; check the buttons for any foreign objects that might be causing them to stick, and clean the button surfaces; if the device still does not respond, contact customer service to have the buttons or internal wiring inspected and repaired.
6.2 Mechanical System Failures
6.2.1 Symptom: The fixture cannot secure the sample; it is loose.
Possible causes: Wear on the fixture jaws, loose adjustment screws, or a mismatch between the sample size and the test rod;
Solution: Check the clamping jaws of the fixture for wear; if they are severely worn, replace them. Tighten the set screws on the fixture’s adjustment threads to ensure smooth adjustment. Verify that the correct test rod has been selected (one with a diameter slightly smaller than the inner diameter of the O-ring and the nearest whole number).
6.2.2 Symptoms: The weights move jerkily and make unusual noises
Possible causes: lack of oil in the drive mechanism, tangled cable, or deformation of the weight cup;
Solution: After turning off the power, inspect the drive mechanism and apply a small amount of lubricating oil to the rotating shaft; straighten the ropes to ensure they are free of tangles or knots; if the ropes are severely worn, replace them; check the weight cup for deformation; if deformed, contact customer service to have it replaced.
6.3 Faults Caused by Abnormal Test Data
Problem Description: Samples are frequently damaged and do not meet expectations.
Possible causes: incorrect torque setting, improper selection of test rod, confusion regarding the applicable standard;
Solution: Double-check the sample type and the diameter of the test rod, and adjust the torque value according to the corresponding standard; verify that the correct test rod has been selected (with a diameter slightly smaller than the inner diameter of the seal and rounded to the nearest whole number); reconfirm the applicable national standard to avoid incorrect parameter settings.