
 الإنجليزية
 中文简体
中文简体 Русский
 Español
 Português
 Türkçe
 العربية
 Deutsch
 Polski
 Italiano
 Français
 한국어
한국어 ไทย
ไทย Tiếng Việt
 日本語
日本語





























نظام اختبار مصباح الأشعة فوق البنفسجية
مستخدم المالكين
قابل للتطبيق LISUN الموديلات: LMS-9000CUV،LMS-9000CUV-VIS،LPCE-2(LMS-9000CUV)
1. فهم أساسي للمعدات
1.1 فتح العلبة والفحص
عند إخراج الجهاز من العبوة، تعامل معه برفق لتجنب خدش الغلاف الخارجي بأدوات حادة. بعد إخراجه، افحص الجزء الخارجي من الجهاز للتأكد من عدم وجود أي تشوه أو انبعاجات ظاهرة، وأن الأزرار سليمة وغير مفكوكة. إذا لاحظت أي خلل في الجهاز أو ملحقاته، فلا تقم بتشغيله. يرجى الاتصال بنا فورًا.
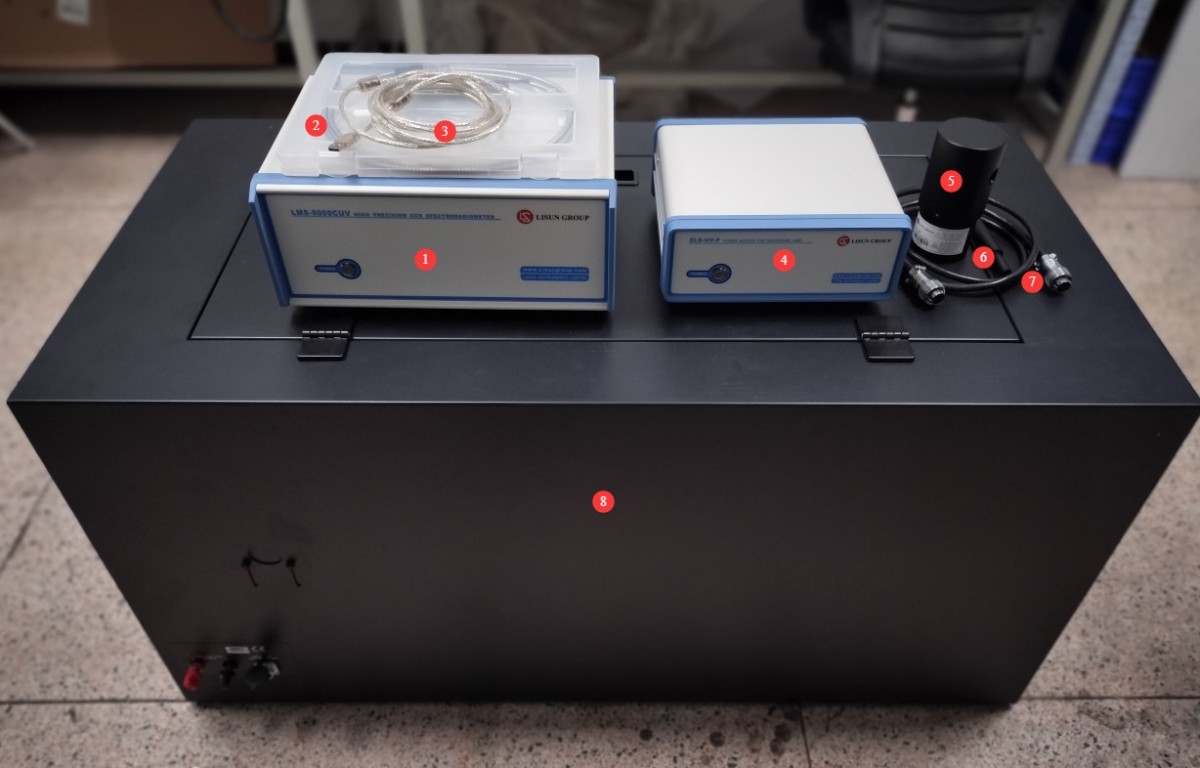
1.2 مكونات الأجهزة الأساسية
انظر الشكل 1-1.
| رقم الهاتف | ملاحظات |
| ① | High-Precision UV Spectroradiometer, Model LMS-9000CUV |
| ② | Quartz UV Optical Fiber Cable, Model CFS-1.5M |
| ③ | كبل USB |
| ④ | Dedicated Power Supply for UV Standard Light Sources, Model SLS-UV-P |
| ⑤ | Ultraviolet Standard Light Source, Model SLS-UV |
| ⑥ | Connecting rod, used for mounting a UV Standard Light Source |
| ⑦ | Power cord, used to connect the dedicated power supply for the UV Standard Light Source to the test dark box |
| ⑧ | Test Chamber, Model CASE-UV036 |
الرقم 1-1
1.3 تنزيل المستندات الإلكترونية
We have already sent download links for the electronic user manual, software, warranty card, and other materials via email at the time of shipment. Please download them as soon as possible. If you missed the email, please feel free to contact us to request the download links again.
2. احتياطات الاستخدام
2.1 السلامة البيئية
يجب وضع المعدات في بيئة جافة جيدة التهوية وخالية من الغبار والغازات المسببة للتآكل؛
درجة الحرارة المحيطة: 15-35 درجة مئوية؛ الرطوبة النسبية: ≤65% (بدون تكثف)؛
أبقِ المعدات بعيدة عن المجالات المغناطيسية القوية والمجالات الكهربائية القوية.
2.2 إجراءات التشغيل
The natural service life of an ultraviolet standard lamp is 1 year; it is recommended that it be replaced when it reaches the end of its service life to avoid affecting test accuracy;
Optical Fiber must not be bent excessively (bending radius ≥ 10 cm). Do not step on or crush the Optical Fiber, as this may cause damage and result in abnormal test results.
2.3 Protection from Direct UV Rays
This equipment is used for testing ultraviolet light sources. Direct exposure to ultraviolet light can cause burns and irreversible damage to the eyes and skin. Under no circumstances should you look directly at the ultraviolet light source or allow ultraviolet light to shine directly on your body during operation.
2.4 أخرى
بالنسبة للأمور غير المشمولة في هذا الدليل، يرجى توخي الحذر أو الاتصال بنا.
3. Equipment Overview and Connections
استخدم LMS-9000CUV is a Spectroradiometer used for testing; the CASE-UV036 is a test chamber used to provide the testing environment. This primarily concerns the connection between these two devices.
3.1 Introduction to and Wiring of the LMS-9000CUV
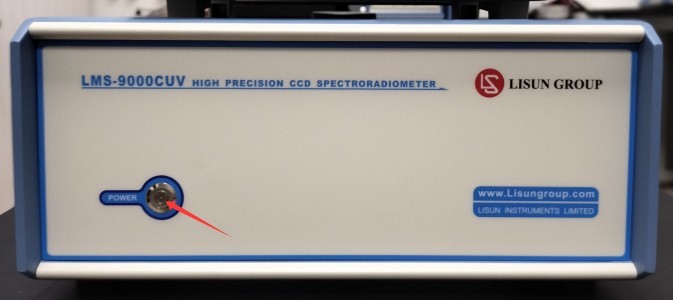
3.1.1 مقدمة عن اللوحة الأمامية
See Figure 3-1. The front panel of the device includes the device’s power switch.
الرقم 3-1
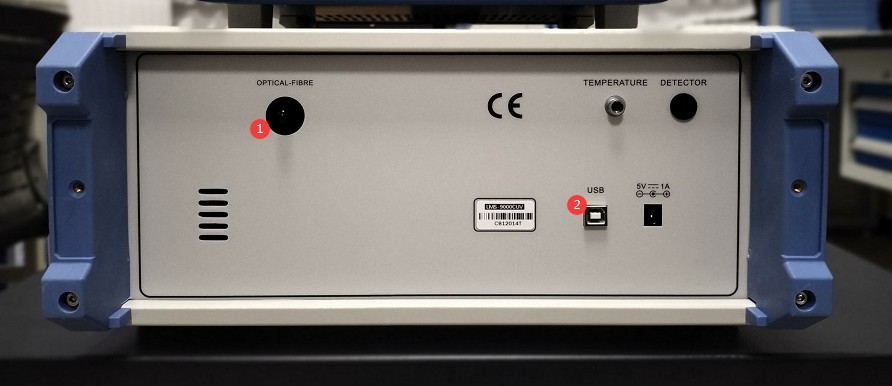
3.1.2 مقدمة عن اللوحة الخلفية
انظر الشكل 3-2.
| رقم الهاتف | ملاحظات |
| ① | Optical Fiber interface; connect via Optical Fiber cable to the test anechoic chamber |
| ② | USB port: Connects to a computer via a USB cable to communicate with computer software and power the device. |
الرقم 3-2
Note: The other ports are for backup purposes only; there is no need to connect to them.
3.2 Introduction to the Test Chamber and Wiring
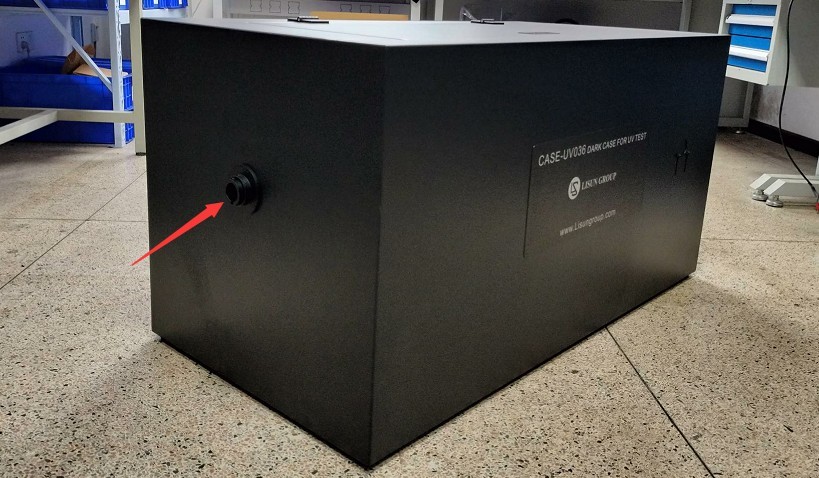
3.2.1 وصلات الألياف الضوئية
Optical Fiber connection interface; see Figure 3-3.
الرقم 3-3
Once the Optical Fiber connection is complete, see Figure 3-4.
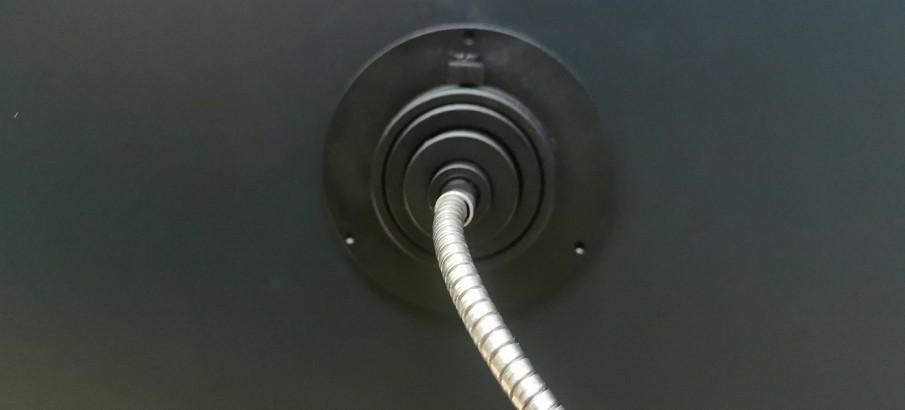
الرقم 3-4
3.2.2 Testing the Appearance of the Test Chamber and Other Interfaces
انظر الأشكال من 3 إلى 5.
| رقم الهاتف | ملاحظات |
| ① | Light box cover; open to view the interior and install lighting fixtures |
| ② | Mounting holes for linear light fixtures |
| ③ | Terminals for the Sample Luminaire Power Cord |
| ④ | Standard Light Source Power Cord Connector |
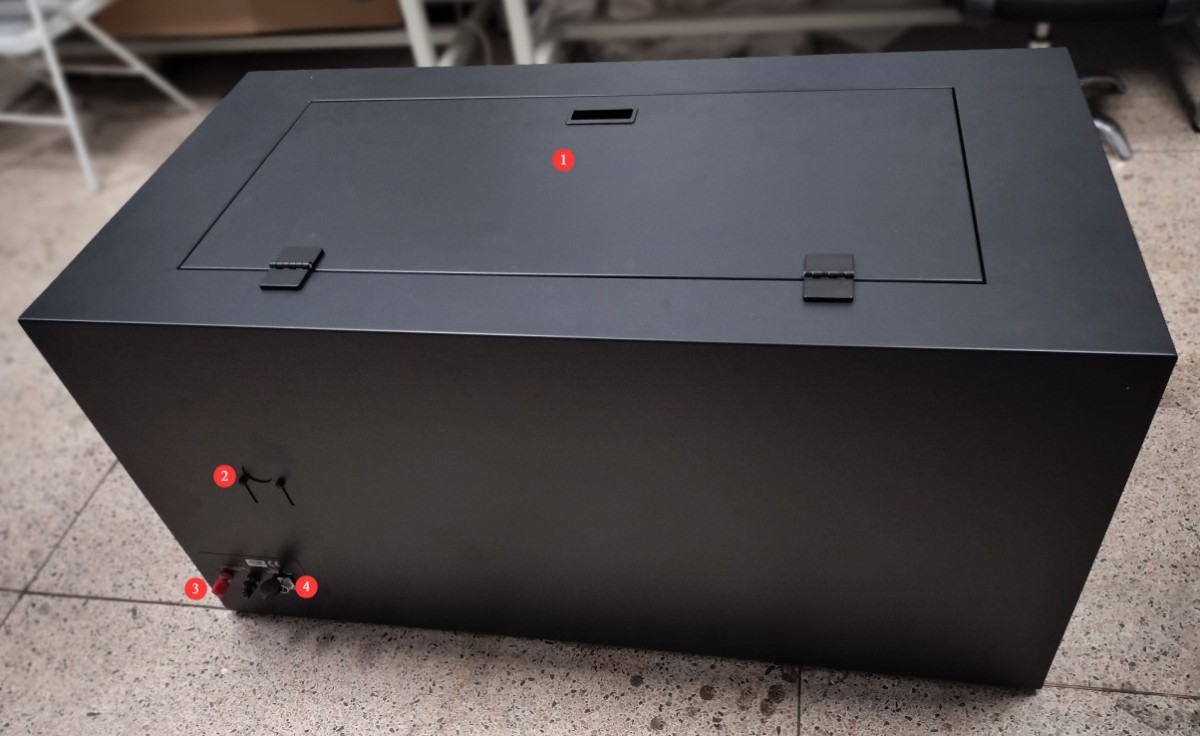
الرقم 3-5
4. تثبيت البرنامج ونظرة عامة
4.1 تثبيت البرامج وبرامج التشغيل
4.1.1 بيئة تشغيل البرمجيات
متطلبات النظام: ويندوز 7/8/10/11 (32 بت/64 بت)؛ يجب أن يحتوي الكمبيوتر على منفذ USB واحد على الأقل.
Note: If you have purchased multiple LMS-9000 series Spectroradiometers, please connect them to different computers whenever possible and avoid mixing them, as doing so may cause the software to display incorrect data.
تثبيت 4.1.2
انظر الشكل 4-1.
| رقم الهاتف | ملاحظات |
| ① | LMS-9000CUV software installation file—please double-click to install |
| ② | LMS-9000CUV Driver—Please double-click to install |
| ③ | SLS-UV Ultraviolet Lamp Calibration File (Note: Each Standard Light Source has a different file), which must be used during system calibration |
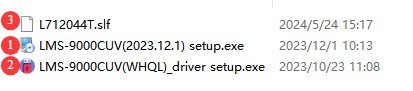
الرقم 4-1
4.1.3 معالجة الاستثناءات
إذا قام برنامج مكافحة الفيروسات أو جدار حماية ويندوز الخاص بك بتصنيف ملف على أنه مشبوه أثناء عملية تثبيت البرنامج، فيرجى تعطيل برنامج مكافحة الفيروسات أو جدار حماية ويندوز مؤقتًا ثم حاول تثبيت البرنامج مرة أخرى.
If the software fails to open when you double-click the icon after a successful installation, please check whether you are logged in to your computer with an administrator account. If the software still does not open after logging in with an administrator account, right-click the software icon to open its Properties window. On the Compatibility tab, check the box next to “Run this program as an administrator” and click “Apply” (Figure 4-2), then double-click the icon again to open the software.
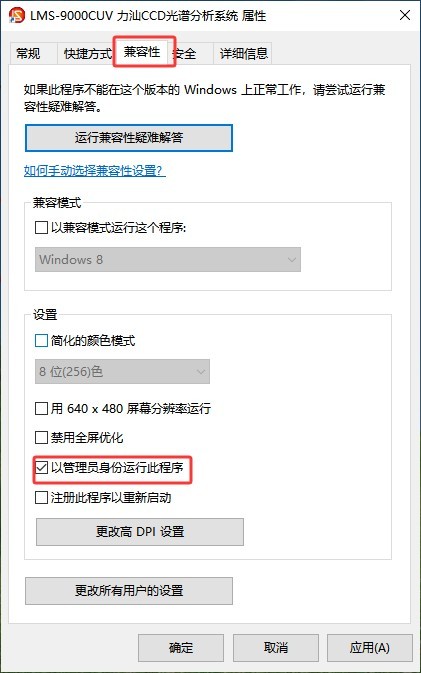
الرقم 4-2
4.2 Initial Software Setup
4.2.1 فتح البرنامج
The first time you open the software, you will be prompted to create a new database file (in .lmsuvi format); subsequent test reports will be automatically saved to this database file. Please enter a file name, select an appropriate path, and click “Save.”
ملاحظة ٢: الـ LMS-9000CUV software can be installed on any computer, but it will not function unless that computer is connected to an LMS-9000 device.
ملاحظة 2: لا يمكن فتح ملفات قاعدة البيانات التي تم إنشاؤها بواسطة برنامج LMS-9000 إلا باستخدام برنامج LMS-9000.
ملاحظة 3: يرجى تجنب وضع ملفات قاعدة البيانات على سطح مكتب جهاز الكمبيوتر الخاص بك كلما أمكن ذلك، لأن هذا قد يتسبب في حدوث أخطاء عند قراءة البيانات أو كتابتها.
4.2.2 تكوين النظام
انظر الشكل 4-3.
| رقم الهاتف | ملاحظات |
| ① | انقر على "تكوين النظام" |
| ② | Spectroradiometer models and related information; the software can automatically retrieve this data |
| ③ | Maximum automatic integration time: During testing, the integration time is set to “Auto” and is inversely proportional to the intensity of the mercury lamp being tested. It is recommended to use a longer maximum automatic integration time—such as 10000—to facilitate testing under low-light conditions. |
| ④ | The wavelength test range is set from 200 to 450 nm. Please verify that the display is correct; if not, please adjust it. |
| ⑤ | انقر على القائمة المنسدلة لاختيار طراز وحدة تزويد الطاقة بالتيار المتردد التي اشتريتها (عادةً سلسلة LSP). إذا لم تكن قد اشتريت LISUN مصدر الطاقة AC، يرجى تحديد "غير مثبت"؛ وإلا سيحدث خطأ في الاتصال. |
| ⑥ | انقر على القائمة المنسدلة لاختيار طراز وحدة تزويد الطاقة DC التي اشتريتها (عادةً سلسلة DC). إذا لم تكن قد اشتريت LISUN مصدر الطاقة DC، يرجى تحديد "غير مثبت"؛ وإلا سيحدث خطأ في الاتصال. |
| ⑦ | انقر على القائمة المنسدلة لاختيار طراز عداد الطاقة الذي اشتريته؛ يمكنك العثور على رقم الطراز على اللوحة الأمامية لعداد الطاقة. يرجى اختيار الطراز الصحيح الذي اشتريته. إذا لم تكن قد اشتريت LISUN عداد الطاقة، يرجى تحديد "غير مثبت"؛ وإلا سيحدث خطأ في الاتصال. |
| ⑧ | The standard test distance for the light box is 1 meter. If you change the actual test distance, please enter the correct test distance here; otherwise, the test data will be incorrect. |
| ⑨ | Please enter the correct area of the light-emitting surface of the sample luminaire. |
| ⑩ | Click to automatically search for the communication port. If an error message appears, please check the connection of the communication cable for the corresponding device according to the message. |
| ⑪ | بمجرد ضبط جميع الإعدادات والاتصالات، انقر ببساطة على "موافق" للحفظ. |
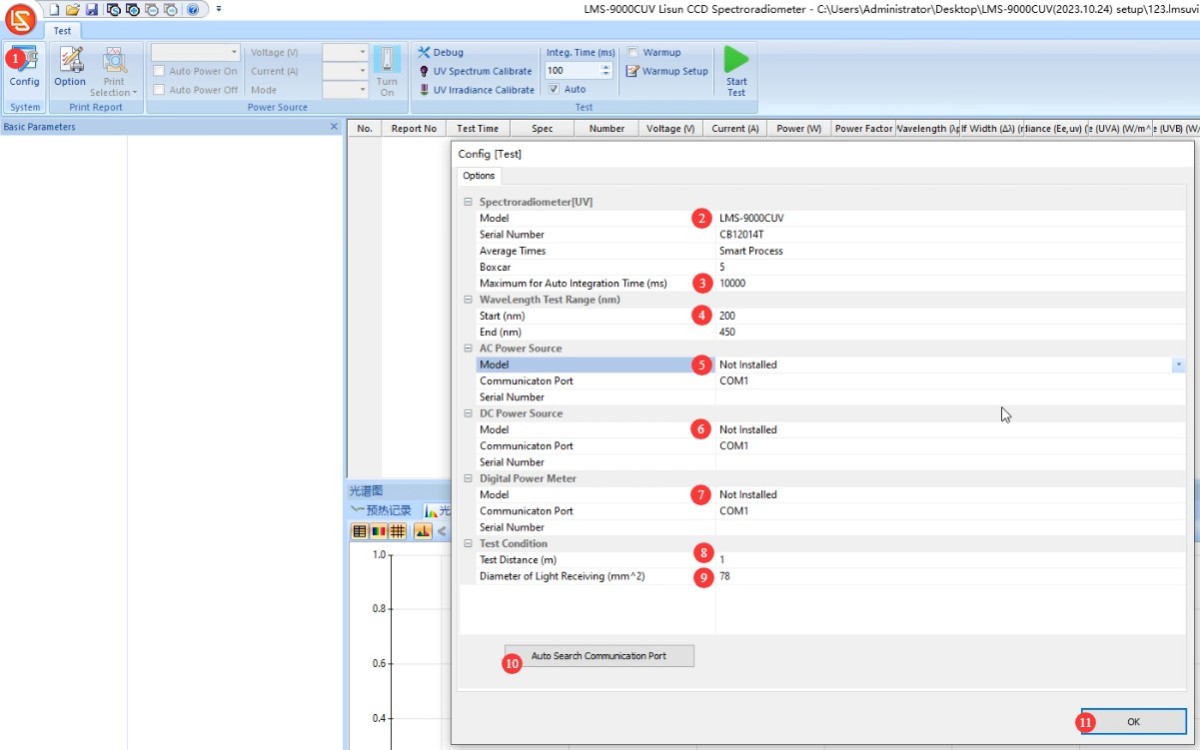
الرقم 4-3
Note 2: Reinstalling the software or unplugging and replugging the USB cable may require re-establishing communication.
5. المعايرة
5.1 مبادئ المعايرة
| وصف الموقف | هل إعادة المعايرة ضرورية؟ |
| اول استخدام | يلزم إجراء معايرة قبل الاستخدام. |
| The equipment is used frequently | It is recommended to calibrate at least once a month. |
| Equipment that has not been used for more than a month | يلزم إجراء المعايرة قبل الاستخدام التالي. |
| أعد تثبيت البرنامج | لا حاجة لإعادة المعايرة |
| استبدال الكمبيوتر | يجب إعادة معايرته |
| توصيل وفصل كابل USB | لا حاجة لإعادة المعايرة |
| Inserting and Removing the Optical Fiber at the End of a Spectroradiometer | |
| Inserting and Removing the Optical Fiber Probe from the Dark Box | يوصى بإعادة المعايرة. |
| تغيرات كبيرة في الظروف البيئية، مثل درجة الحرارة والرطوبة |
5.2 إجراء المعايرة
5.2.1 Installation and Illumination of The Standard Light Source
See Figure 5-1 for the power connection for the SLS-UV-P ultraviolet Standard Light Source.
| رقم الهاتف | ملاحظات |
| ① | Connect the input power supply. Please follow the prompts to connect the SLS-UV-P to a suitable power source. |
| ② | Connect the output power cord to the test chamber. |
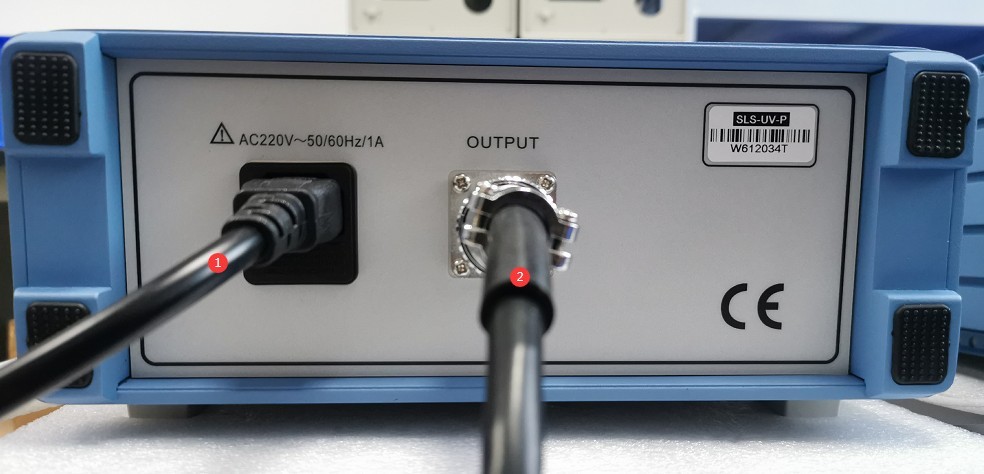
الرقم 5-1
Use the connecting rod to mount the SLS-UV ultraviolet Standard Light Source to the dark box, and connect the power cord of the ultraviolet Standard Light Source inside the dark box to the Standard Light Source, as shown in Figure 5-2.
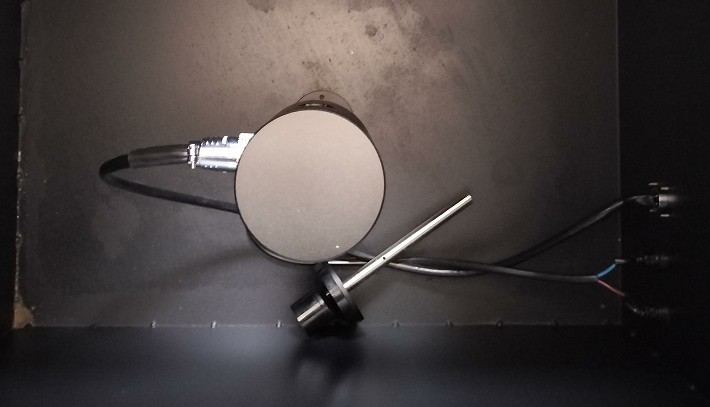
الرقم 5-2
بدوره على SLS-UV-P and activate the UV Standard Light Source.
Adjust the orientation of the Standard Light Source’s light-emitting aperture so that it is directly aligned with the aperture in the aperture diaphragm and the Optical Fiber on the opposite side of the dark box. Then close the dark box cover, as shown in Figure 5-3.
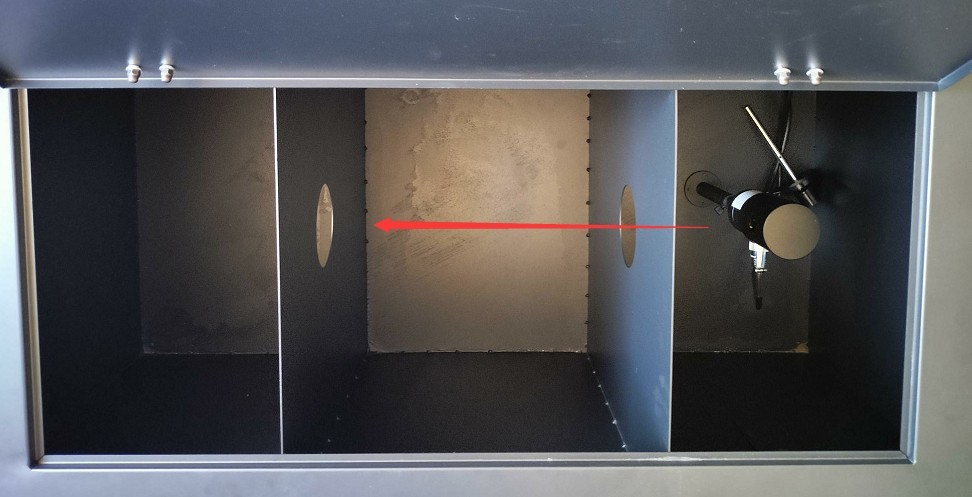
الرقم 5-3
5.2.2 Calibration via the Software Interface
انظر الشكل 5-4.
| رقم الهاتف | ملاحظات |
| ① | Click “UV Spectrum Calibrate” |
| ② | Our calibration documents use W/m²/nm; please select the correct unit. |
| ③ | Retrieve the calibration file with the .slf extension mentioned in Section 4.1.2 |
| ④ | When earning points, be sure to check “Automatic”/”Auto” |
| ⑤ | Average count—no need to change it; just use the default value. |
| ⑥ | Stabilization time for Standard Light Sources: UV Standard Light Sources require at least 10 minutes to stabilize; a stabilization period of 10 to 15 minutes is recommended. Calibration can only be performed after the Standard Light Source has stabilized. |
| ⑦ | After confirming that the settings are correct, click Start. |
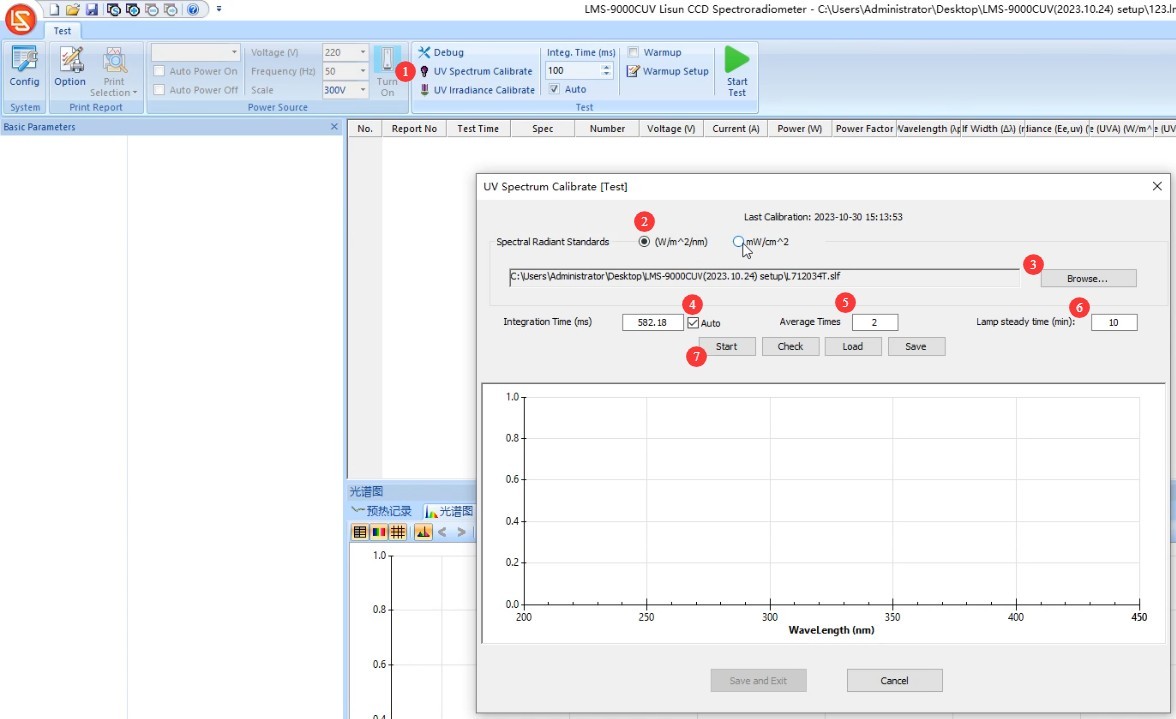
الرقم 5-4
When the countdown ends, the software automatically performs calibration, as shown in Figure 5-5.
| رقم الهاتف | ملاحظات |
| ① | اكتملت المعايرة |
| ② | Relative Spectral Curves of Ultraviolet Standard Light Sources |
| ③ | Click “Save and Exit” |
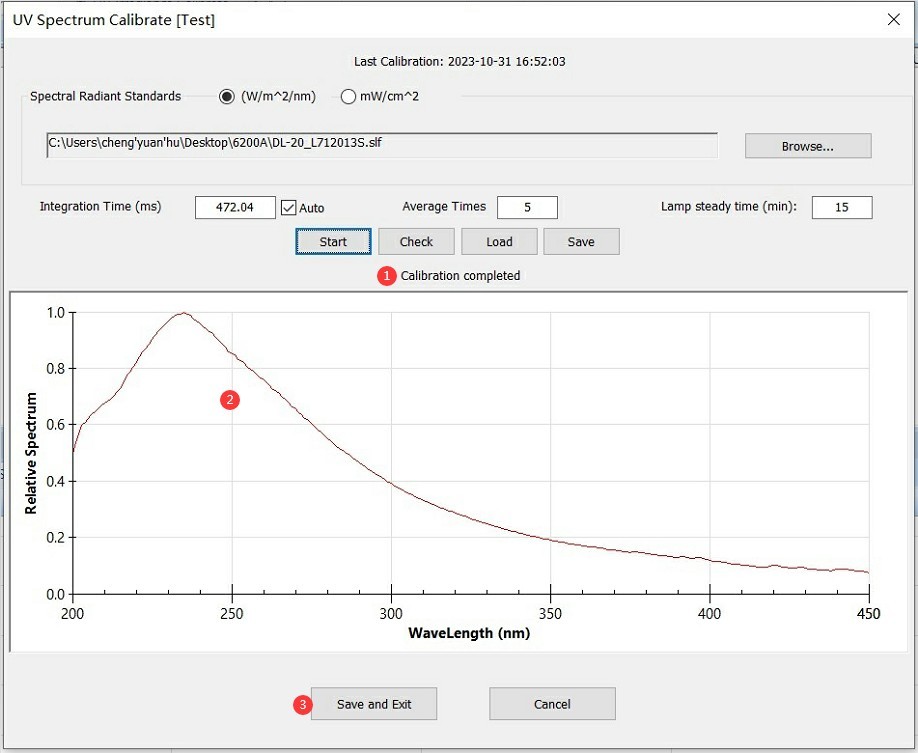
الرقم 5-5
5.2.3 Removal of The Standard Light Source
Turn off the dedicated power supply for the SLS-UV-P ultraviolet Standard Light Source, disconnect the Standard Light Source cable, wait for the Standard Light Source to cool down, then remove the Standard Light Source and its connecting rod and store them properly.
6. اختبارات
6.1 Installing and Powering On the Sample Light Fixture
6.1.1 تركيب وحدات الإضاءة النموذجية
We offer models with E27 sockets, as shown in Figure 6-1.
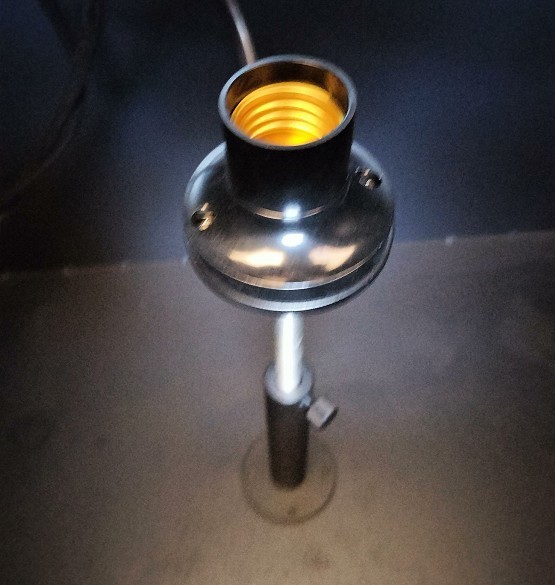
الرقم 6-1
When testing linear luminaires, refer to Section 3.2.2 for installation instructions. For other types of luminaires, secure the light-emitting surface of the luminaire at the standard test position 1 meter from the Optical Fiber, with the light-emitting surface facing the aperture of the light shield and the Optical Fiber. If you need to adjust the actual test distance, refer to Section 4.2.3 to enter the correct test distance into the software.
6.1.2 Turning On the Test Luminaire
Refer to Section 3.2.2, connect the sample luminaire to a suitable power source, turn it on, and then close the test chamber lid.
ملاحظة: إذا كان لديك LISUN power supply, you can use the LMS-9000C software to control the power supply output (Figure 6-2). If you are using your own power supply, please control it manually and turn on the sample lamp.
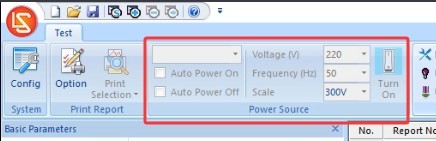
الرقم 6-2
6.2 تشغيل البرمجيات
6.2.1 Setting the Units of Irradiance
انقر فوق اللون الأحمر LISUN logo in the upper-left corner of the software interface, then click the “List Setup” drop-down menu, as shown in Figure 6-3.
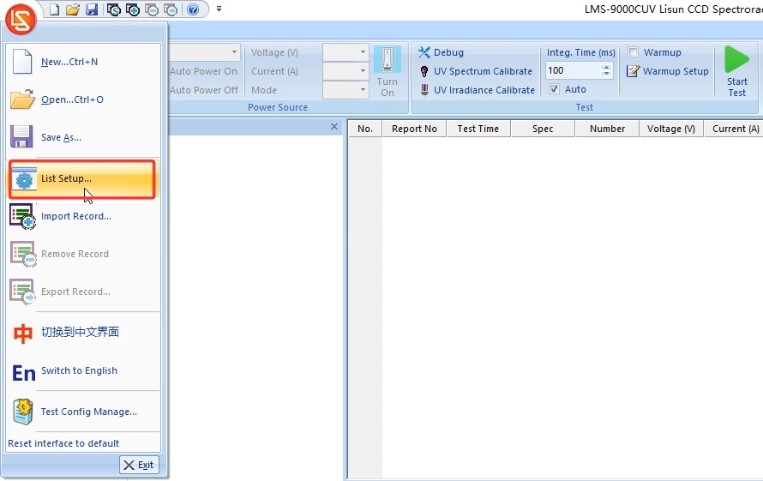
الرقم 6-3
The default unit for irradiance is W/m². Check the option shown in the figure below to change the unit to mW/cm², as shown in Figure 6-4.
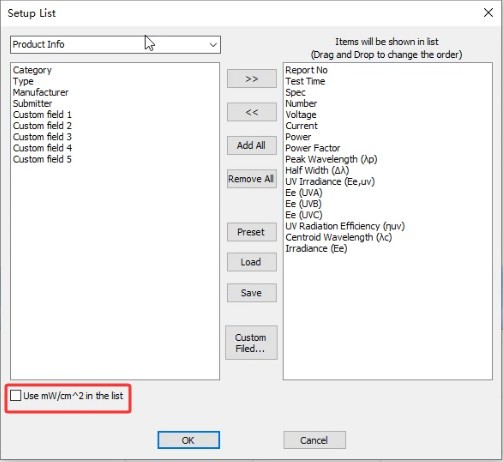
الرقم 6-4
6.2.2 إعدادات معلمات التسخين المسبق
انظر الشكل 6-5.
| رقم الهاتف | ملاحظات |
| ① | انقر على "إعدادات معلمات التسخين المسبق" |
| ② | ضبط مدة التسخين: الغرض من التسخين هو السماح لجهاز الإضاءة بالبقاء قيد التشغيل لفترة من الوقت حتى تستقر معايير الإضاءة واللون، وبعد ذلك يستمر الاختبار تلقائيًا. |
| ③ | Sampling interval: The software automatically takes samples at the set interval throughout the entire warm-up period to obtain real-time data. We recommend setting the interval to 5 seconds or longer. |
| ④ | If this box is checked, the test will begin automatically once the light fixture reaches a stable state, skipping the remaining warm-up time; if this box is not checked, the test will begin only after the warm-up period has elapsed as set. |
| ⑤ | If this box is checked, test reports for all sampling points will be saved automatically; if it is unchecked, only the final test report will be saved automatically. |
| ⑥ | تعريف حالة الاستقرار لوحدة الإضاءة. إذا تم ضبط القيم على 20 و 0.5%، فإن وحدة الإضاءة تعتبر في حالة استقرار إذا لم يتغير المعامل بأكثر من 0.5% خلال العشرين دقيقة الماضية. |
| ⑦ | يمكنك تحديد المعايير التي يجب أن يستخدمها البرنامج لتحديد ما إذا كان تركيب الإضاءة مستقرًا: المعايير البصرية، والمعايير الكهربائية |
| ⑧ | سيقوم البرنامج بحفظ منحنيات التغيير للمعلمات المحددة خلال فترة الإحماء في تقرير الاختبار. |
| ⑨ | Once you’ve finished configuring the settings, click OK to confirm and exit. |
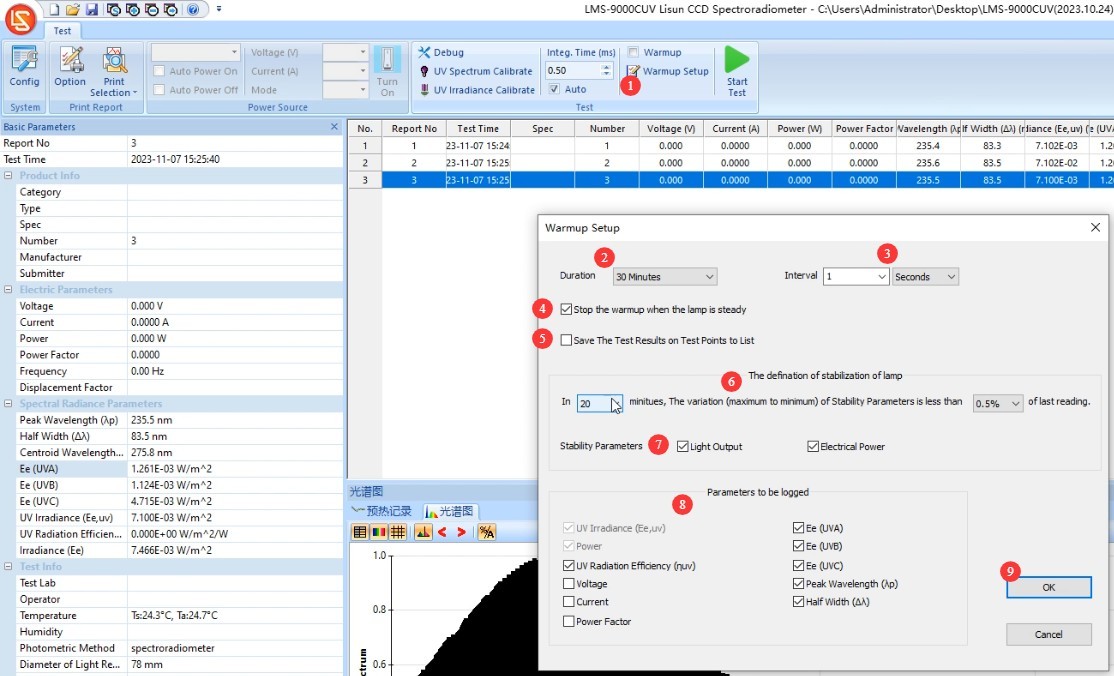
الرقم 6-5
6.2.3 Confirm the test control parameters and conduct the test
انظر الشكل 6-6.
| رقم الهاتف | ملاحظات |
| ① | Be sure to select “Automatic” for “Points Time,” otherwise the test results will be inaccurate. |
| ② | إذا كنت بحاجة إلى التسخين المسبق، فضع علامة في المربع؛ وإذا لم تكن بحاجة إلى ذلك، فاتركه بدون علامة. |
| ③ | انقر لتشغيل الاختبار. إذا تم تحديد خيار "الإحماء"، فسيبدأ البرنامج عدًا تنازليًا للإحماء ويعرض تقدم الإحماء الحالي والبيانات في الزاوية العلوية اليمنى؛ أما إذا لم يتم تحديد خيار "الإحماء"، فسيبدأ البرنامج الاختبار فورًا ويعرض نتائج الاختبار. |
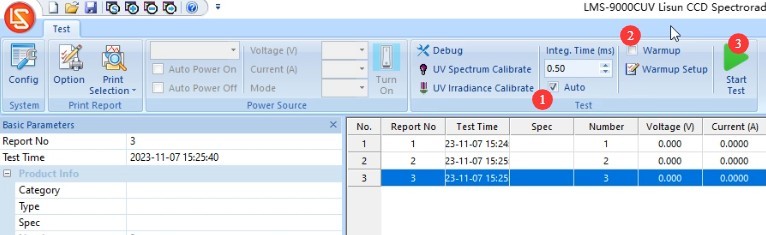
الرقم 6-6
During the warm-up process, the software interface appears as shown in Figures 6 and 7.
| رقم الهاتف | ملاحظات |
| ① | يعرض هذا القسم تقدم عملية التسخين المسبق، بالإضافة إلى معلمات التسخين المسبق الحالية ومنحنى التسخين المسبق. |
| ② | انقر لتخطي مرحلة الإحماء والانتقال مباشرةً إلى الاختبار |

الأشكال من 6 إلى 7
After the test is complete, turn off the power to the test lamp and remove it. Do not store lamps in the test chamber when not in use.
6.3 Test File Processing
انظر الأشكال من 6 إلى 8.
| رقم الهاتف | ملاحظات |
| ① | After the test is complete, all test reports will be automatically saved in the current database file. |
| ② | لحذف تقرير اختبار من ملف قاعدة البيانات، حدد التقرير وانقر فوق "حذف". |
| ③ | لتسهيل العثور على تقارير الاختبار، انقر على الزر الفارغ الموضح في الصورة أدناه لإنشاء ملف قاعدة بيانات جديد، وتخزين تقارير وحدات الإضاءة المختلفة في ملفات قواعد بيانات منفصلة. بعد إنشاء ملف قاعدة البيانات الجديد، يمكنك المتابعة مباشرةً في الاختبار دون الحاجة إلى إعادة معايرة النظام أو إعادة تهيئته. |
| ④ | انقر فوق "فتح" لفتح ملف قاعدة بيانات تم حفظه مسبقًا. |
| ⑤ | Electrical Parameters: If you have purchased a LISUN power meter and successfully established communication as described in Section 4.2.3, the LMS-9000CUV will automatically retrieve the electrical parameters from the power meter; otherwise, you can enter the electrical parameters manually. |
| ⑥ | Click to set print options |
| ⑦ | Click to print the test report. The software automatically uses the printers installed on your computer, including PDF printers. |
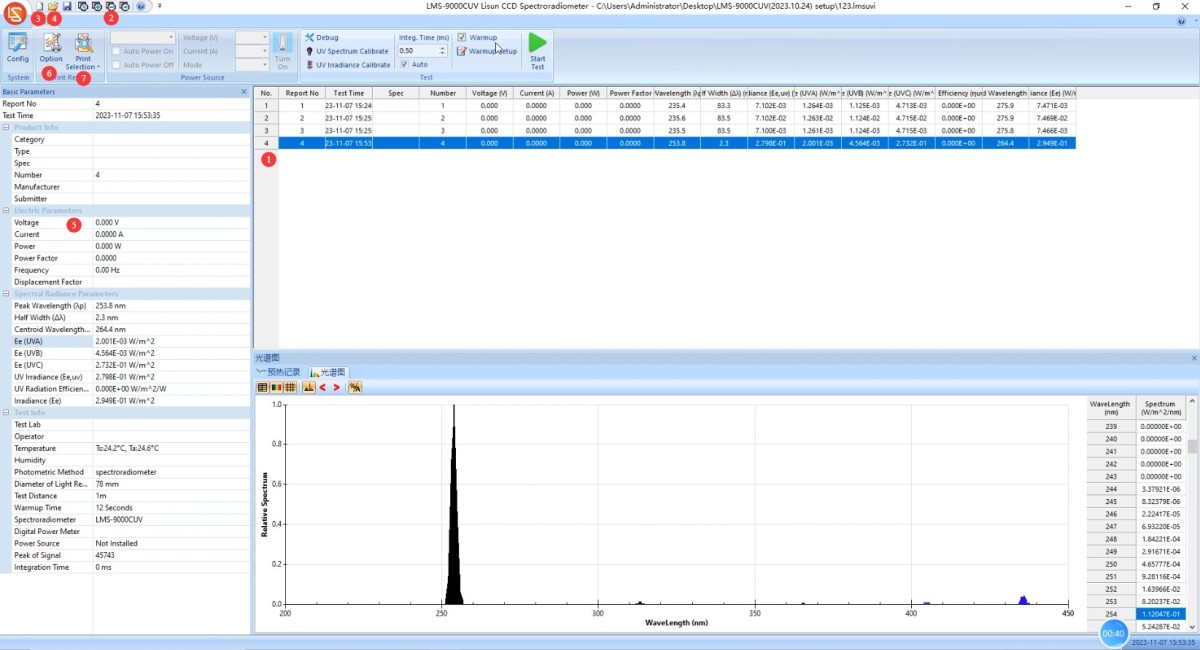
الأشكال من 6 إلى 8
7. الصيانة اليومية للمعدات والعناية بها
7.1 Routine Hardware Maintenance
Check that all connections are secure and that the USB cables and Optical Fibres are not damaged;
Inspect the packaging of the Standard Light Source to ensure there is no moisture or damage, and verify the expiration date.
7.2 إيقاف التشغيل والصيانة على المدى الطويل
Thoroughly clean all equipment surfaces and cover all equipment with dust-proof cloths; store USB cables and Optical Fibers separately and securely;
Ensure that the laboratory is dry and well-ventilated to prevent equipment from becoming damp; if the ambient humidity is high, keep a dehumidifier on hand;
Run the system online once a month to ensure it is operating normally.
7.3 متطلبات فترة المعايرة
لضمان دقة القياس وموثوقية تشغيل الجهاز، يُوصى بإرساله دوريًا إلى مؤسسة قياس معتمدة لإجراء المعايرة. يُوصى بإجراء المعايرة كل 12 شهرًا. ويمكن للمستخدمين تحديد فترة المعايرة المناسبة بناءً على وتيرة الاستخدام والظروف البيئية ومتطلبات نظام الجودة.
8. استكشاف الأخطاء وإصلاحها وحل المشكلات الشائعة
| أعراض الخلل | الأسباب المحتملة | العملية |
| The software won’t open | Not running as an administrator; software installation is incomplete | Right-click the software shortcut and select “Run as administrator”; uninstall the old software, delete any remaining folders, and then reinstall the software. |
| Software Communication Error | Driver not installed or installation failed; USB connection error | See Section 4.1.2 for driver installation; try a different USB port. |
| “Signal too weak” message appears during calibration or testing | “Auto” is not checked for the accumulation time, and the maximum automatic accumulation time is set too short | Refer to sections 5.2.2 and 6.2.3; be sure to select “Auto” for the integration time during calibration or testing. Refer to section 4.2.3 to set a longer maximum automatic integration time. If the signal is still too weak, the Optical Fiber may be damaged. |
| The electrical parameter is displayed as 0 | You have not purchased a LISUN power meter, or there is a communication error. | See Section 6.3 for automatically retrieving electrical parameters or manually entering them. |
| Software Encountered an Error Opening the Database File | The database file path does not exist, or the file is in use | See Section 6.3 for instructions on creating a new database file; do not store database files directly on your computer’s desktop. |