
 الإنجليزية
 中文简体
中文简体 Русский
 Español
 Português
 Türkçe
 العربية
 Deutsch
 Polski
 Italiano
 Français
 한국어
한국어 ไทย
ไทย Tiếng Việt
 日本語
日本語





























جهاز اختبار الطيف والنفاذية والانعكاس
مستخدم المالكين
قابل للتطبيق LISUN models: LMS-6600R、LMS-6600T、LMS-6600TR
1. فتح العلبة والتعرف الأساسي على المعدات
1.1 المواصفات الفنية الرئيسية
| المعاملات | ملاحظات |
| Spectroscopy Platform | Long-Focus Crossed Asymmetric CT Spectroscopic System |
| دقة الطول الموجي | ±0.5 nm; Resolution: ±0.2 nm; Sample scanning interval: ±0.1 nm |
| دقة إحداثيات اللون (Δx، Δy) | ± 0.005 |
| Relevant Color Temperature Range | 1000K–100000K; Color temperature accuracy: ±0.6% |
| نطاق الإضاءة | 5–200000 ليكس |
| لون جعل مؤشر | 0–100.0; Accuracy: ± (0.3% of reading ± 0.3) |
| الخطية الضوئية | ±0.6%; Straylight: <0.015% (600 nm) and <0.03% (435 nm) |
| Points Time | 0.1 مللي ثانية - 5 ثوانٍ |
| شاشة LCD | 5-inch HD IPS capacitive touchscreen with a resolution of 480×854 |
| بطاريات السيارات | 4000 mAh rechargeable lithium-ion battery, capable of up to 20 hours of continuous operation |
| الأبعاد | شنومك مم × شنومك مم × شنومك مم |
| ذاكرة | Comes with an 8GB SD memory card for storing test data |
| تطبيقات الكمبيوتر | It runs on Windows 7, Windows 8, Windows 10, and Windows 11. |
1.2 فتح العلبة والتحقق من المحتويات
1.2.1 فك التغليف والفحص البصري
عند إخراج الجهاز من العلبة، تعامل معه برفق لتجنب خدش غلافه بأدوات حادة. بعد إخراجه، افحص الجزء الخارجي منه للتأكد من عدم وجود أي تشوهات أو انبعاجات ظاهرة، وأن الأزرار سليمة وغير مفكوكة. إذا لاحظت أي خلل في الجهاز أو ملحقاته، فلا تقم بتشغيله. يرجى الاتصال بنا فورًا.
1.2.2 الوحدة الرئيسية والملحقات
| رقم الهاتف | ملاحظات |
| ① | LMS-6600TR |
| ② | كبل USB |
| ③ | محول الطاقة |
| ④ | حقيبة شعر |
| ⑤ | حقيبة يد |
تم إرسال روابط تحميل دليل المستخدم الرقمي، والبرامج، وبطاقة الضمان، وغيرها من المواد عبر البريد الإلكتروني. يُرجى تحميلها في أقرب وقت ممكن. إذا لم يصلك البريد الإلكتروني، يمكنك التواصل معنا لطلب روابط التحميل مرة أخرى.
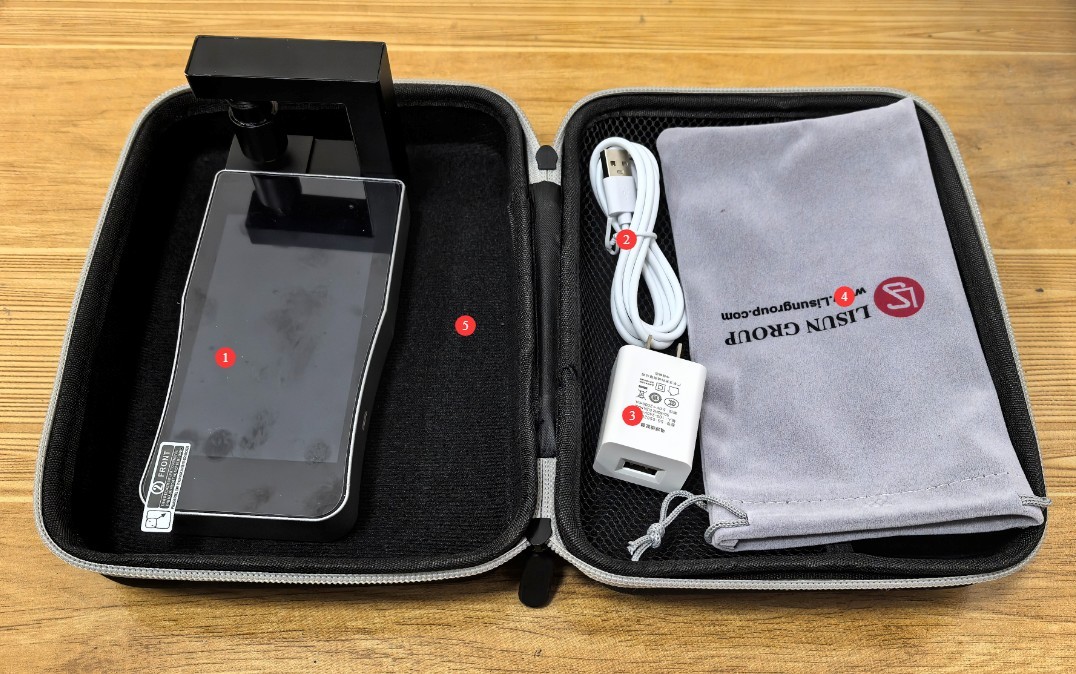
الشكل 0
1.3 وصف هيكل المعدات
| رقم الهاتف | ملاحظات |
| ① | LMS-6600TR الوحدة الرئيسية |
| ② | الفئة الأساسية |
| ③ | زر الطاقة - اضغط مع الاستمرار لتشغيل الجهاز أو إيقاف تشغيله |
| ④ | Standard Light Sources and Their Sleeves |
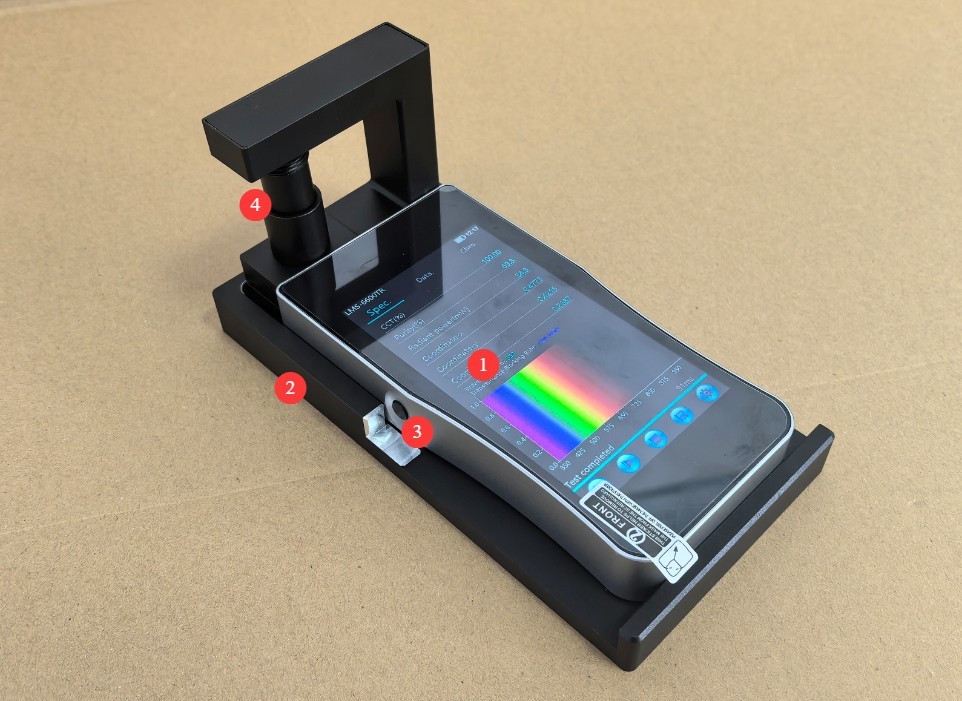
الشكل 1
ملاحظة: LMS-6600TR includes both transmittance and reflectance testing; the LMS-6600T includes only transmittance testing (without a stand); and the LMS-6600R includes only reflectance testing.
2. احتياطات السلامة
2.1 السلامة البيئية
لا تستخدم المعدات في البيئات القابلة للاشتعال أو الانفجار أو ذات درجات الحرارة العالية أو الرطوبة العالية أو الضغط العالي أو الغبار، وذلك لمنع حدوث دوائر قصر أو تآكل أو أعطال في الأداء.
تجنب وضع الجهاز في ضوء الشمس المباشر لمنع تلف الشاشة وارتفاع درجة حرارة المكونات الداخلية.
تجنب البيئات ذات المجالات المغناطيسية أو الكهربائية القوية (مثل محولات الجهد الكبيرة أو أفران الميكروويف) لتجنب التداخل مع دقة بيانات الاختبار.
المبادئ التوجيهية التشغيلية لعام 2.2
Do not plug in or unplug communication cables or other accessories during testing to prevent damage to the interface or data loss.
This device contains glass optical components and a touchscreen. Handle it with care during use; do not drop or crush it to prevent the screen from shattering or the optical components from being damaged.
When the probe is aimed at the light source being measured, avoid looking directly at bright light sources—especially ultraviolet light sources—to prevent eye injury.
To ensure accurate test results, try to avoid stray light interference during testing; if necessary, conduct the test in a darkroom.
Please use the standard USB cable to connect the device; using a different USB cable may cause some features to malfunction.
2.3 سلامة مصدر الطاقة والبطارية
The built-in lithium-ion battery has a capacity of 4000 mAh and is compatible only with the standard power adapter. Please note: Using a non-standard power adapter—especially one designed for high-current fast charging—may damage the battery.
Do not use the device for extended periods when the battery level is below 15 percent. If you notice the battery level is below 15 percent during initial use, charge it promptly. Do not charge the battery after it has been deeply discharged, as this may shorten its lifespan.
تأكد من تهوية المنطقة جيدًا أثناء الشحن، وأبقِ الشاحن بعيدًا عن المواد القابلة للاشتعال، وافصله فورًا بعد اكتمال الشحن.
If the device will not be used for an extended period, fully charge it first, and then top it up every three months to prevent the battery from discharging completely and becoming damaged.
2.4 مواصفات الصيانة والمعايرة
يُمنع منعاً باتاً على الأفراد غير المصرح لهم فتح العلبة لإجراء الإصلاحات، وذلك لمنع حدوث المزيد من الأضرار أو الإصابات الشخصية.
يجب إرسال المعدات إلى مختبر معتمد للمعايرة الطيفية والضوئية؛ والفترة الزمنية الموصى بها للمعايرة هي مرة واحدة في السنة.
2.5 أخرى
بالنسبة للأمور غير المشمولة في هذا الدليل، يرجى توخي الحذر أو الاتصال بنا.
3. مقدمة لبرنامج الشاشة اللمسية
3.1 الواجهة الرئيسية
3.1.1 تصميم الواجهة الرئيسية
| رقم الهاتف | ملاحظات |
| ① | Key Parameters and Spectral Diagrams |
| ② | All Parameter Pages |
| ③ | مخطط اللونية |
| ④ | Calibration Button |
| ⑤ | زر الاختبار |
| ⑥ | “Stop Test” button: Click this button to turn off the standard light source when you won’t be conducting tests for an extended period of time. |
| ⑦ | Click the “Save” button to save the test report as a CSV file, which you can then open in software on your computer. |
| ⑧ | Settings button: Tap to open the Settings screen |
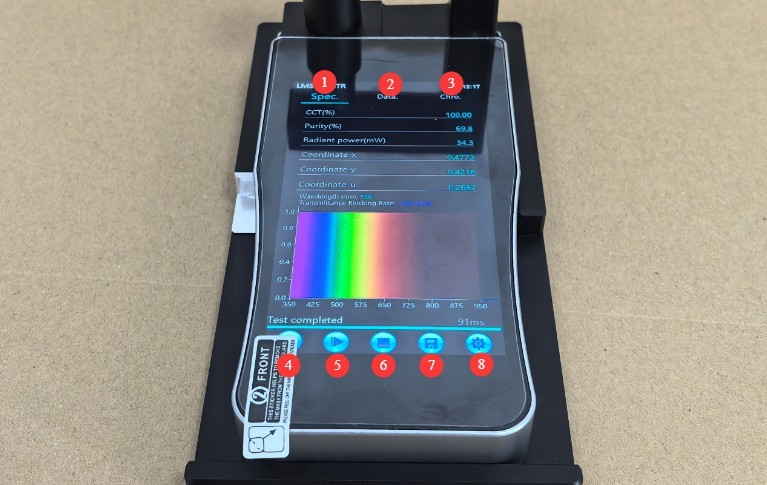
الشكل 2
Note: When saving test files to a device, only the CSV format is currently supported (the PDF feature is still under development). If you need a report in PDF format, you can open the saved CSV file using desktop software and print it as a PDF.
3.1.2 Changing the Main Screen Display Settings
If you need to modify the display settings on the main screen, simply click the corresponding item to make changes directly.
3.2 واجهة الإعدادات
3.2.1 Interface Navigation
| رقم الهاتف | ملاحظات |
| ① | إعدادات القياس |
| ② | إدارة الملفات: قراءة أو حذف ملفات الاختبار المحفوظة |
| ③ | اعدادات النظام |
| ④ | رقم إصدار الجهاز و LISUN معلومات الإتصال |
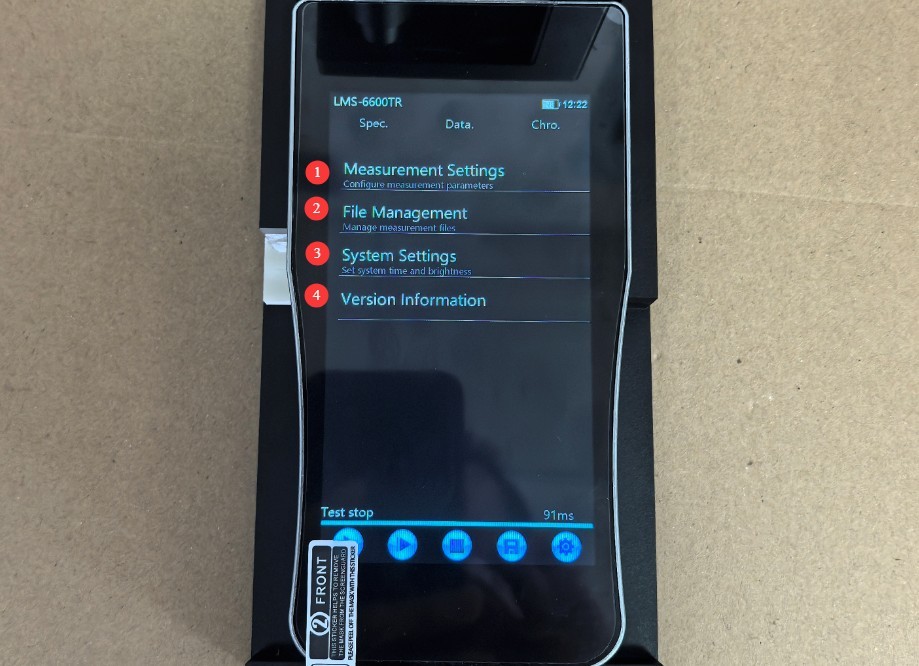
الشكل 3
3.2.2 شاشة إعدادات القياس
| رقم الهاتف | ملاحظات |
| ① وضع النقاط | يشمل ذلك التكامل التلقائي واليدوي. ما لم يُنص على خلاف ذلك، يُرجى اختيار التكامل التلقائي. |
| ② Maximum integration time | القيمة الافتراضية هي 5000 مللي ثانية؛ لا حاجة لإجراء أي تغييرات. |
| ③ Average number of times | The higher the average number of runs, the more accurate the test data will be, but the longer the test will take. The default is 1 run. |
| ④ Custom Bands | Customizable bands within the 350 nm to 950 nm range to display corresponding blue light test results; up to 3 bands can be set. |
| ⑤ Correction Factor | Please keep the default values; do not modify them without authorization, as doing so may cause abnormal test results. |
| ⑥ Measurable Wavelength Range | |
| ⑦ Blackboard reflectance | This applies only to reflectance testing. Please keep the default value and do not modify it without authorization, as doing so may result in abnormal test results. |
| ⑧ Whiteboard reflectance coefficient | |
| ⑨ More Settings | Click to go to Page 2 of the measurement settings screen |
| ⑩ Exit | Click to return to the Settings navigation page |
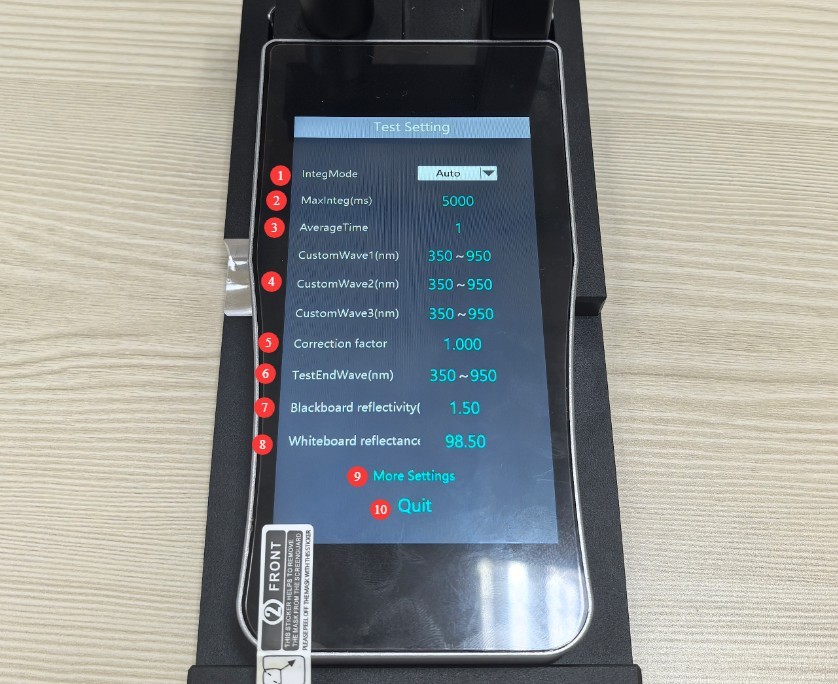
الشكل 4
Click “More Settings” to go to Page 2.
| رقم الهاتف | ملاحظات |
| ① Comparative Testing | This model does not have this feature. |
| ② Reference Standard Testing | |
| ③ More Settings | Click to go to Page 1 of the measurement settings screen |
| ④ Exit | Click to return to the Settings navigation page |
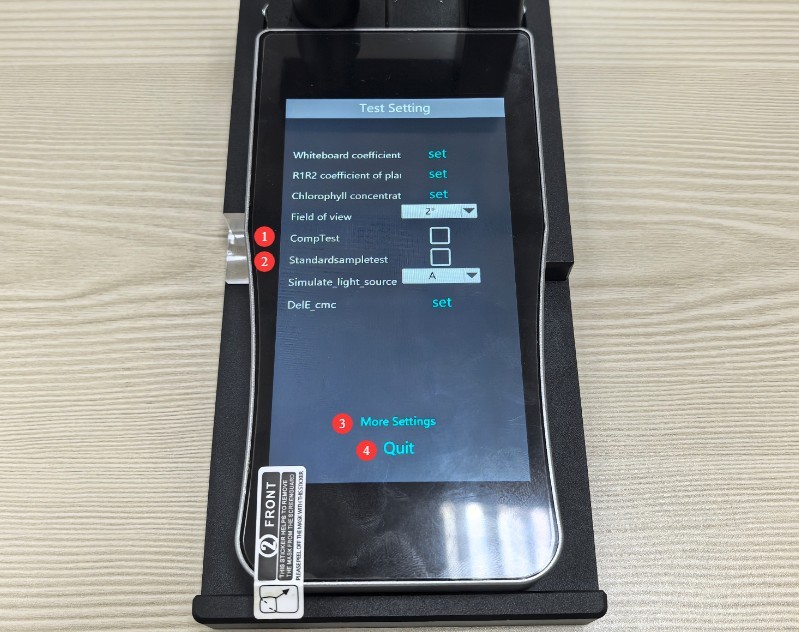
الشكل 5
Note: Leave the other parameters on this screen at their default values. Do not modify them without authorization, as doing so may result in abnormal test results.
3.2.3 واجهة إعدادات النظام
| رقم الهاتف | ملاحظات |
| ① لغة النظام | يمكنك التبديل بين اللغتين الصينية والإنجليزية |
| ② الوضع المتقدم | Used to calibrate equipment; a password is required to use it. Calibration must be performed by a professional. |
| ③ حدد التاريخ | |
| ④ اضبط الوقت | |
| ⑤ مدة شاشة التوقف | After the screen has been idle for the set amount of time, it will automatically dim. |
| ⑥ إيقاف التشغيل التلقائي | The device will automatically shut down after the set standby time has elapsed. |
| ⑦ Adjust screen brightness | |
| ⑧ اتصال USB | لنقل الملفات، حدد "نقل الملفات"؛ للتحكم في جهاز باستخدام برنامج، حدد "الاتصال التسلسلي". |
| ⑨ مفتاح البلوتوث | لا تزال وظيفة البلوتوث قيد التطوير وهي غير متاحة حاليًا. |
| ⑩ Automatic switching of standard light sources | To automatically turn the standard light source on and off, it is recommended that you leave this option unchecked, so that the standard light source remains on at all times. Frequent switching on and off can affect measurement results and reduce the service life of the standard light source. |
| ⑪More Settings | Click to go to Page 2 of the system settings screen |
| ⑫ Exit | Click to return to the Settings screen navigation page |
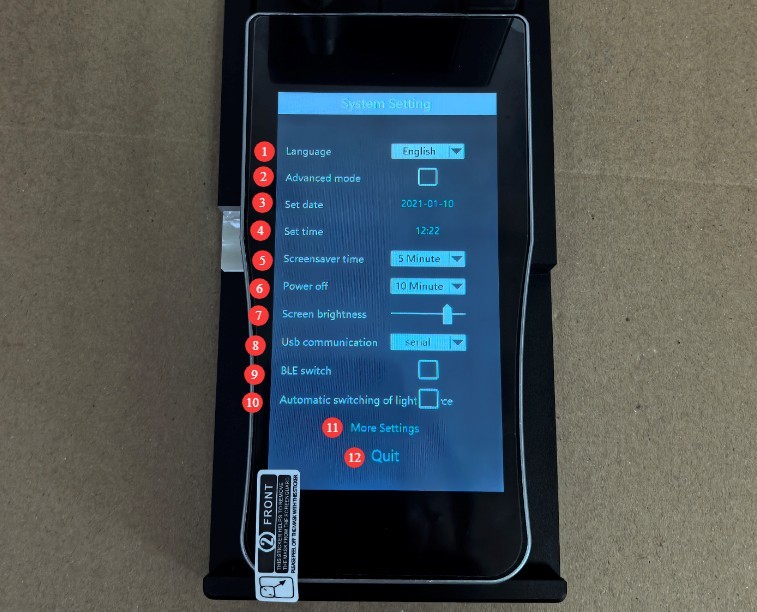
الشكل 6
Click “More Settings” to go to Page 2.
| رقم الهاتف | ملاحظات |
| ① Test Mode | إذا كان نموذجك هو LMS-6600TR, you’ll need to switch between test modes—transmittance or reflectance—here. You’ll need to restart the device after each switch. |
| ② More Settings | Click to go to Page 1 of the system settings interface |
| ④ Exit | Click to return to the Settings navigation page |
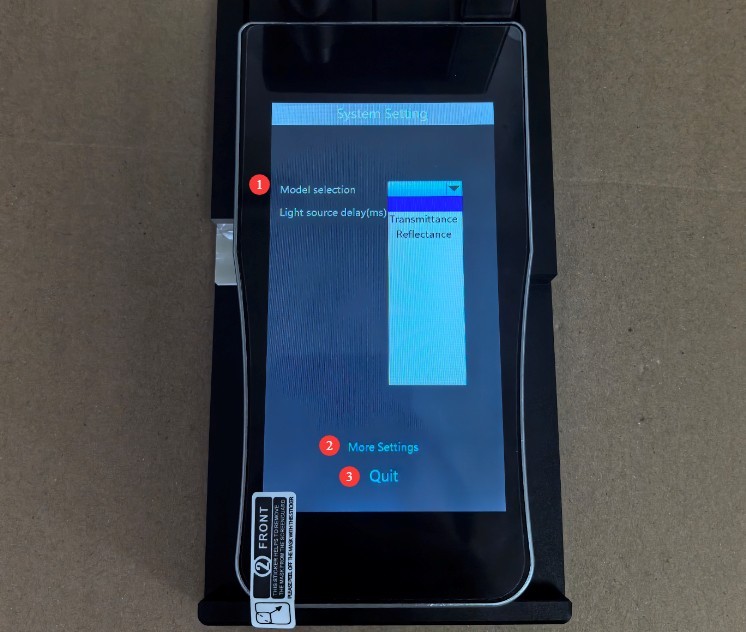
الشكل 7
Note: Leave the other parameters on this screen at their default values. Do not modify them without authorization, as doing so may result in abnormal test results.
4. Operate the equipment to conduct tests
4.1 Procedures for Reflectance Testing
Refer to Section 3.2.3, select “Reflectance Test” in the system settings, and restart the device.
Place the device in the cradle and press the calibration button to calibrate it. Note: Calibration must be performed each time the device is turned on.
After calibration is complete, remove the device from its base and position the test probe on the object being tested.
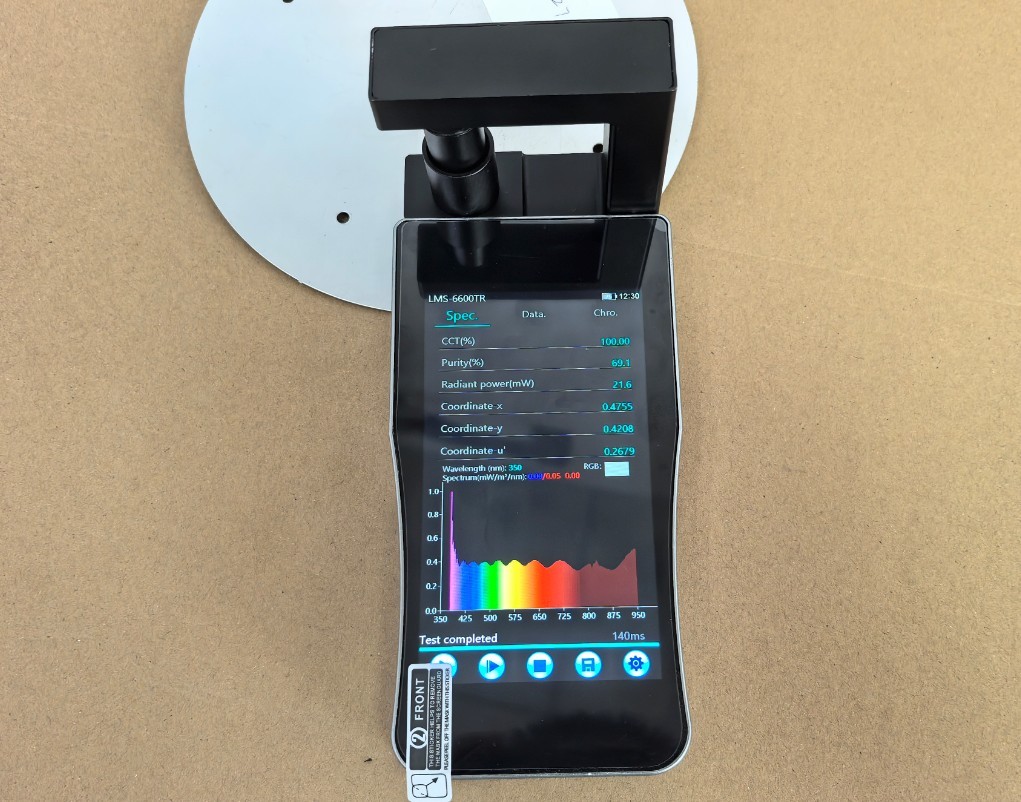
الشكل 8
Minimize stray light between the test object and the test aperture; if necessary, perform the test in a darkroom. Click the “Test” button to complete the test. If desired, click the “Save” button to save the test report as a CSV file on the device.
4.2 Procedure for Transmittance Testing
Refer to Section 3.2.3, select “Transmittance Test” in the system settings, and restart the device.
Place the device in the base (the LMS-6600T model does not have a base), then press the calibration button to perform calibration. Note: Calibration must be performed each time the device is turned on.
After calibration is complete, place the sample between the standard light source sleeve and the test aperture.
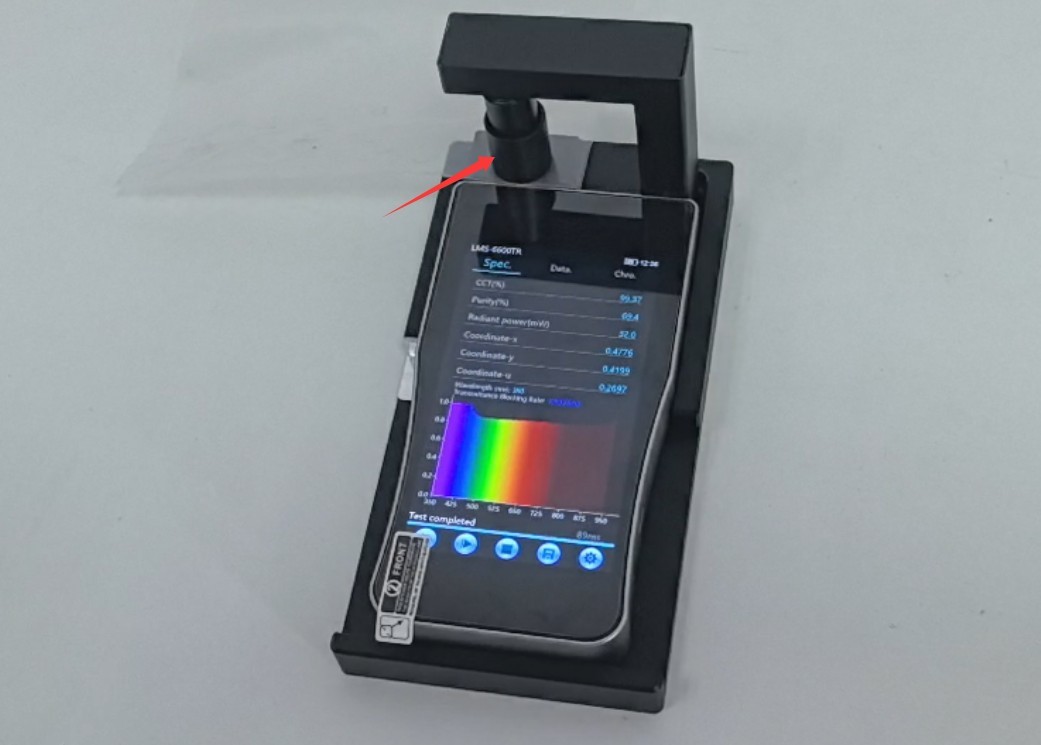
الشكل 9
If necessary, the test can be conducted in a darkroom. Click the “Test” button to complete the test. If desired, click the “Save” button to save the test report as a CSV file to the device.
5. تشغيل البرنامج
5.1 تثبيت البرنامج
Computer System Requirements: Compatible with Windows 7 or later (32-bit/64-bit).
متطلبات الأجهزة: يجب أن يحتوي الكمبيوتر على منفذ USB لتوصيل الجهاز؛ إذا كنت بحاجة إلى طباعة التقارير، فيجب أن يكون لديك طابعة مثبتة (طابعة تدعم طباعة PDF).
| أمر التثبيت | ملاحظات |
| ① | Double-click to install the LMS-6600TR نظام البرمجيات |
| ② | Install the appropriate drivers based on your computer’s operating system. |
| ③ | If your computer is running a 32-bit operating system, you’ll need to install “vcredist_x86.exe.” |

الشكل 10
5.2 Use the software to open test reports saved on the device
Refer to Section 3.2.3 to change the USB communication mode to “File Transfer.”
Then connect the device to your computer using a USB cable. Double-click the software icon on your desktop, and the IoT test interface will open automatically.
| العملية | ملاحظات |
| ① | Click to switch the test mode to transmission/reflection testing |
| ② | Click “File,” select “Import File,” and then locate the corresponding CSV file using the path to view the corresponding test report in the software interface. |
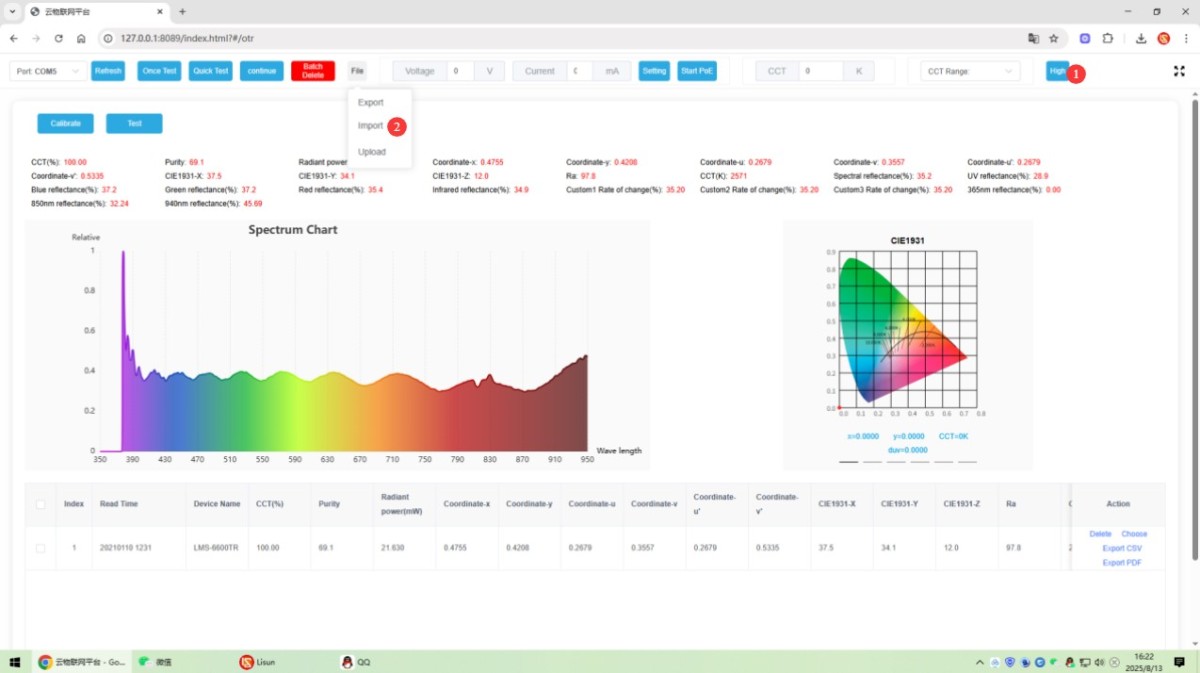
الشكل 11
5.3 Testing Using Software to Control Devices
Refer to section 3.2.3, “USB Communication,” and change the USB communication mode to “Serial Communication.”
قم بتوصيل LMS-6600TR to your computer using the original USB cable. You should see a COM port with the following name in the computer’s “Device Manager,” indicating that communication with the device is working properly.
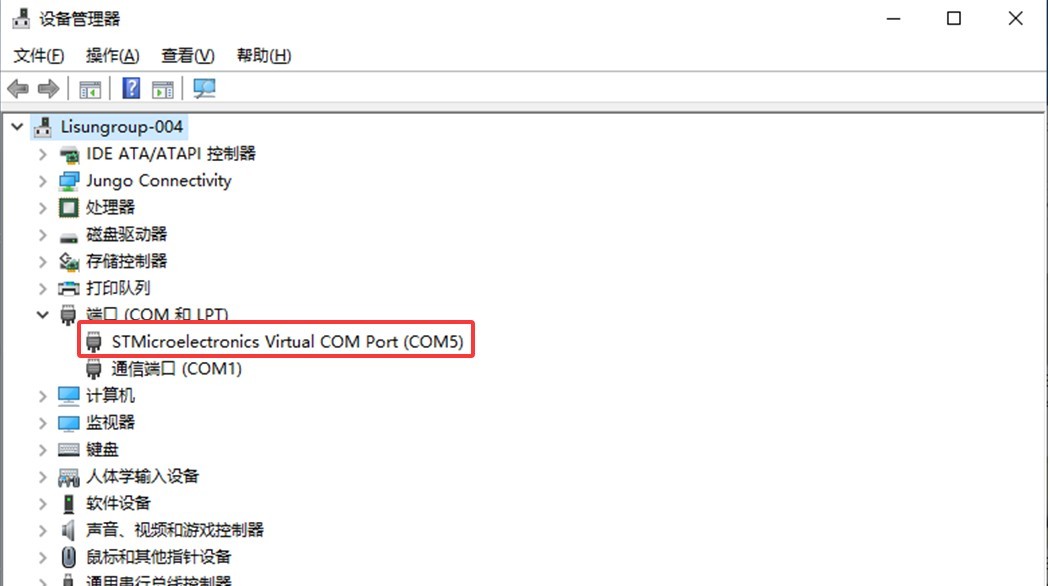
الشكل 13
When you double-click the software’s desktop icon, the IoT testing interface will open automatically.
| تعليمات | ملاحظات |
| ① | Click to switch the test mode to transmission/reflection testing |
| ② | Refer to section 3.2.3, “Test Modes,” to verify that the device is in the correct test mode. Refer to Chapter 4 to set the device to calibration mode, then click “Calibrate” to perform calibration. |
| ③ | Refer to Chapter 4 to set the device to test mode, then click “Test” to run the test. |
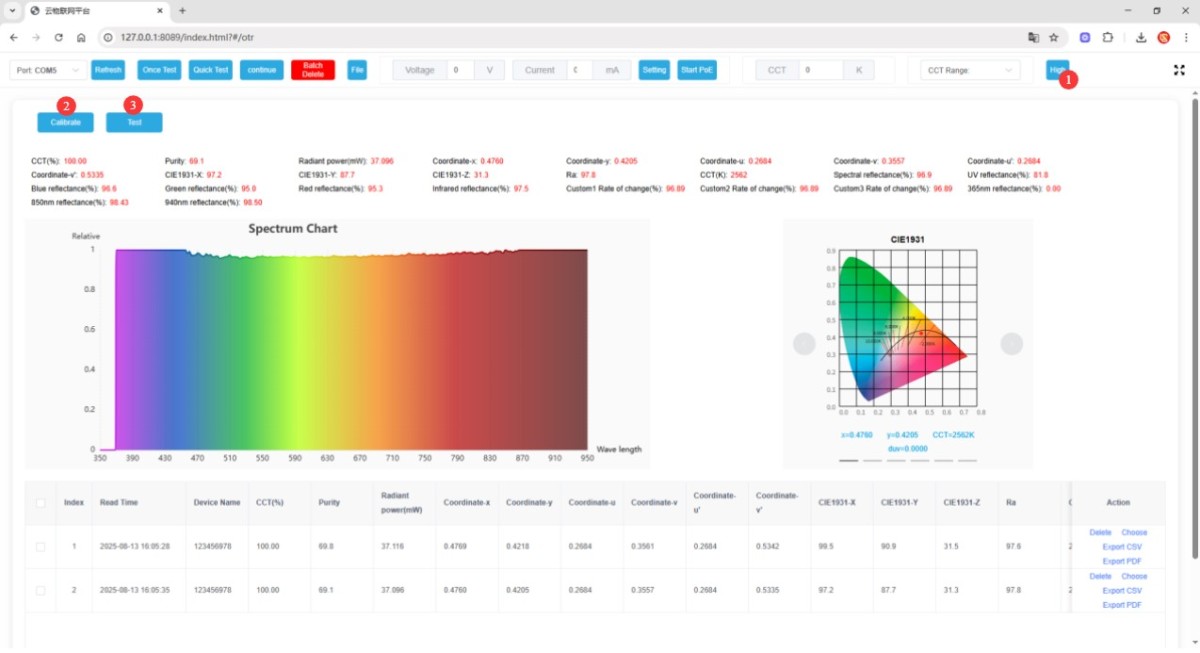
الشكل 14
5.4 معالجة تقارير الاختبار
All current reports are automatically saved in the list below the software. You can click the options on the right to export them as CSV or PDF files.

الشكل 15
6. الصيانة اليومية للمعدات والعناية بها
6.1 الفحص اليومي قبل الاستخدام
Battery Level Check: After turning on the device, check the battery level. If it is below 15%, charge it promptly to prevent the device from shutting down during testing.
6.2 التخزين والصيانة على المدى الطويل
شروط التخزين: يُخزن في مكان جاف وجيد التهوية وبارد عند درجة حرارة ≤50 درجة مئوية ورطوبة نسبية <70%.
التحضير قبل التخزين: اشحن البطارية بالكامل، وأطفئ الجهاز، وضعه في كيس من الفانيلا، واحفظه بعيدًا عن الماء والزيت والمواد الكيميائية والسوائل أو الغازات المسببة للتآكل.
الصيانة الدورية: إذا لم يُستخدم الجهاز لفترة طويلة، فقم بإزالته وشحنه مرة كل ثلاثة أشهر. شغّله واتركه يعمل لمدة خمس دقائق قبل إيقافه وتخزينه لمنع تدهور البطارية.
6.3 المعايرة وصيانة الأداء
المعايرة الدورية: قم بمعايرة الجهاز بشكل احترافي مرة واحدة في السنة لضمان دقة وموثوقية بيانات الاختبار، واحتفظ بشهادة المعايرة في مكان آمن بعد المعايرة.
7. استكشاف الأخطاء وإصلاحها وحل المشكلات الشائعة
7.1 الجهاز لا يعمل
7.1.1 الأسباب المحتملة
البطارية فارغة؛ البطارية تالفة.
7.1.2 خطوات استكشاف الأخطاء وإصلاحها
Charge the device using the standard power adapter and USB cable, then try turning it on again after 1 hour;
إذا استمر الجهاز في عدم التشغيل، فهذا يعني أن البطارية تالفة. يرجى إرساله إلينا بالبريد لنتمكن من استبدال البطارية.
7.2 شذوذ بيانات الاختبار
7.2.1 الأسباب المحتملة
The test environment is subject to stray light interference; the equipment has not been calibrated for an extended period; and the test parameters are set incorrectly.
7.2.2 خطوات استكشاف الأخطاء وإصلاحها
Avoid stray light interference; if necessary, conduct tests in a darkroom environment;
Check the calibration schedule for your equipment. If it has been more than a year since the last calibration, have it calibrated promptly. You may send it to a third-party laboratory for calibration or return it to us, and we will calibrate it for you;
Check and confirm the test parameters: Verify that the integration time is set to “Auto” and that the wavelength range is set correctly. Refer to Section 3.2.2 to ensure that other parameters are set to their factory defaults; do not modify them without authorization.
7.3 The software fails to open or functions abnormally
7.3.1 الأسباب المحتملة
إعدادات وضع اتصال USB غير صحيحة؛ كابل USB تالف؛ منفذ كمبيوتر معطل.
7.3.2 خطوات استكشاف الأخطاء وإصلاحها
Verify that the device’s USB communication mode is set correctly; restart the device if necessary, as described in Section 3.2.3;
استخدم كابل USB الأصلي، أو حاول إعادة توصيله بمنفذ USB مختلف على جهاز الكمبيوتر الخاص بك، وتأكد من توصيل الكابل بشكل آمن؛
If you are still unable to connect, try using a different computer to rule out any issues with your own computer.
7.4 مشاكل عدم استجابة شاشة اللمس
7.4.1 الأسباب المحتملة
بقع أو علامات مائية على الشاشة؛ تجمد الجهاز؛ عطل في أجهزة شاشة اللمس.
7.4.2 خطوات استكشاف الأخطاء وإصلاحها
Wipe the screen with a clean touchscreen cleaning cloth to remove any smudges or water stains, then try the operation again; press and hold the device’s power button for 10 seconds to force a shutdown, wait 30 seconds, then turn it back on to see if the touchscreen responds; if it still does not respond after multiple restarts, please send it back to us for repair.