
 الإنجليزية
 中文简体
中文简体 Русский
 Español
 Português
 Türkçe
 العربية
 Deutsch
 Polski
 Italiano
 Français
 한국어
한국어 ไทย
ไทย Tiếng Việt
 日本語
日本語





























الطيف المحمولة اتفاقية مكافحة التصحر
مستخدم المالكين
قابل للتطبيق LISUN الموديلات: LMS-6000،LMS-6000أ.LMS-6000B،LMS-6000BF،LMS-6000C،LMS-6000F،LMS-6000I،LMS-6000L،LMS-6000P،LMS-6000S،LMS-6000SF،LMS-6000TLCI、LMS-6000UV
1. فتح العلبة والتعرف الأساسي على الجهاز
1.1 المواصفات الفنية الرئيسية
| LISUN الموديل | اسم صيني | معلمات الاختبار | نطاق الطول الموجي |
| LMS-6000 | الطيف المحمولة اتفاقية مكافحة التصحر | Illuminance ((0.1–500000 lx ± 0.1 lx)), E(Fc), Ee (W/m²), Tc (K), Deviation from blackbody (Duv), Correlated Color Temperature (CCT), Chromaticity Coordinates, Color Rendering Index (CRI), TM-30 (Rg, Rf), chromaticity, peak wavelength, dominant wavelength, half-bandwidth, center-of-mass wavelength, central wavelength, total color difference, luminance difference, red-greenness, yellow-blueness, correlated color temperature difference, color tolerance diagram, spectrogram. Click here to view the LMS-6000 تقرير الاختبار. | 380 – 780 nm |
| LMS-6000C | Portable CCD Spectroradiometer (Economy Edition) | استخدم LMS-6000 specifications do not include the TM-30 (Rg, Rf) or PC software. | |
| LMS-6000UV | Portable CCD Spectroradiometer (UV Version) | UVA, UVB, UVC, irradiance (0.1–500000 μW/cm² ±0.01 μW/cm²), UV hazard irradiance, peak signal, start wavelength, end wavelength, peak wavelength, dominant wavelength, spectrum. Click here to view the LMS-6000UV تقرير الاختبار. | 200 – 400 nm |
| LMS-6000F | Portable CCD Spectroradiometer (with Stroboscope Function) | LMS-6000 Specifications + Stroboscopic Testing | 380 – 780 nm |
| LMS-6000L | Portable CCD Spectroradiometer (with Luminance Measurement) | Luminance (0.1–500000 cd/m² ± 0.1 cd/m²), imperial luminance (fL), Tc (K), deviation from blackbody (Duv), correlated color temperature (CCT), chromaticity coordinates, color rendering index (CRI), TM-30 (Rg, Rf), chromaticity, peak wavelength, dominant wavelength, half-bandwidth, center of mass wavelength, central wavelength, total color difference, luminance difference, red-greenness, yellow-blueness, correlated color temperature difference, color tolerance diagram, spectrogram. Click here to view the LMS-6000L تقرير الاختبار. | |
| LMS-6000B | Portable CCD Spectroradiometer (Includes Retinal Blue Light Hazard Testing) | LMS-6000 Specifications + Blue Light Hazard-Weighted Irradiance + Retinal Blue Light Hazard Testing in accordance with GB/T 20145 و CIE S009/ه:2002 | 350 – 800 nm |
| LMS-6000BF | Portable CCD Spectroradiometer (Includes Retinal Blue Light Hazard and Flicker Analysis) | LMS-6000B Specifications + Stroboscopic Testing. Click here to view the LMS-6000BF تقرير الاختبار. | |
| LMS-6000P | Portable CCD Spectroradiometer (Includes Plant Illumination Testing) | LMS-6000 parameters + plant lighting test parameters such as: PAR, PPFD, YPFD (0.1–500000 μmol/m²·s ±0.01 μmol/m²·s), blue-violet irradiance (Eb), yellow-green irradiance (Ey), red-orange irradiance (Er), and red-blue radiance ratio | 350 – 850 nm |
| LMS-6000S | Portable CCD Spectroradiometer (Includes Plant Lighting and TM-30 Testing) | LMS-6000P Specifications + Blue Light Hazard-Weighted Irradiance + Retinal Blue Light Hazard Testing comply with GB/T 20145 و CIE S009/E:2002. Click here to view the LMS-6000S تقرير الاختبار. | 350 – 950 nm |
| LMS-6000SF | Portable CCD Spectroradiometer (Full-Featured Version) | LMS-6000S Specifications + Stroboscopic Testing. Click here to view the LMS-6000SF تقرير الاختبار. | |
| LMS-6000تي إل سي آي | Portable CCD Spectroradiometer (TLCI Professional Edition) | LMS-6000 Specifications + TLCI Test | 380 – 780 nm |
| LMS-6000I | Portable CCD Spectroradiometer (Industrial Edition) | LMS-6000 Specifications + Input/Output Control, RS-485 Interface |
1.2 فحص الملحقات والتحقق منها بعد فتح العلبة
1.2.1 فك التغليف والفحص البصري
عند إخراج الجهاز من العبوة، تعامل معه برفق لتجنب خدش الغلاف الخارجي بأدوات حادة. بعد إخراجه، افحص الجزء الخارجي من الجهاز للتأكد من عدم وجود أي تشوه أو انبعاجات ظاهرة، وأن الأزرار سليمة وغير مفكوكة. إذا لاحظت أي خلل في الجهاز أو ملحقاته، فلا تقم بتشغيله. يرجى الاتصال بنا فورًا.
1.2.2 الوحدة الرئيسية والملحقات
| رقم الهاتف | ملاحظات |
| ① | حقيبة يد |
| ② | حقيبة شعر |
| ③ | اكياس بلاستيك |
| ④ | محول الطاقة |
| ⑤ | كبل USB |
| ⑥ | LMS-6000 Series Portable Spectrometers |
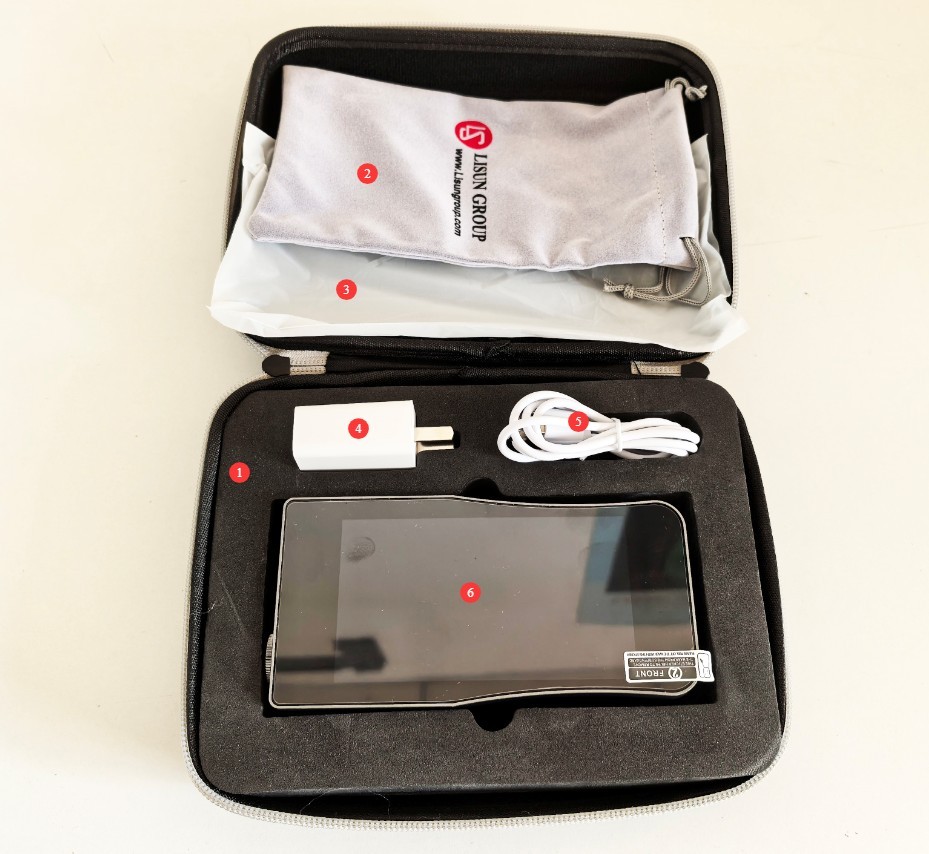
الشكل 1
Download links for the digital user manual, software, warranty card, and other materials have been sent via email. Please download them promptly. If you missed the email, you may contact us to request the download links again.
1.3 وصف هيكل المعدات
| رقم الهاتف | ملاحظات |
| ① | USB Type-C Cable Connector |
| ② | الشاشة التي تعمل باللمس |
| ③ | Photosensitive Probe |
| ④ | Control buttons: Press and hold to turn the device on or off; press briefly to start a single test. |
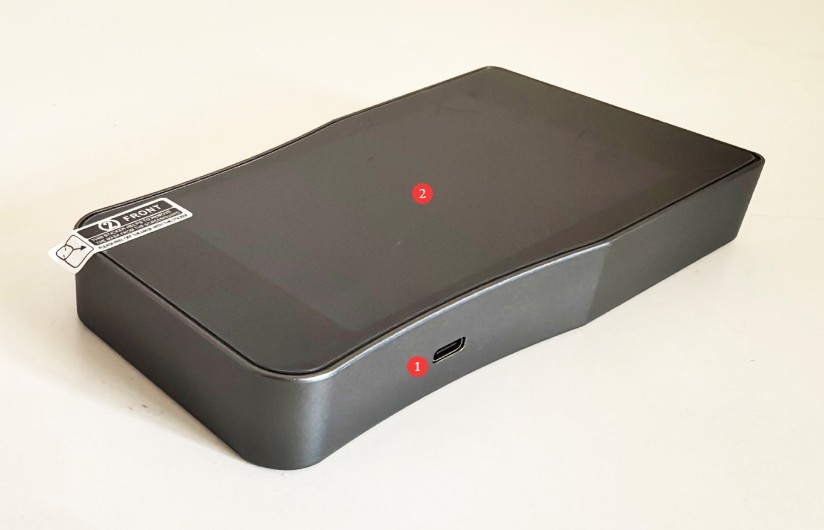
الشكل 2
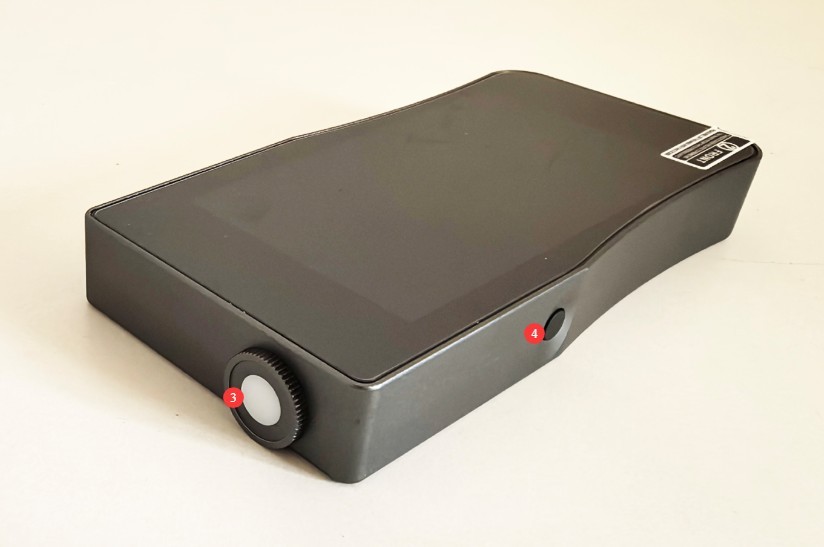
الشكل 3
Note: The shape of the light-sensitive probe may vary depending on the model. For example, models with a stroboscopic test function include two probes, one of which is specifically designed for stroboscopic testing, as shown in the figure below:
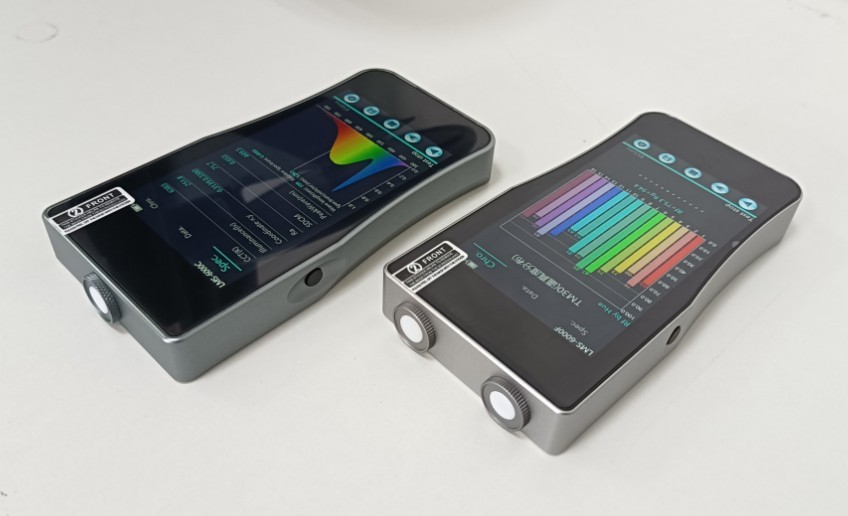
الشكل 4
الجزء الخارجي من LMS-6000L portable spectrometer, which includes a luminance measurement function, is shown in the figure below:
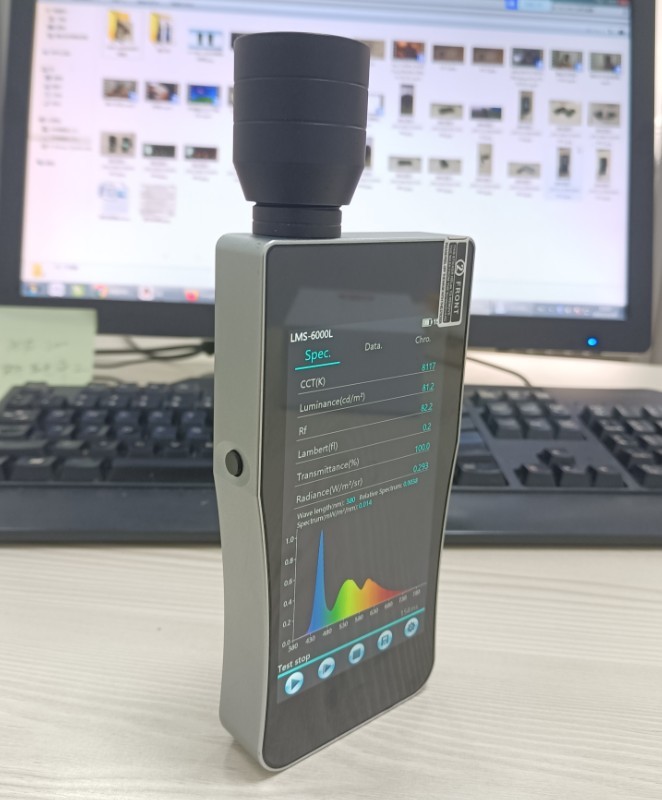
الشكل 5
2. احتياطات السلامة
2.1 السلامة البيئية
لا تستخدم المعدات في البيئات القابلة للاشتعال أو الانفجار أو ذات درجات الحرارة العالية أو الرطوبة العالية أو الضغط العالي أو الغبار، وذلك لمنع حدوث دوائر قصر أو تآكل أو أعطال في الأداء.
تجنب وضع الجهاز في ضوء الشمس المباشر لمنع تلف الشاشة وارتفاع درجة حرارة المكونات الداخلية.
Stay away from environments with strong magnetic or electric fields (such as large Voltage Transformers or microwave ovens) to prevent interference that could affect the accuracy of test data.
2.2 Operational Conduct Guidelines
Do not plug in or unplug measurement probes, communication cables, or other accessories during testing to prevent damage to the connectors or data loss.
This device contains glass optical components and a touchscreen. Handle it with care when using it; do not drop or crush it, to prevent the screen from cracking or the optical components from being damaged.
When pointing the probe at the light source being measured, avoid looking directly at bright light sources—especially ultraviolet light sources—to prevent eye injury.
When performing a strobe test, you must select the continuous test mode.
لضمان دقة نتائج الاختبار، حافظ على مسافة معقولة وثابتة من مصدر الضوء أثناء الاختبار لتجنب تداخل الضوء المتناثر. إذا لزم الأمر، قم بإجراء الاختبار في غرفة مظلمة.
Please use the standard USB cable to connect the device; using a different USB cable may cause some functions to malfunction.
2.3 سلامة مصدر الطاقة والبطارية
The built-in lithium-ion battery has a capacity of 4000mAh and is compatible only with the standard power adapter. Please note: Using a non-standard power adapter—especially a high-current fast-charging adapter—can easily damage the battery.
لا تستخدم الجهاز لفترات طويلة عندما يكون مستوى شحن البطارية أقل من 15%. عند استخدام الجهاز لأول مرة، احرص على شحنه فور وصول مستوى شحن البطارية إلى 15%. لا تشحن البطارية بعد تفريغها بشكل كبير، فقد يؤدي ذلك إلى تقصير عمرها الافتراضي.
تأكد من تهوية المنطقة جيدًا أثناء الشحن، وأبقِ الشاحن بعيدًا عن المواد القابلة للاشتعال، وافصله فورًا بعد اكتمال الشحن.
If the device will not be used for an extended period, fully charge it first, and then top it up every 3 months to prevent the battery from becoming damaged due to discharge.
2.4 Maintenance and Calibration Specifications
Unauthorized personnel are strictly prohibited from opening the casing for repairs, to avoid exacerbating the problem or causing personal injury.
Equipment must be sent to a laboratory accredited for spectral and photometric calibration; the recommended calibration interval is once a year.
2.5 أخرى
بالنسبة للأمور غير المشمولة في هذا الدليل، يرجى توخي الحذر أو الاتصال بنا.
3. تشغيل LMS-6000 الجهاز
3.1 Power On/Off Procedures
3.1.1 Startup Procedure
Press and hold the device’s single control button for 3 seconds; the screen will light up and display the device model and name.
The system initializes within 3 seconds of startup and automatically enters the main test interface.
3.1.2 Shutdown Procedure
After completing the test and saving the test report, press and hold the operation button for 3 seconds, then tap the power-off option on the touchscreen to shut down the device.
If the device remains inactive for an extended period, it will automatically shut down according to the auto-shutdown time set in System Settings (default: 10 minutes). This setting can be adjusted in System Settings.
3.2 الواجهة الرئيسية
3.2.1 Main Interface Layout
| رقم الهاتف | ملاحظات |
| ① | Continuous Test Mode |
| ② | Single-Test Mode |
| ③ | During continuous testing, click here to stop the test. |
| ④ | After the test is complete, click to save the test file to your device. |
| ⑤ | Click to go to the settings screen |
| ⑥ | Main Parameters and Spectral Plot Display Interface |
| ⑦ | Interface Displaying All Test Parameter Data |
| ⑧ | CIE Color Diagram Display Interface |
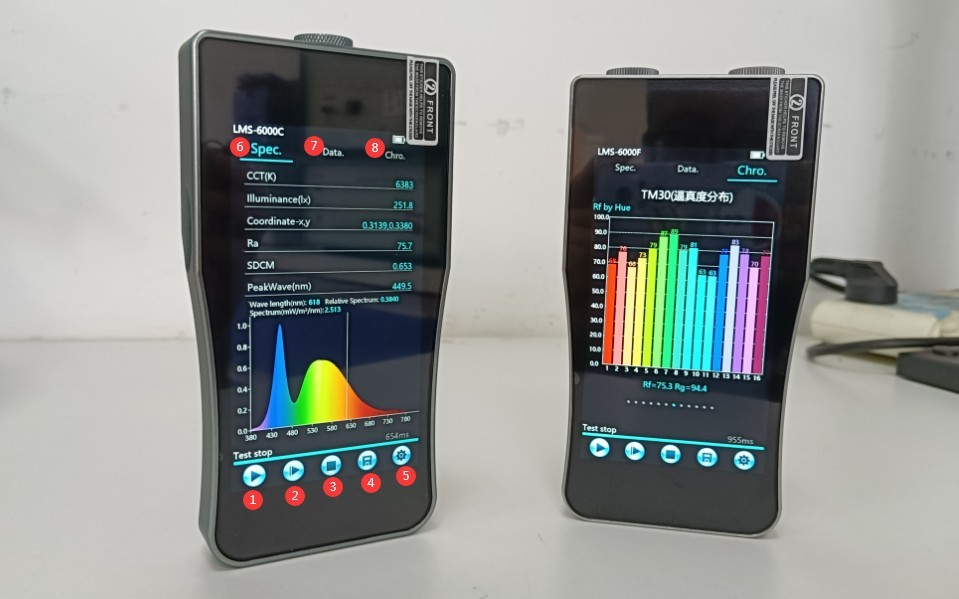
الشكل 6
Note 1: You can also enter single-test mode by briefly pressing the left function button.
Note 2: When conducting a strobe test, you must select the continuous test mode.
Note 3: When saving test files to the device, only CSV files can be saved (the PDF feature is not yet fully functional). If you need a report in PDF format, you can use software on your computer to open the saved CSV file and print it as a PDF.
3.2.2 Recommended Testing Methods
All photometric data, except for luminance, are distance-dependent. For example, if you need to measure the illuminance of a light fixture at a specific distance, position the probe directly in front of the light-emitting surface of the fixture and maintain a fixed distance; changes in distance will cause the illuminance value to change. If you need to avoid interference from other light sources, you can move to a darkroom to conduct the test.
If you need to test the photometric and colorimetric parameters at a specific location and orientation indoors or outdoors, place the probe at the corresponding location, adjust it to the corresponding orientation, and then click “Test.”
Luminance data is independent of distance; the LMS-6000L is typically used to measure the luminance of displays and other devices. When using the LMS-6000L luminance meter, to avoid the influence of stray light, place the black sleeve at the front of the probe in close contact with the object being measured to obtain accurate luminance readings.
3.2.3 Changing the Main Interface Display Settings
If you need to edit any of the items displayed within the area marked in the image below, simply click on the corresponding item to edit it directly.
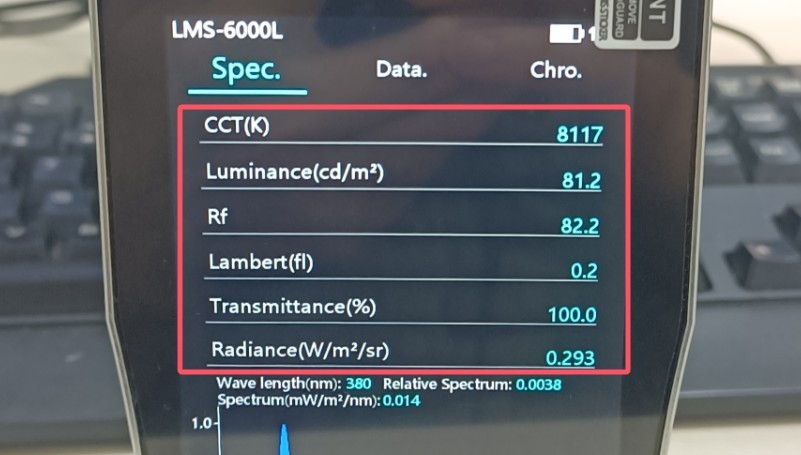
الشكل 7
3.3 واجهة الإعدادات
التنقل في الموقع:
| رقم الهاتف | ملاحظات |
| ① | Measurement Settings |
| ② | File Management: Read or delete saved test files |
| ③ | اعدادات النظام |
| ④ | Equipment Version Number and LISUN معلومات الإتصال |
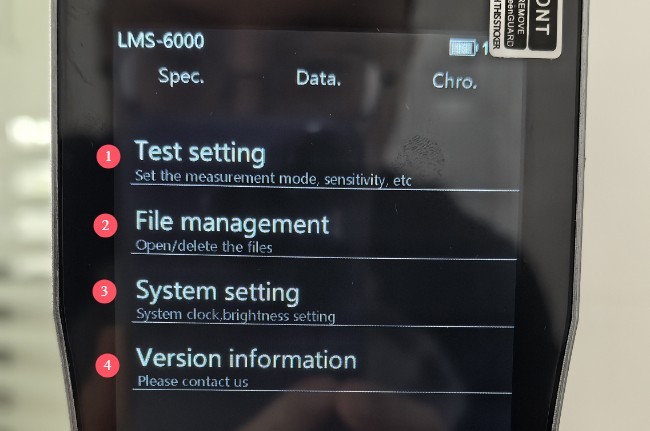
الشكل 8
3.3.1 Measurement Settings Screen
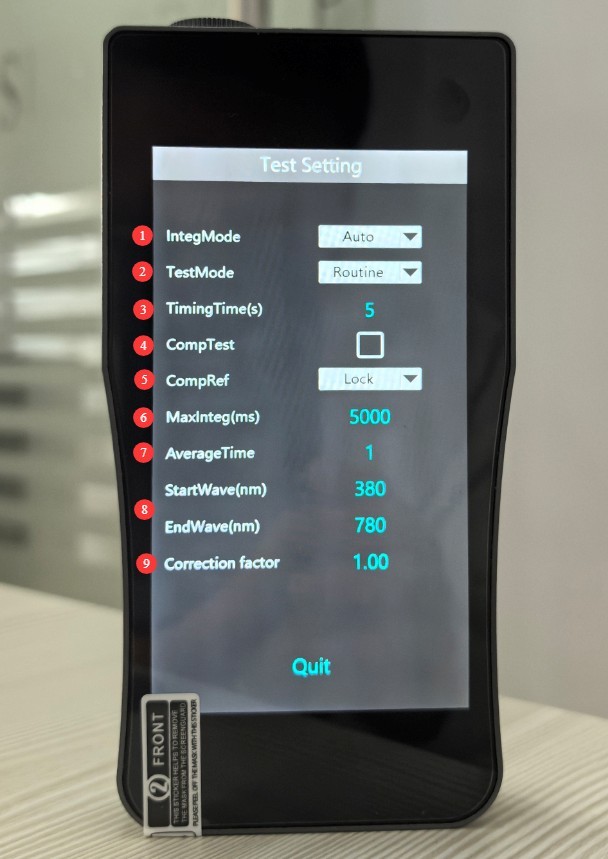
| رقم الهاتف | ملاحظات |
| ① Points Mode | This includes both automatic and manual integration. Unless otherwise specified, please select automatic integration. |
| ② Test Mode | Includes Normal Mode and Timed Mode |
| ③ Timer Duration | If you select the timer mode in test mode, you’ll need to set the timer duration. When you click to start the test, it will run automatically once the countdown ends. |
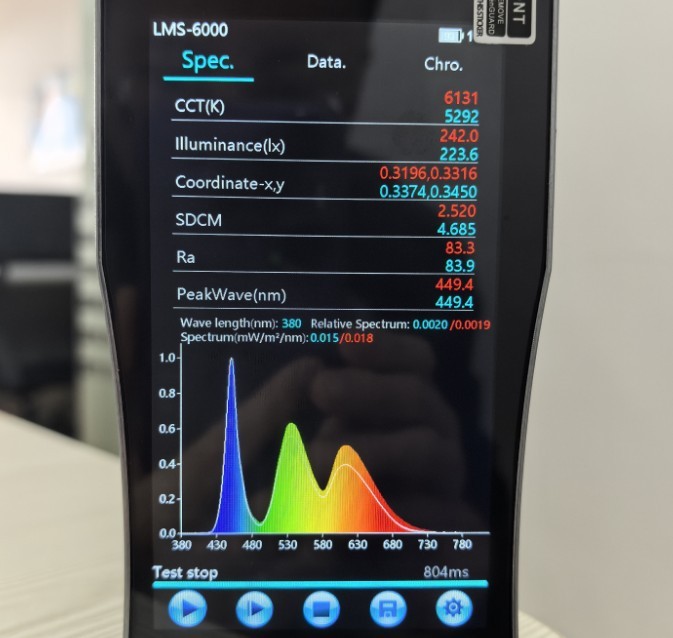
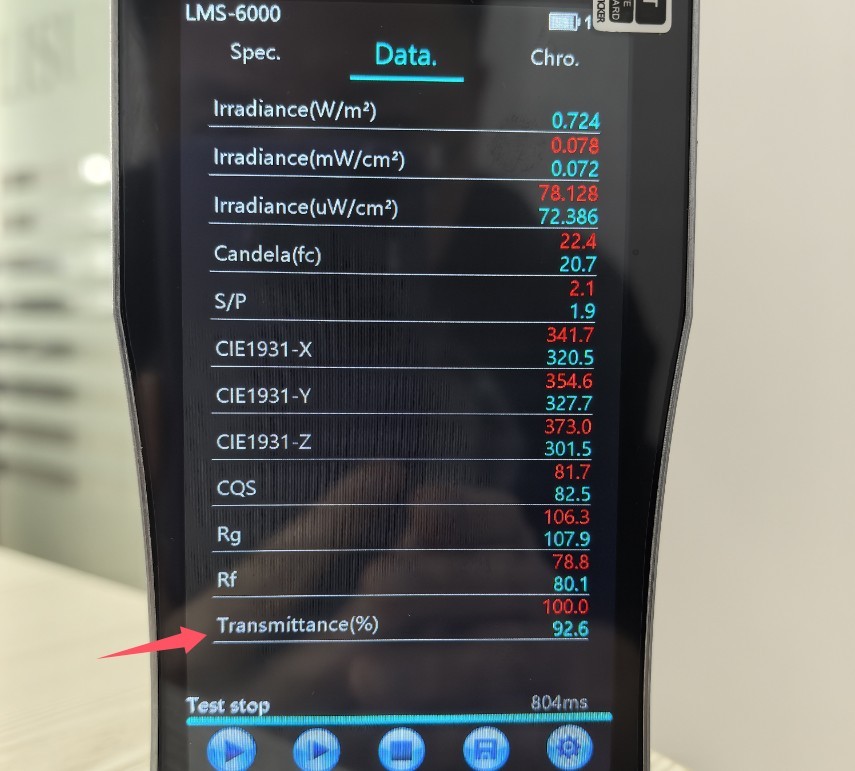
| ④ Comparative Testing | If this box is checked, the test interface will display the comparison test results and the transmittance test results. |
| ⑤ Comparison and Reference | You can choose between “Lock” and “Rolling.” “Lock” means comparing the results to those of the first test, while “Rolling” means comparing the results to those of the last two tests. |
| ⑥ Maximum Points | The default value is 5000 ms; no changes are needed. |
| ⑦ Average Number of Times | The range is set from 1 to 10; the higher the average number of repetitions, the longer the test will take. Generally, 1 to 2 repetitions are sufficient. |
| ⑧ Wavelength Range | Please verify that the set wavelength range matches the actual wavelength range of the equipment you purchased; otherwise, the test data will be inaccurate. |
| ⑨Correction Factor | The default value is 1. Do not change it. |
الشكل 9
Note: The results of the comparison test are shown in the figure below, where red represents the reference values and blue represents the current test values:
الشكل 10
The transmittance test results are shown in the figure below:
الشكل 11
3.3.2 File Management Interface
You can open or delete previously saved test files.
3.3.3 System Settings Interface
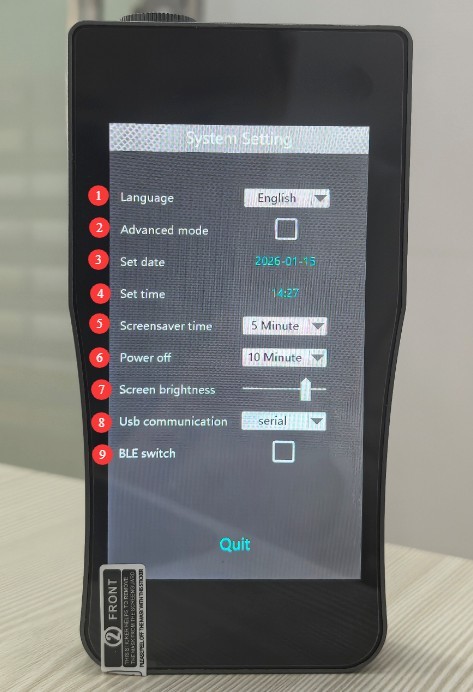
| رقم الهاتف | ملاحظات |
| ① System Language | You can switch between Chinese and English |
| ② Advanced Mode | Used to calibrate equipment; a password is required to use it. |
| ③ Set the date | |
| ④ Set the time | |
| ⑤ Screen Saver Duration | After the screen has been idle for the set amount of time, it automatically dims. |
| ⑥ Automatic Shutdown | The device will automatically shut down after the set idle time has elapsed. |
| ⑦ Screen Brightness | |
| ⑧USB Communication | To transfer files, select “File Transfer”; to control a device using software, select “Serial Communication.” |
| ⑨ Bluetooth Switch | Bluetooth functionality is still under development and is currently unavailable. |
الشكل 12
4. Using the Desktop Software
4.1 تثبيت البرنامج
Computer System Requirements: Compatible with Windows 7 or later (32-bit/64-bit); the computer must have a D: drive (the software automatically creates database files on the D: drive).
Hardware Requirements: The computer must have a USB port to connect the device; if you need to print reports, you must have a printer installed (one that supports PDF printing).
Copy all the software folders to your computer. The LMS-6000 series software is a portable application; simply double-click to open and use it. When you use the software, it will automatically create a database file on Drive D, so your computer must have a Drive D. If your computer is running a 32-bit operating system, you may need to install “vcredist_x86.exe.”
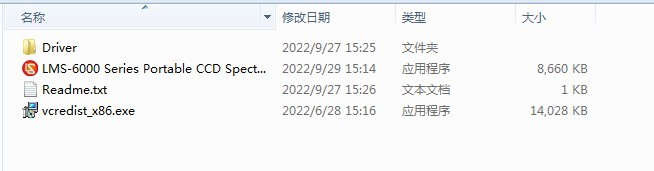
الشكل 13
4.2 Use the software to open CSV files saved on the device
Go to the system settings screen and change the USB communication mode to “File Transfer.”
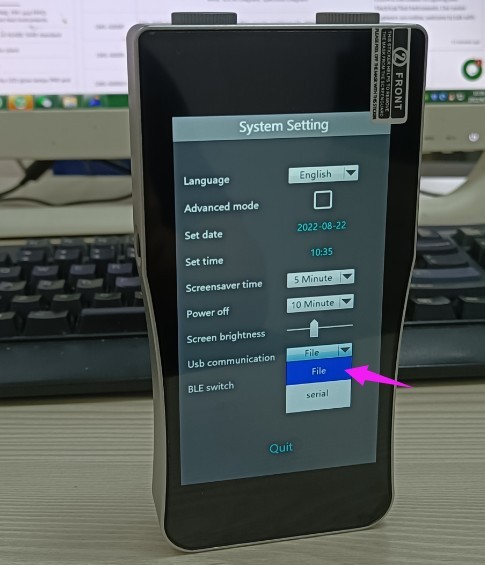
الشكل 14
Then connect the device to your computer using a USB cable. Note: Whenever possible, plug in or unplug the USB cable while the device is turned off.
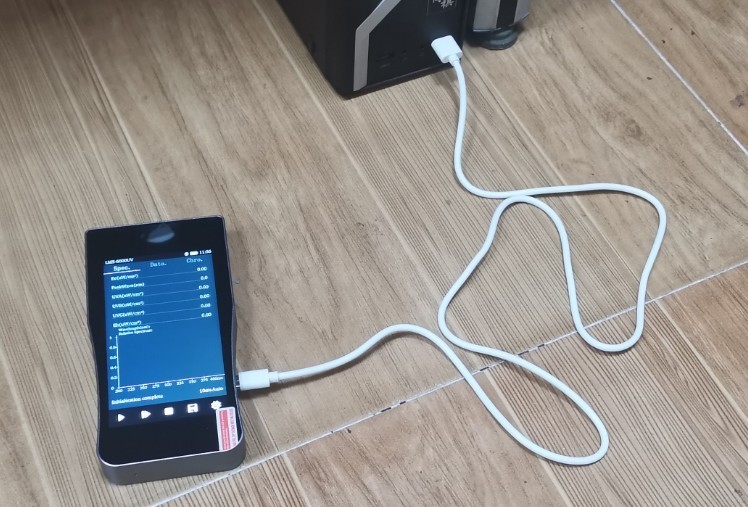
الشكل 15
Double-click to open the software, and then click the corresponding CSV file in the navigation bar.
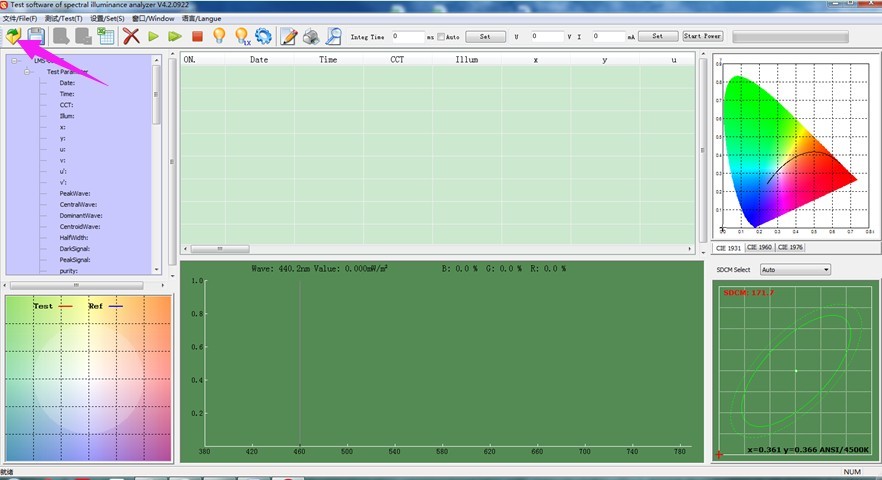
الشكل 16
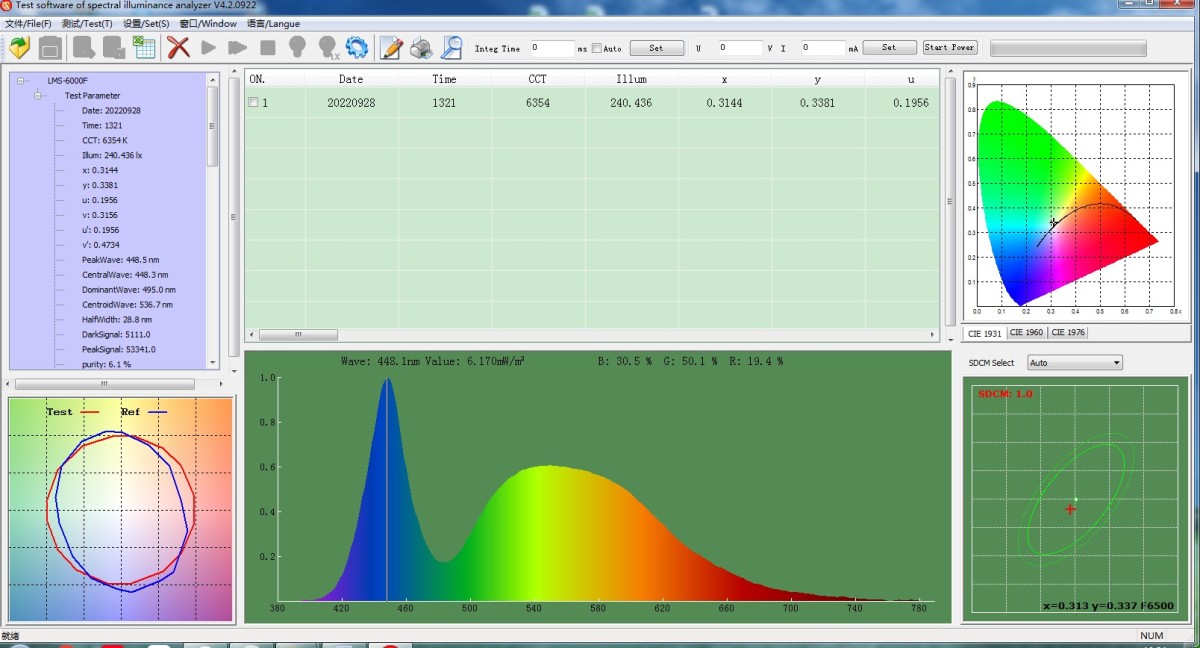
الشكل 17
4.3 Testing Using Software to Control the Device (The LMS-6000C does not have this feature)
Go to the system settings screen and change the USB communication mode to “Serial Communication.”
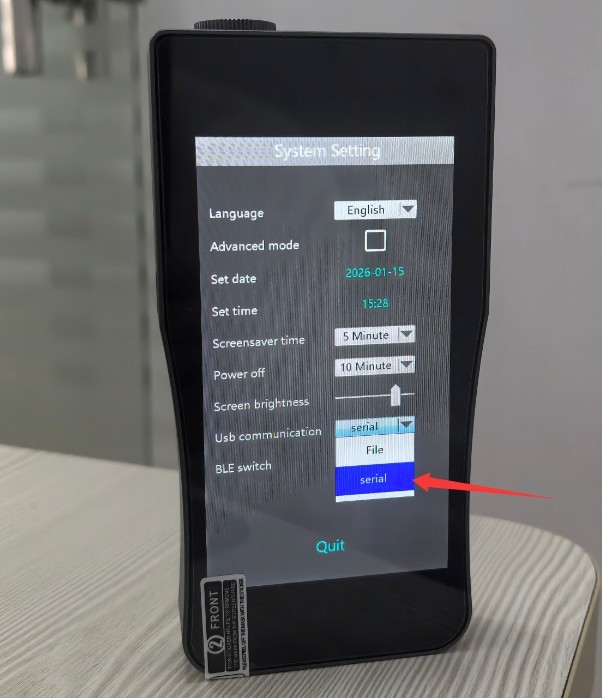
الشكل 18
Note: If the device is already connected to the computer via a USB cable, you must restart the device after changing the USB communication mode so that the computer can recognize it properly.
Go to Device Manager. If the computer correctly recognizes the ports with the following names, it means the software and the device are communicating properly.
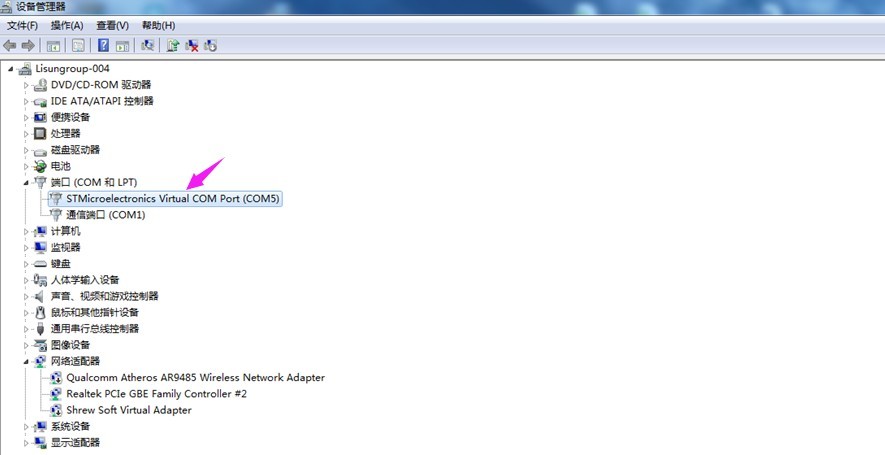
الشكل 19
If you cannot see this port, or if it displays an error, please manually install the driver from the software folder. If you are using a 64-bit Windows system, you may also need to disable the 64-bit digital signature enforcement on your computer; please refer to the link below for instructions. Continue until you can see the port shown in the image above in Device Manager.https://www.lisungroup.com/news/technology-news/disable-digital-signature-enforcement-for-64bit-win-7-8-10.html
Double-click to open the software. If the software is already running, you may need to restart it before the test button shown in the image below turns green and becomes active. Click the button with your mouse, and the software and device will simultaneously perform either continuous or single-run testing. Once the test is complete, the results will be displayed simultaneously on both the device and the software.
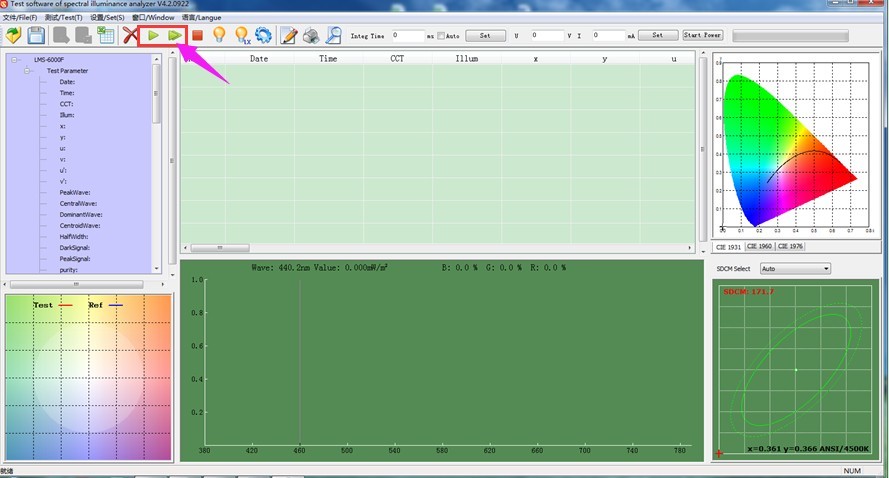
الشكل 20
4.4 Overview of Key Software Features
4.4.1 Introduction to the Home Screen
| رقم الهاتف | ملاحظات |
| ① | Open the CSV file stored on the device |
| ② | Save the currently selected report as a CSV file |
| ③ | Save the currently selected report as an Excel file |
| ④ | Delete the currently selected report |
| ⑤ | Single-Test Mode |
| ⑥ | Continuous Test Mode |
| ⑦ | توقف عن الاختبار |
| ⑧ | Information on the Product Under Test and Printing Options |
| ⑨ | To print the test report, you can connect a printer or use a PDF printer. |
| ⑩ | معاينة قبل الطباعة |
| ⑪ | Equipment Model and Test Parameter Display |
| ⑫ | List of test reports. To process a specific report, check the corresponding box. |
| ⑬ | Selecting a CIE Color Diagram |
| ⑭ | TM-30 Image |
| ⑮ | طيف |
| ⑯ | For the SDCM color tolerance setting, “Auto” is generally the best choice. |
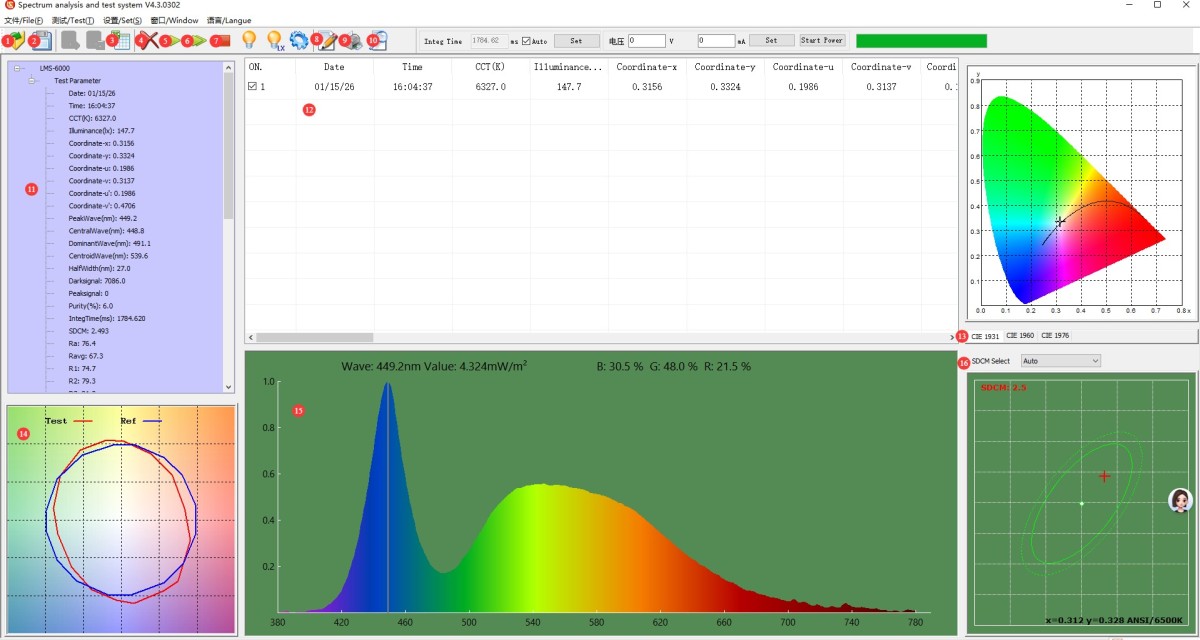
الشكل 21
Product Information and Print Options Window:
| رقم الهاتف | ملاحظات |
| ① | Choose to print either the CIE color diagram or the SDCM color tolerance chart; you can only select one of the two. |
| ② | Select whether to print electrical parameters. The LMS-6000 cannot test electrical parameters, but they can be entered manually. |
| ③ | Select whether to print plant lighting parameters, cold light source parameters, TV lighting consistency index, flicker parameters, color quality table, and TM-30 parameters. Note: You must also confirm whether the model of the device you purchased includes this feature. |
| ④ | Enter Information About the Product to Be Tested |
| ⑤ | Optional manually entered electrical parameters |
| ⑥ | Stroboscopic light source filtering requires custom equipment to support this feature. |
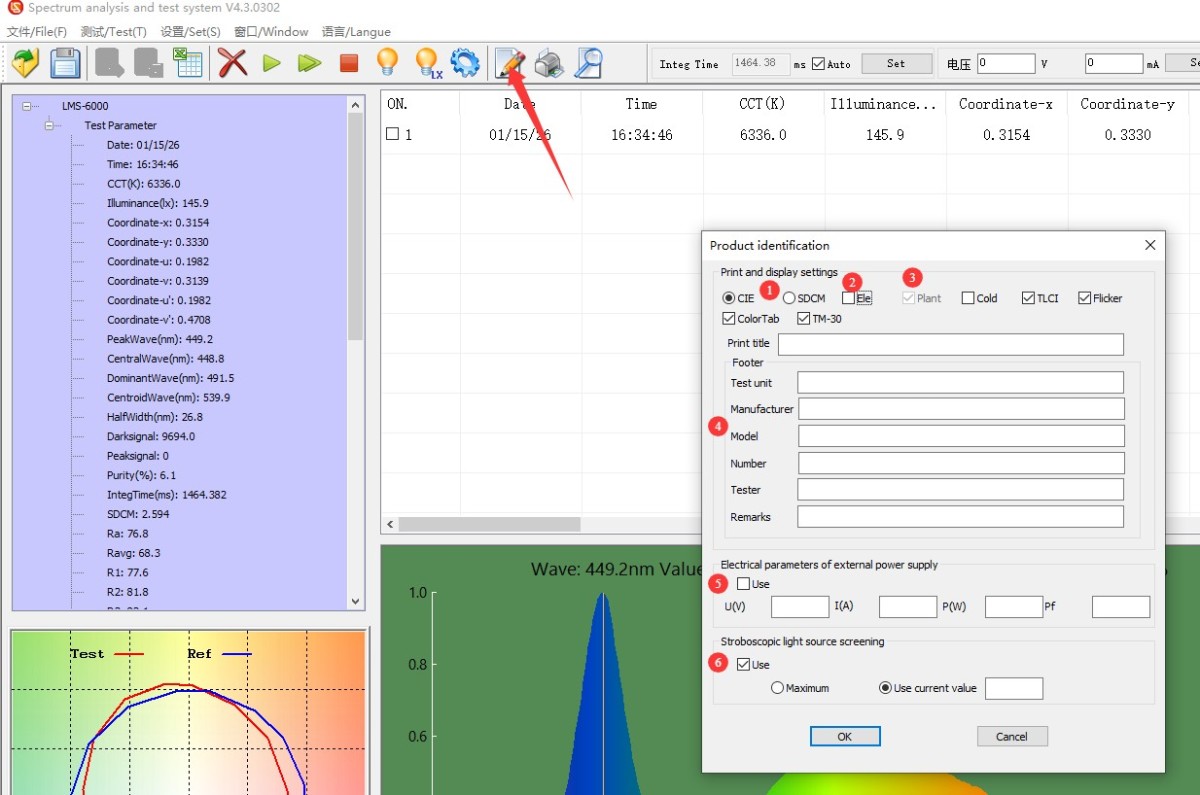
الشكل 22
4.4.2 Introduction to Key Features of the Navigation Bar Drop-down Menu
File > Save Spectral Data; you can choose an interval of 1 nm or 5 nm.
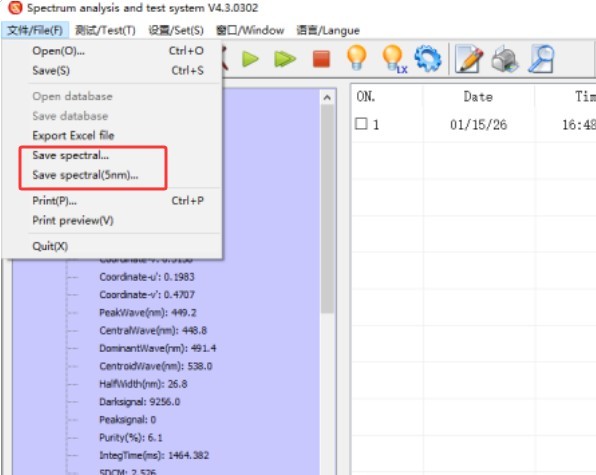
الشكل 23
In this window, you can select the content to display on the main screen. Select “Default Layout” to restore the display to its default settings.
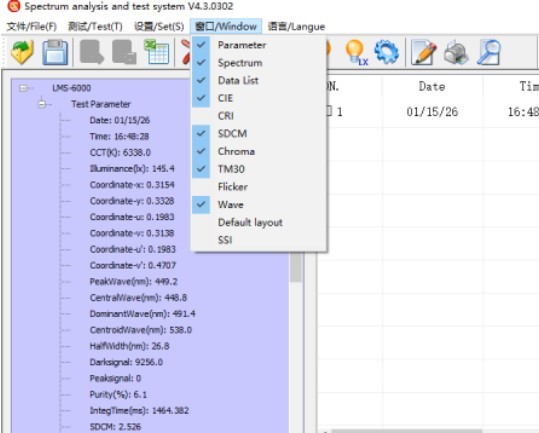
الشكل 24
Language: You can switch the language of the test report between Chinese and English.
5. الصيانة اليومية للمعدات والعناية بها
5.1 الفحص اليومي قبل الاستخدام
Probe Cleaning: Gently wipe the probe window with a clean, lint-free cloth to remove fingerprints and dust, ensuring the optical path remains clean and preventing any impact on test accuracy.
Battery Check: After turning on the device, check the battery level. If it is below 15%, charge it promptly to prevent the test from being interrupted.
5.2 التخزين والصيانة على المدى الطويل
Storage Conditions: Store in a dry, well-ventilated, and cool location at a temperature of ≤50°C and a relative humidity of <70% RH.
Preparation before storage: Fully charge the battery, turn off the device, place it in a flannel pouch, and keep it away from water, oil, chemicals, and corrosive liquids or gases.
Regular Maintenance: If the device will not be used for an extended period, remove it and charge it once every 3 months. Turn it on and let it run for 5 minutes before turning it off and storing it to prevent battery degradation.
5.3 Calibration and Performance Maintenance
Regular Calibration: Have the equipment professionally calibrated once a year to ensure the accuracy and reliability of test data, and keep the calibration certificate in a safe place after calibration.
6. استكشاف الأخطاء وإصلاحها وحل المشكلات الشائعة
6.1 الجهاز لا يعمل
6.1.1 Possible Causes
The battery is dead; the battery is damaged.
6.1.2 خطوات استكشاف الأخطاء وإصلاحها
Charge the device using the included power adapter and USB cable, then try turning it on again after 1 hour;
If the device still won’t turn on, the battery is damaged. Please mail it back to us so we can replace the battery for you.
6.2 شذوذ بيانات الاختبار
6.2.1 Possible Causes
The probe window is dirty, dusty, or scratched; there is stray light interference in the test environment; the equipment has not been calibrated for an extended period; or the test parameters are set incorrectly.
6.2.2 خطوات استكشاف الأخطاء وإصلاحها
Clean the probe window with a lint-free cloth to ensure it is free of obstructions and smudges. If there are any scratches, contact customer service for repair;
Adjust the test position to maintain a reasonable distance from the light source, avoid interference from stray light, and, if necessary, conduct the test in a darkroom;
Check the calibration schedule for your equipment. If it has been more than a year since the last calibration, please have it calibrated promptly. You may send it to a third-party laboratory for calibration, or return it to us and we will calibrate it for you free of charge;
Check and verify the test parameters: whether the integration time is set to “Auto,” whether the wavelength range is set correctly, whether the correction factor is correct, and whether the stroboscopic test is using continuous test mode, etc.
6.3 The software won’t open or is malfunctioning
6.3.1 Possible Causes
Incorrect USB communication mode settings; damaged USB cable; faulty computer port.
6.3.2 خطوات استكشاف الأخطاء وإصلاحها
Verify that the device’s USB communication mode is set correctly; restart the device if necessary, as described in Sections 4.1 and 4.3;
Use the original USB cable, or try reconnecting it to a different USB port on your computer, and make sure the cable is securely connected;
If you’re still unable to connect, try using a different computer to rule out any issues with your own computer.
6.4 Touchscreen Unresponsiveness Issues
6.4.1 Possible Causes
Stains or water marks on the screen; the device freezes; touchscreen hardware failure.
6.4.2 خطوات استكشاف الأخطاء وإصلاحها
Wipe the screen with a clean touchscreen cleaning cloth to remove any smudges or water marks, then try the operation again; press and hold the device’s power button for 10 seconds to force a shutdown, wait 30 seconds, then turn it back on to see if the touchscreen has resumed responding; if it still does not respond after multiple restarts, you may return it to us for a free repair.