
 الإنجليزية
 中文简体
中文简体 Русский
 Español
 Português
 Türkçe
 العربية
 Deutsch
 Polski
 Italiano
 Français
 한국어
한국어 ไทย
ไทย Tiếng Việt
 日本語
日本語





























صندوق بالتنقيط
مستخدم المالكين
قابل للتطبيق LISUN الموديلات: JL-12
1. فتح العلبة والتعرف الأساسي على المعدات
1.1 المواصفات الفنية الرئيسية
| المعاملات | ملاحظات |
| مستويات مقاومة الماء القابلة للقياس | IPX1 و IPX2 |
| Drip Tray Dimensions | 800 × 800 × 45 مم (L × W × H) |
| قطر فتحة التصريف | سماكة 0.4 ملم |
| Drip Hole Spacing | سماكة 20 ملم |
| أقصى حمولة لقرص الدوران | كجم 50 |
Note: The drip tray and test turntable can be customized based on the maximum dimensions and weight of the test object.
يتوافق الجهاز مع متطلبات الاختبار لـ IPX1 و IPX2 المحددة في GB/T 4208-2017، الأقسام 14.2.1–14.2.2 والشكل 3.
1.2 فتح العلبة والتحقق من المحتويات
1.2.1 فك التغليف والفحص البصري
عند إخراج الجهاز من العبوة، تعامل معه برفق لتجنب خدش غلافه بأدوات حادة. بعد إخراجه، افحص الجزء الخارجي منه للتأكد من عدم وجود أي تشوهات أو انبعاجات ظاهرة، وأن الأزرار سليمة وغير مفكوكة. إذا لاحظت أي خلل في الجهاز أو ملحقاته، فلا تقم بتشغيله. يرجى الاتصال بنا فورًا.
1.2.2 الوحدة الرئيسية والملحقات
المكونات الرئيسية:
| رقم | ملاحظات |
| ① Drip tray | Includes a lifting motor, drip tray, etc. |
| ② Control Cabinet | Includes electrical cabinets, touchscreens, etc. |
| ③ Turntable | Mount the sample; it will rotate automatically during testing. |
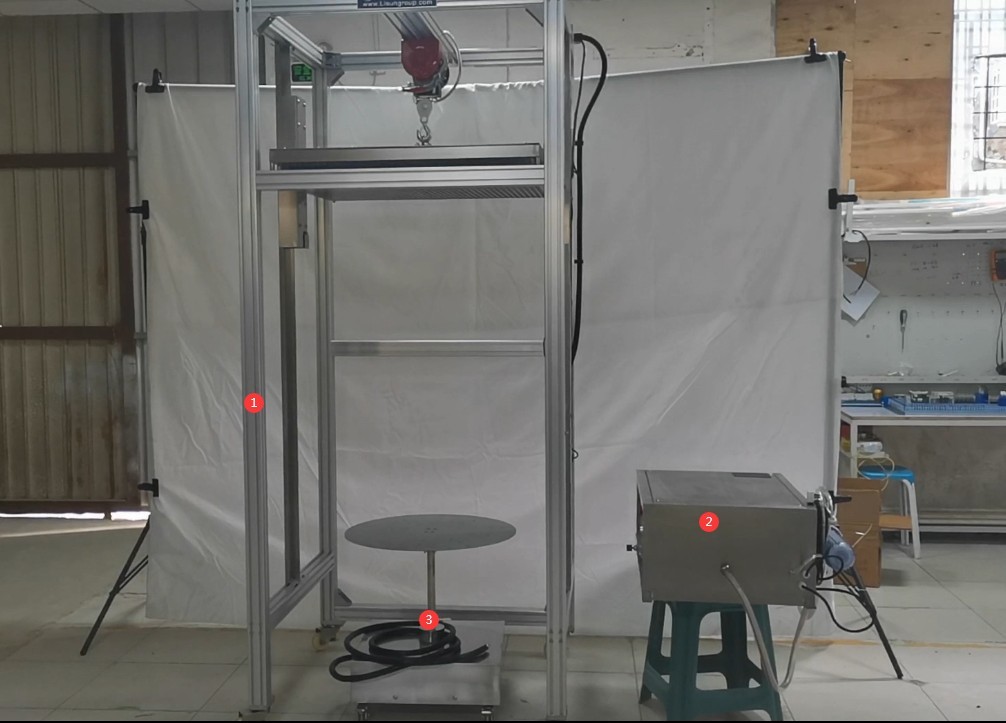
الشكل 1
Other Major Components:
| رقم | ملاحظات |
| ① Waterproof outlets and plugs | Used to connect the turntable to the sample during electrical testing |
| ② Straps | Can be used to secure samples |
| ③ Spare copper nozzle | Used to connect the drip tray to the needle; the drip tray already has enough copper fittings, so this is a spare. |
| ④ Spare needles | There are already enough needles on the drip tray; these are spares. |
| ⑤ Hex key | For use when installing control cabinets |
| ⑥ Needle Passing | إذا انسدت الإبرة، فاستخدم هذا لتنظيفها |
| ⑦ Filter Wrench | يُستخدم عند استبدال خرطوشة الفلتر |
| ⑧ Spare Filter Cartridge | الوحدة مزودة بالفعل بخرطوشة فلتر؛ هذه خرطوشة احتياطية. |
| ⑨ Inlet Pipe | Used to connect the water supply to the control cabinet of the Drip Box |
| ⑩ Outlet Pipe | Used to connect the control cabinet to the drip tray |
| ⑪ Clamp | Secure the hoses when installing the inlet and outlet hoses |
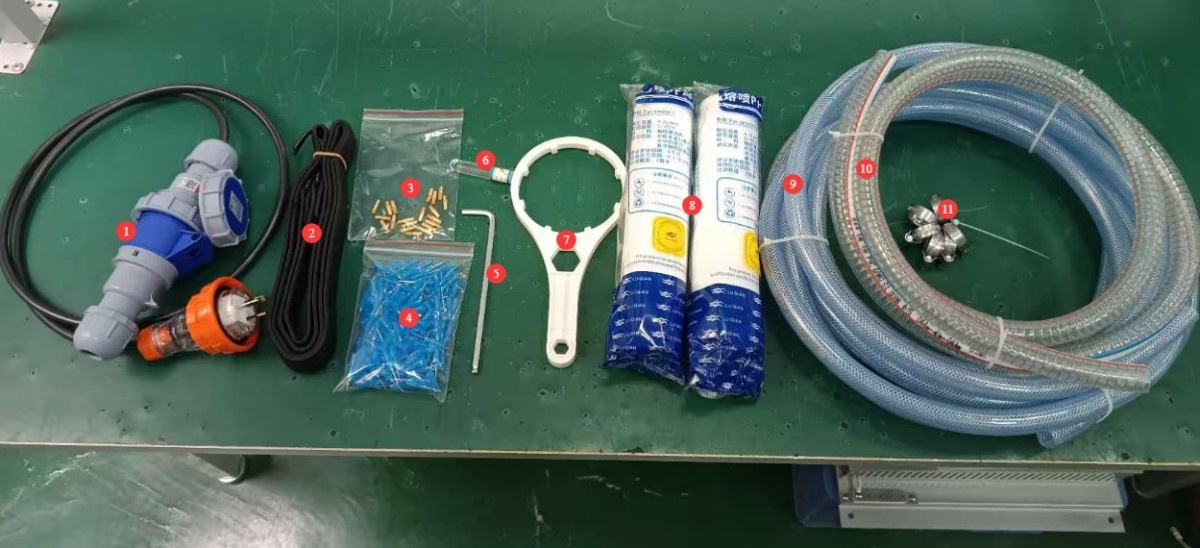
الشكل 2
تم إرسال روابط تحميل دليل المستخدم الإلكتروني، والبرامج، وبطاقة الضمان، وغيرها من المواد عبر البريد الإلكتروني. يُرجى تحميلها في أقرب وقت ممكن. إذا لم يصلك البريد الإلكتروني، يُرجى التواصل معنا لطلب روابط التحميل مرة أخرى.
2. احتياطات السلامة
2.1 السلامة الكهربائية
2.1.1 مواصفات توصيل الطاقة
استنادًا إلى لوحة البيانات، قم بتوصيل حجرة الاختبار بمصدر الطاقة الصحيح، عادةً 220 فولت، 50 هرتز (يتوفر 60 هرتز عند الطلب)، وتأكد من صحة الجهد والتردد. يُرجى استخدام دائرة كهربائية مخصصة لتجنب مشاركة الدائرة مع أجهزة أخرى عالية الطاقة. تأكد من أن جميع التوصيلات محكمة وغير مفكوكة.
2.1.2 متطلبات التأريض
The test chamber must be reliably grounded, with a grounding resistance of ≤4 Ω. Do not use gas pipes, non-metallic water pipes, or the neutral wire as a substitute for the grounding wire. After grounding is complete, use a Grounding Resistance Tester to measure the ground resistance. Power may only be applied after confirming that the resistance meets the requirements to prevent electric shock, test chamber malfunctions, or measurement errors caused by poor grounding.
2.1.3 موانع استخدام التشغيل الكهربائي
Before wiring, servicing, or maintaining the test chamber, you must disconnect the main power supply and confirm that there is no residual voltage before proceeding;
تجنب تشغيل مفتاح الطاقة أو شاشة اللمس أو أزرار الجهاز في غرفة الاختبار بأيدٍ مبللة لتجنب خطر الصدمة الكهربائية؛
لا تضع أي أجسام غريبة (مثل الأدوات أو الورق) داخل خزانة التحكم الكهربائية لمنع الغبار أو الأجسام الغريبة من التسبب في حدوث دوائر قصر أو إتلاف المكونات؛
Do not plug in or unplug power cords or signal cables while the test chamber is running, to prevent short circuits that could damage the controller or electrical components.
2.2 سلامة التشغيل
When the drip tray is being raised or lowered, do not touch the drip tray, the lifting motor, the steel cables, or any other parts to avoid danger;
During testing, entry into the test area is prohibited, and touching the turntable or samples is prohibited. If maintenance is required, testing must be stopped, and the power and water supply must be shut off before proceeding;
If the test chamber malfunctions, non-professionals are prohibited from disassembling or repairing it; contact LISUN Customer Service or operate the equipment under the guidance of a technician.
2.3 السلامة البيئية
The distance between the drip tray and the wall, as well as surrounding equipment (such as other test equipment and shelves), shall be at least 1500 mm to facilitate operation and maintenance;
The drip rack must be placed on a sturdy, level surface. Use a level to ensure it is level, making sure the bubble in the level is centered. If the unit is tilted, it may cause the drip tray to jam when raising or lowering it, result in uneven dripping, or even damage the equipment. Note: The legs of the drip rack are adjustable to ensure the unit is level.
2.4 أخرى
بالنسبة للأمور غير المشمولة في هذا الدليل، يرجى توخي الحذر أو الاتصال بنا.
3. Equipment Assembly and Startup
3.1 Installing the Control Cabinet
There are four pre-drilled screw holes and four screws on the side of the drip tray; simply mount the control cabinet in the corresponding position.
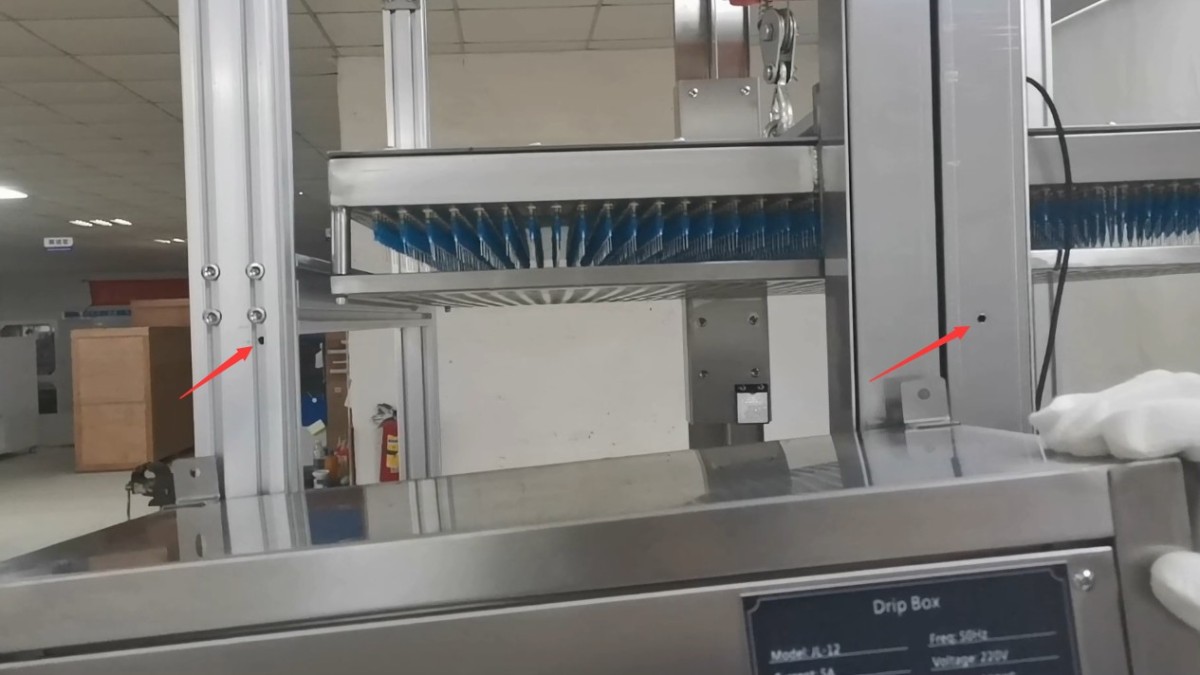
الشكل 3
3.2 توصيلات الكابلات
| رقم | ملاحظات |
| ① | Connect the turntable’s cable to the control cabinet |
| ② | Connect the cable from the lifting motor at the top of the drip rack to the control cabinet |
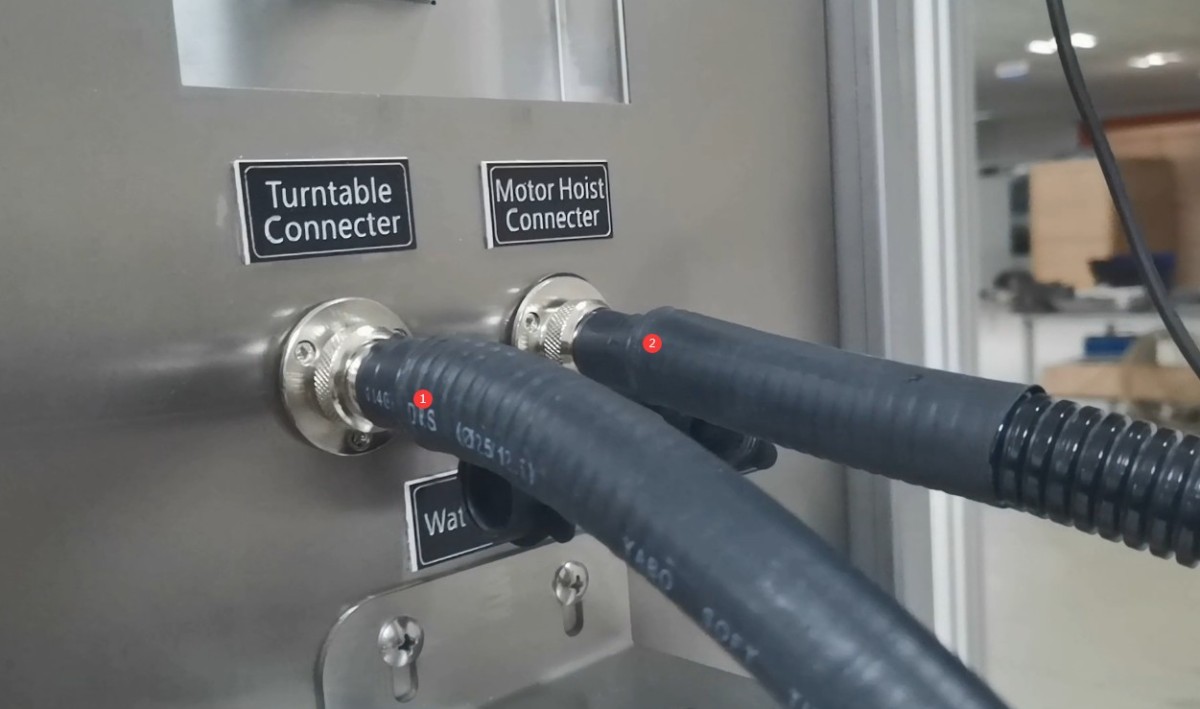
الشكل 4
3.3 Air Compressor Connection (if applicable)
Air line connections at the bottom of the control cabinet. If your company has an air compressor, you can connect this hose to the air compressor (supply pressure: 0.3–0.8 MPa). After testing is complete, you can use the air compressor to remove any residual water from the drip tray.
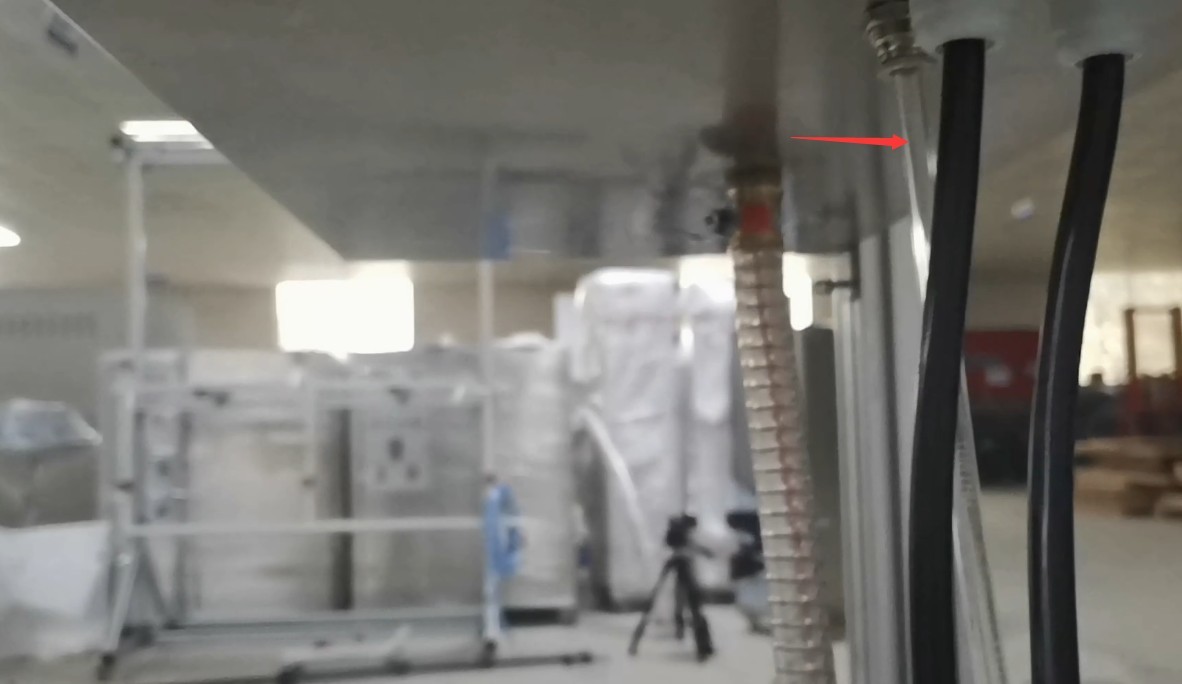
الشكل 5
Note: Not connecting the air compressor does not affect the equipment’s foundation drip test function.
3.4 توصيلات أنابيب المياه
3.4.1 Inlet Pipe Connection
Simply connect the filter’s inlet to a faucet. The IPX1 and IPX2 water resistance tests do not require a water pump; normal faucet water pressure is sufficient.
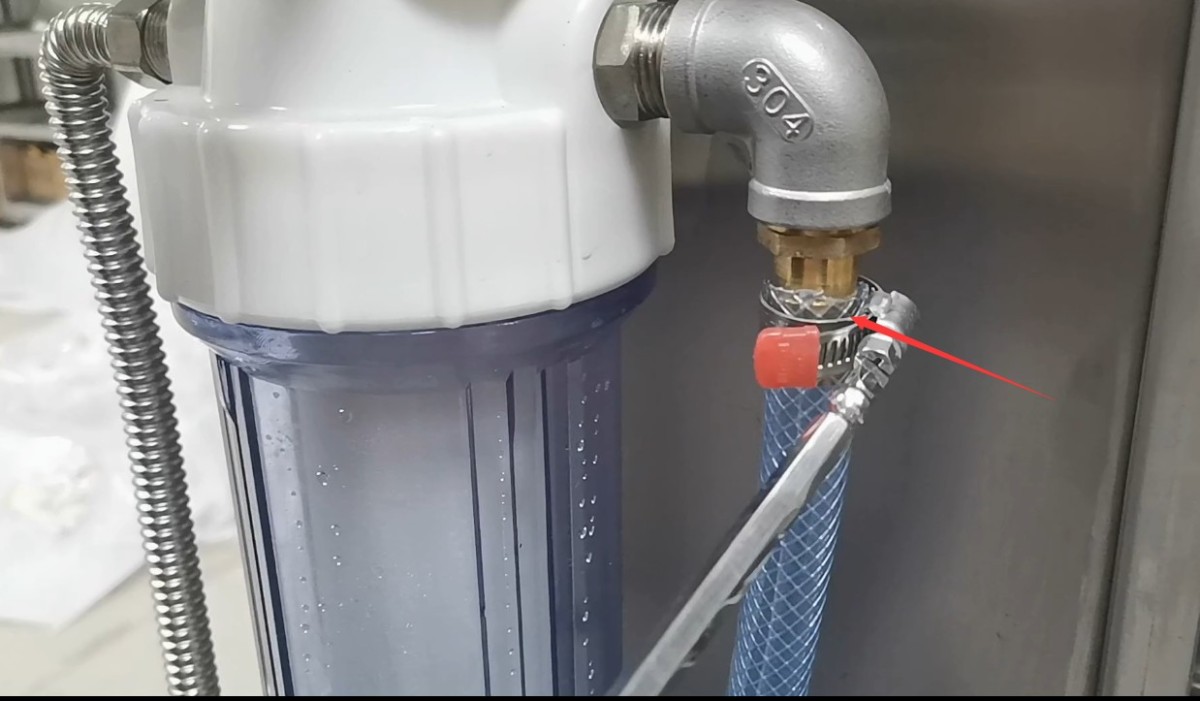
الشكل 6
Note 1: The water inlet faucet may remain open. Once the equipment is started, the program uses a solenoid valve to control whether water is fed into the drip tray. At the end of the day’s testing, simply close the water inlet faucet.
Note 2: We recommend using deionized water or purified water (a water purifier may be used); if tap water containing high levels of minerals and impurities is used, it may cause scale buildup, which can affect the test water flow rate and may require frequent filter replacement and needle cleaning.
3.4.2 Outlet Pipe Connection
Connect the control cabinet’s outlet pipe to the connection point above the drip tray.
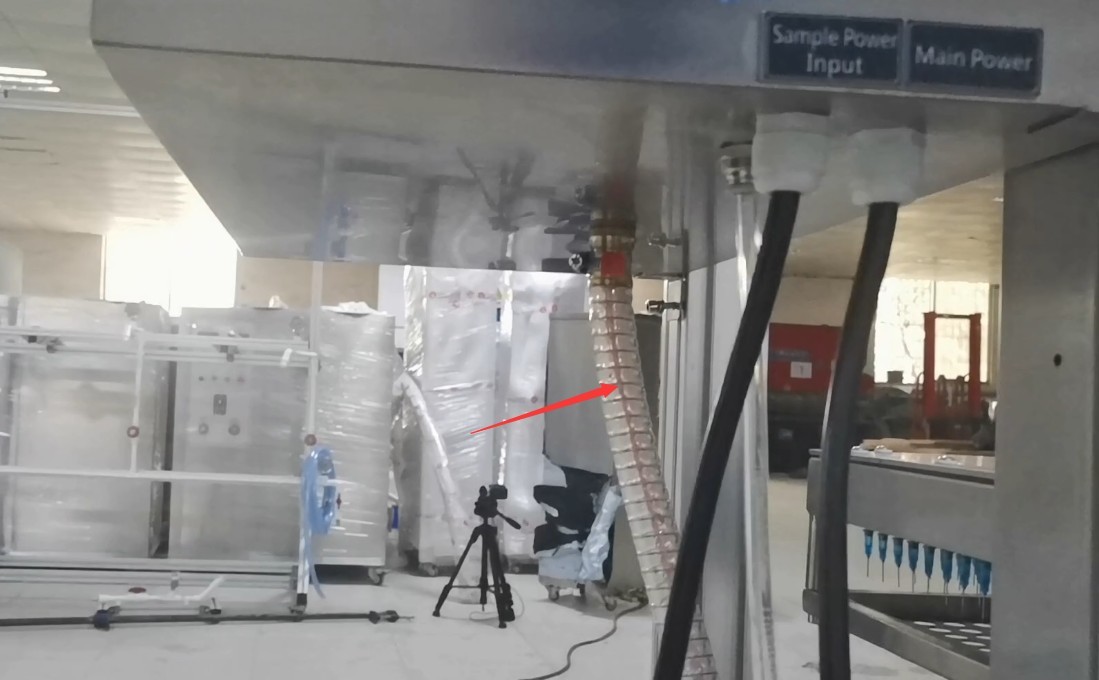
الشكل 7
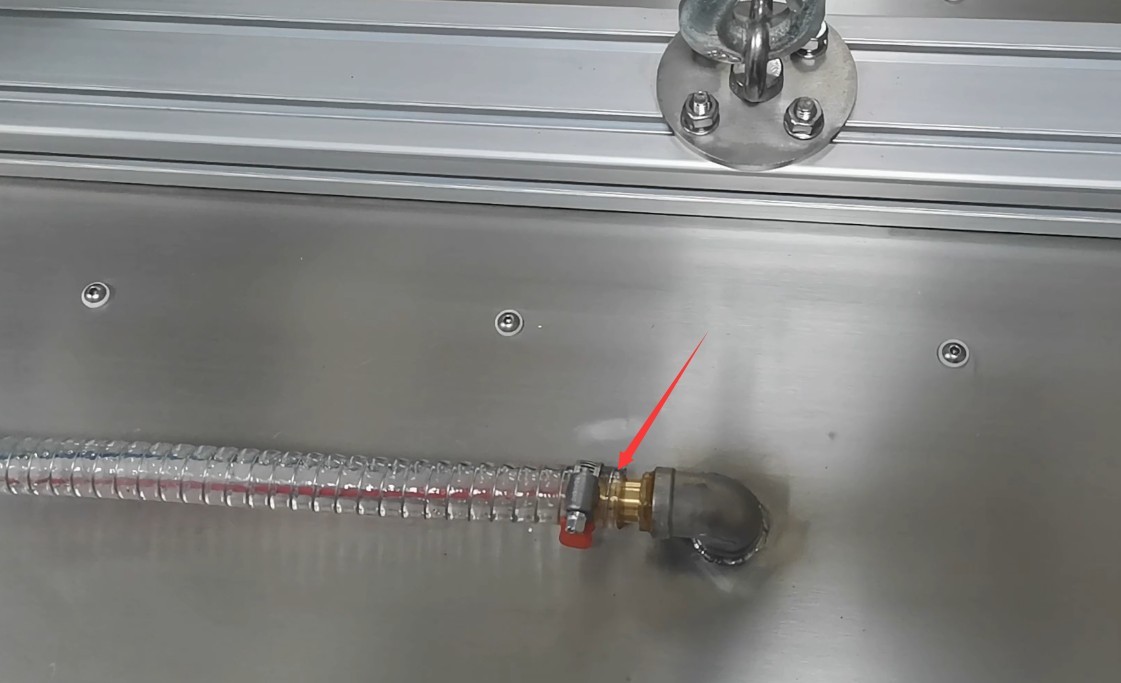
الشكل 8
Note: If the drip tray is too high to connect easily, refer to Section 4.1.3 to lower the drip tray before connecting the drain pipe.
3.5 توصيل سلك الطاقة
| رقم | ملاحظات |
| ① Sample power cord | Please connect the sample to an appropriate power source. Note: Abnormal conditions, such as short circuits, may occur in the sample during testing; you may connect an external ground-fault circuit interrupter here. |
| ② Main Power Supply for the Equipment | يرجى توصيل الجهاز بمصدر الطاقة المناسب وفقًا للمعلومات الموجودة على لوحة البيانات. |
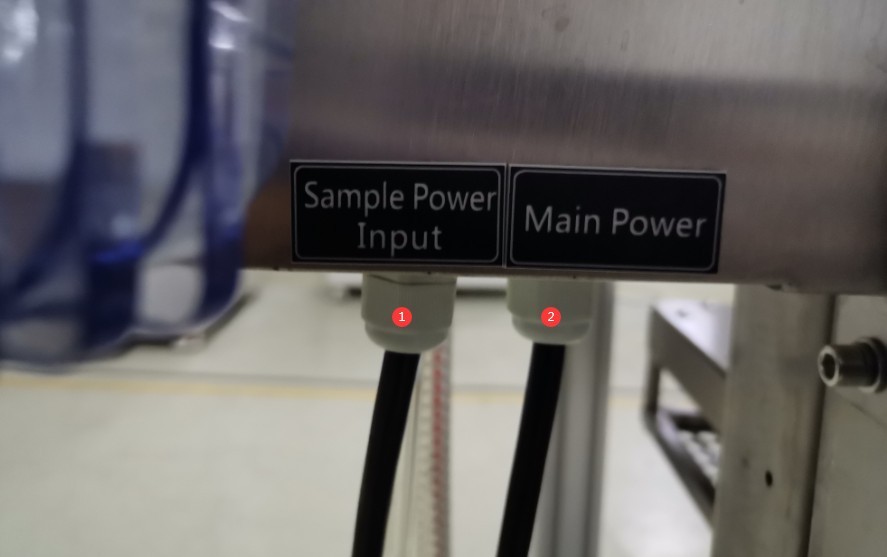
الشكل 9
Once everything is assembled, it will look like the image below.
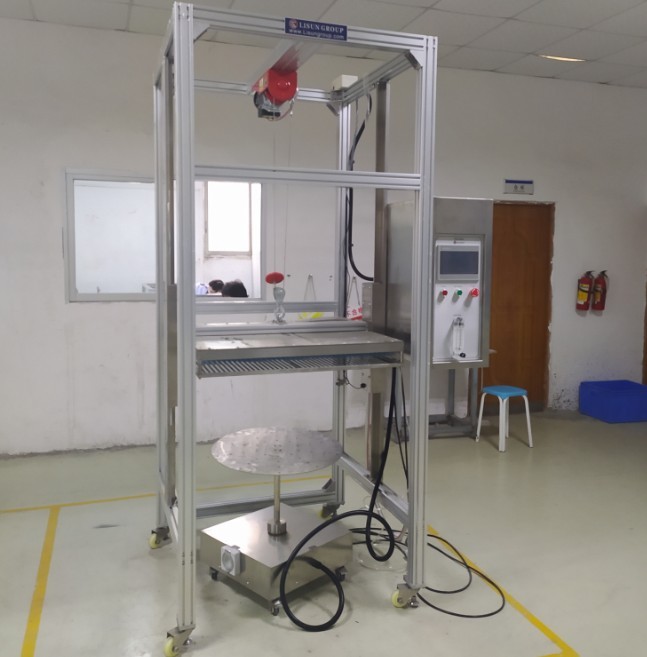
الشكل 12
After verifying that all connections are correct, turn on the device.
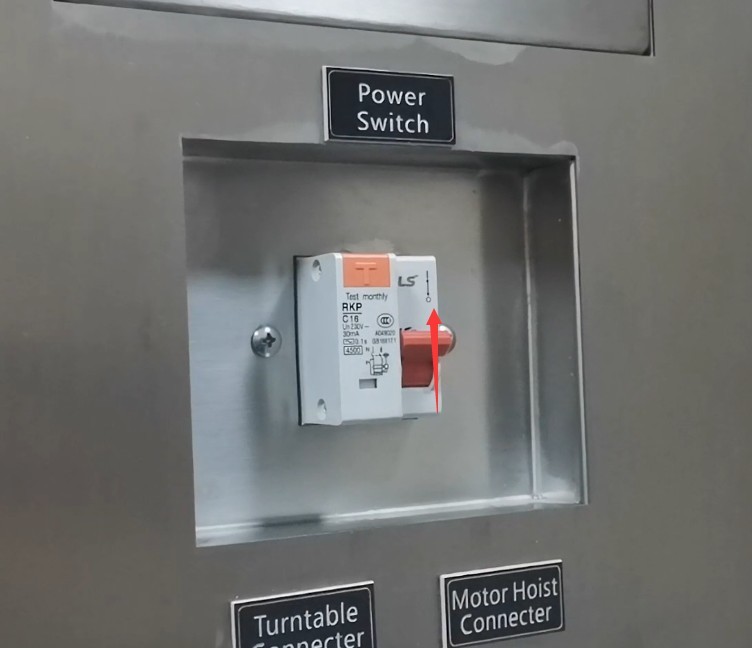
الشكل 10
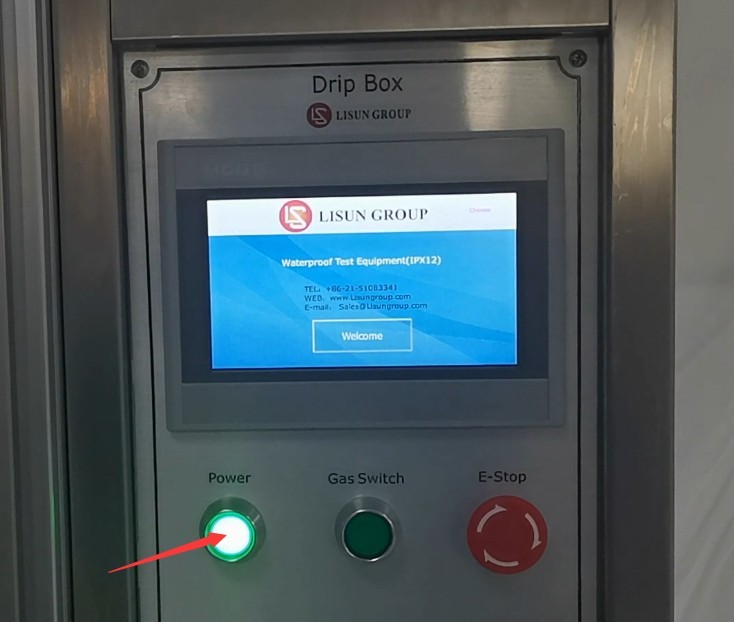
الشكل 11
4. مقدمة لبرنامج الشاشة اللمسية
4.1 مكونات الواجهة الرئيسية للبرنامج
4.1.1 واجهة المستخدم
| رقم | ملاحظات |
| ① تصنيف مقاومة الماء: IPX1 | Once selected, you can configure the IPX1 test parameters and perform the IPX1 dripping water test. |
| ② تصنيف مقاومة الماء: IPX2 | Once selected, you can configure the IPX2 test parameters and perform the IPX2 dripping water test. |
| ③ Test Parameters | انقر للوصول إلى شاشة إعدادات معلمات الاختبار |
| ④ Factory Settings | عندما يعمل الجهاز بشكل طبيعي، لا داعي للدخول إلى وضع التصحيح. أما إذا كانت معايير اختبار الجهاز غير طبيعية، فيمكنك الدخول إلى وضع التصحيح. يلزم إدخال كلمة مرور؛ يرجى التواصل معنا. |
| ⑤ Manual Window | قبل الاختبار الرسمي، يمكنك التحقق مما إذا كانت جميع وظائف الجهاز تعمل بشكل صحيح في نافذة الدليل. |
| ⑥ The drip tray rises | Press to raise the drip tray for easy sample installation. The drip tray is equipped with a limit stop and will rise no higher than the upper limit stop. |
| ⑦ The drip tray lowers | Press this button to lower the drip tray. The drip tray is equipped with an infrared sensor and will automatically lower to a position 200 mm from the sample to meet the test height required by the standard. |
| ⑧ Sample Power Supply | يمكن تشغيل أو إيقاف تشغيل طاقة العينة. عند تشغيل طاقة العينة للاختبار، سيقوم البرنامج تلقائيًا بتزويد العينة بالطاقة وفقًا لأوقات التشغيل/الإيقاف المحددة في واجهة إعدادات المعلمات. |
| ⑨ Clear and Reset | قبل بدء الاختبار، انقر هنا لمسح بيانات الاختبار السابق. |
| ⑩ Experiment Start | Click to start the water droplet test |
| ⑪ Test Stopped | Click to stop the drip test |
| ⑫ Test Duration Display | اعرض مدة الاختبار الحالية |
| ⑬ Standard Flow Display | Displays the required standard water flow rate under the current standard |
| ⑭ Sample Exposure Time | اعرض مدة تشغيل الجهاز الحالية للعينة |
| ⑮ Sample power-off time | Display the duration of power interruption for the current sample |
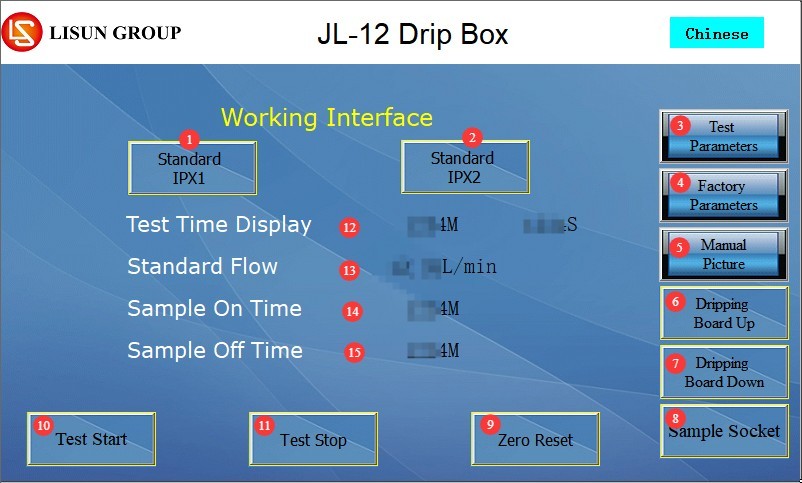
الشكل 15
4.1.2 واجهة إعدادات المعلمات
| رقم | ملاحظات |
| ① مدة الاختبار | يمكن تحديد مدة الاختبار الإجمالية؛ ويحدد معيار GB/T 4208-2017 أن مدة الاختبار لكل من IPX1 و IPX2 هي 10 دقائق. |
| ٢- سرعة القرص الدوار | Only IPX1 can be configured; the standard is 1 r/min, with a customizable range of 0–5 r/min. IPX2 cannot be configured; rotation during testing is performed automatically according to the standard. Note: During IPX1 testing, for samples that require power to be tested, the turntable will automatically rotate in both directions to prevent the sample’s power cord from becoming tangled. |
| ③ الوقت الذي يتم فيه تنشيط العينة | Set the duration of continuous power supply to the sample during the test, in minutes |
| ④ Time the sample is without power | Set the duration of the power outage for the sample during the test, in minutes |
| ⑤ Turntable Interval Time | Applies to IPX2. According to the standard, set the duration to 150 seconds, which means 2.5 minutes per angle, for a total of 10 minutes across all four angles. |
| ⑥ العودة | انقر للعودة إلى واجهة العمل |
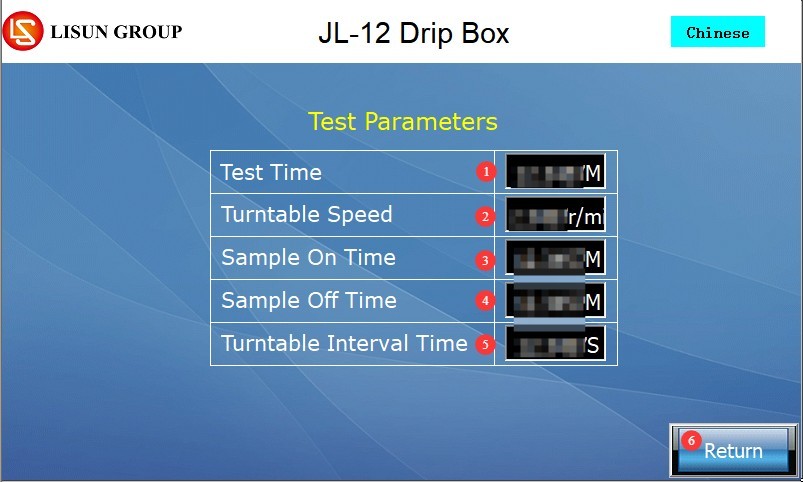
الشكل 16
Note: Continuous power supply: Power-on time = test duration; power-off time = 0 min; No power supply: Power-on time = 0 min; power-off time = test duration.
4.1.3 نافذة يدوية
| رقم | ملاحظات |
| ① Drip Solenoid Valve | The water inlet solenoid valve can be turned on or off; once turned on, water begins to flow into the drip tray at the flow rate set by the flow meter. |
| ② نموذج لمصدر الطاقة | إذا تم توصيل مصدر طاقة العينة والعينة نفسها، يمكنك تشغيل مصدر طاقة العينة أو إيقاف تشغيله. |
| ③ The drip tray rises | Click to raise or lower the drip tray; release to stop. |
| ④ The drip tray lowers | |
| ⑤ Turntable Rotates Clockwise | انقر لتدوير القرص الدوار باتجاه عقارب الساعة أو عكسها؛ حرر الزر للتوقف. ملاحظة: إذا كانت هناك أسلاك بين القرص الدوار والعينة، فلا تقم بتدويره في اتجاه واحد لفترة طويلة لتجنب تشابك الأسلاك. |
| ⑥ عكس اتجاه القرص الدوار | |
| ⑦الخلف | انقر للعودة إلى واجهة العمل |
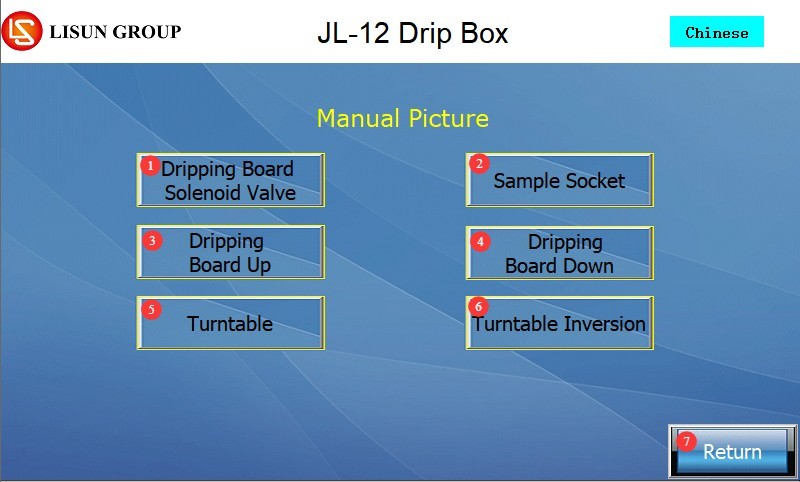
الشكل 17
4.2 وصف واجهة إنذار البرنامج
لم تتم إعادة ضبط زر التوقف الطارئ. يرجى تدوير زر التوقف الطارئ باتجاه عقارب الساعة لإعادة ضبطه، ثم حاول مرة أخرى.
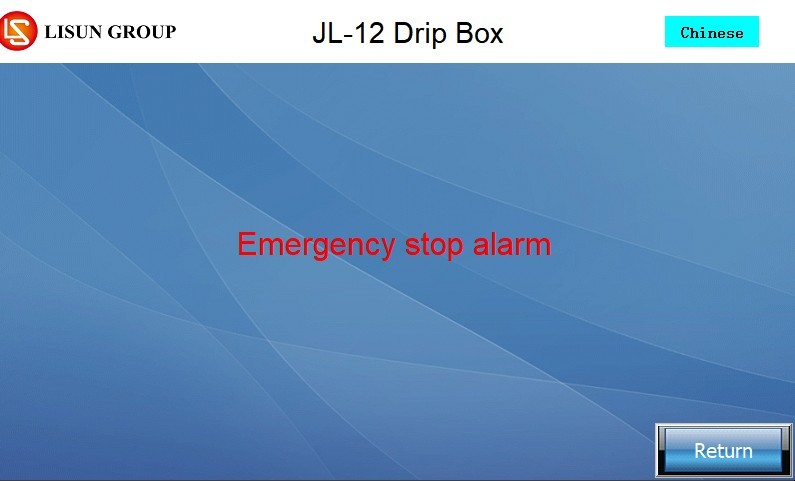
الشكل 18
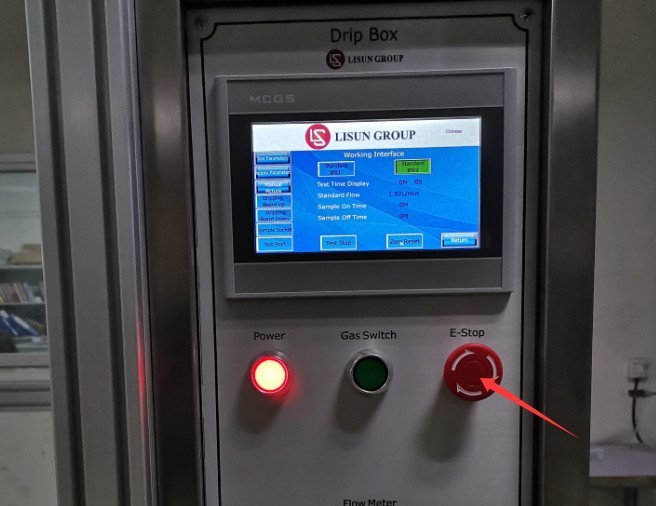
الشكل 18.1
The water droplet test is complete. Click “Back” to continue.
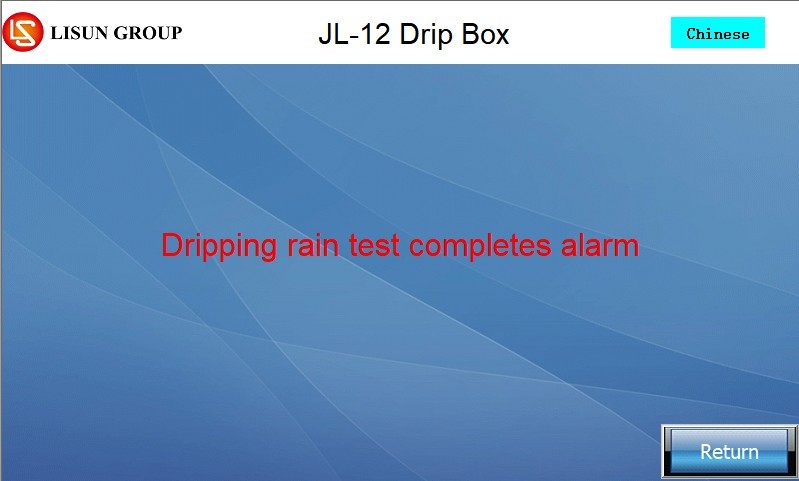
الشكل 19
لم يتم تحديد أي تصنيف لمقاومة الماء. يرجى النقر على "رجوع"، ثم تحديد تصنيف مقاومة الماء الذي ترغب في اختباره، والمحاولة مرة أخرى.
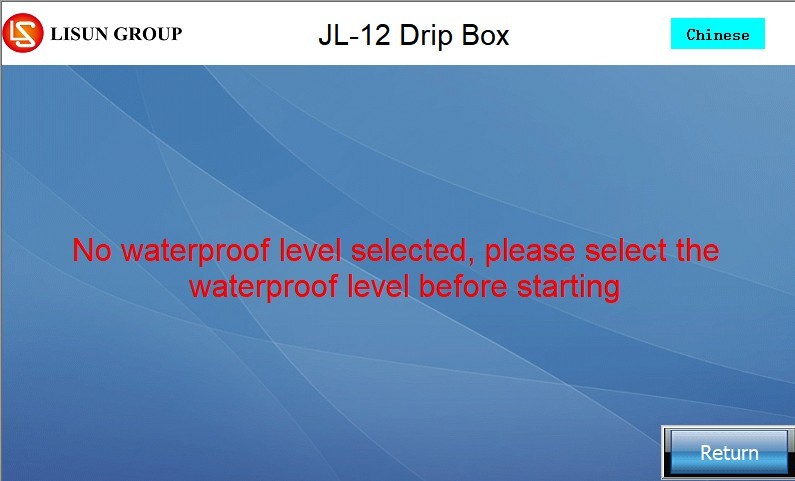
الشكل 20
لم تتم إعادة ضبط وقت الاختبار. يرجى النقر على "رجوع"، ثم النقر على "إعادة ضبط" لمسح بيانات الاختبار السابق والمحاولة مرة أخرى.
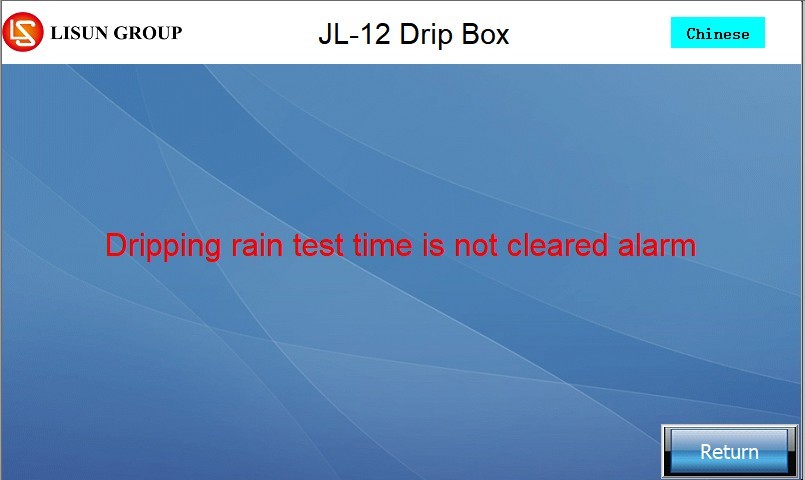
الشكل 21
5. Water Drop Test Procedure
5.1 جاهز
5.1.1 Test Parameter Requirements
| تقييم مقاومة الماء | IPX1 (Vertical Water Drops) | IPX2 (dripping water at a 15° angle) |
| طرق الاختبار | Place the specimen on the turntable with its axis 100 mm from the turntable’s axis. Note: Please manually install and secure the specimen to the turntable. | The specimen is tilted 15° at each of the four fixed positions. Note: The turntable must be manually tilted 15° and secured. |
| مدة الاختبار | المجموع: 10 دقيقة | Total duration: 10 minutes (2.5 minutes per position). During the test, the turntable automatically rotates to the four positions specified in the standard and performs the test without requiring manual intervention. |
| متطلبات مشغل الأسطوانات | Rotation speed: 1 r/min, continuous rotation | No rotation, fixed position |
| هطول الأمطار | 1-1.5 مم/دقيقة | 3-3.5 مم/دقيقة |
| Since drip plates come in a variety of sizes, the standard setting is a flow meter (L/min) rather than a rainfall gauge (mm/min). Before the equipment leaves the factory, we have already converted the rainfall rate into water flow based on the drip plate size and displayed it in the working interface. When conducting your tests, simply adjust the flow meter to the correct flow rate indicated on the screen. | ||
Note 1: How to tilt the turntable 15°.
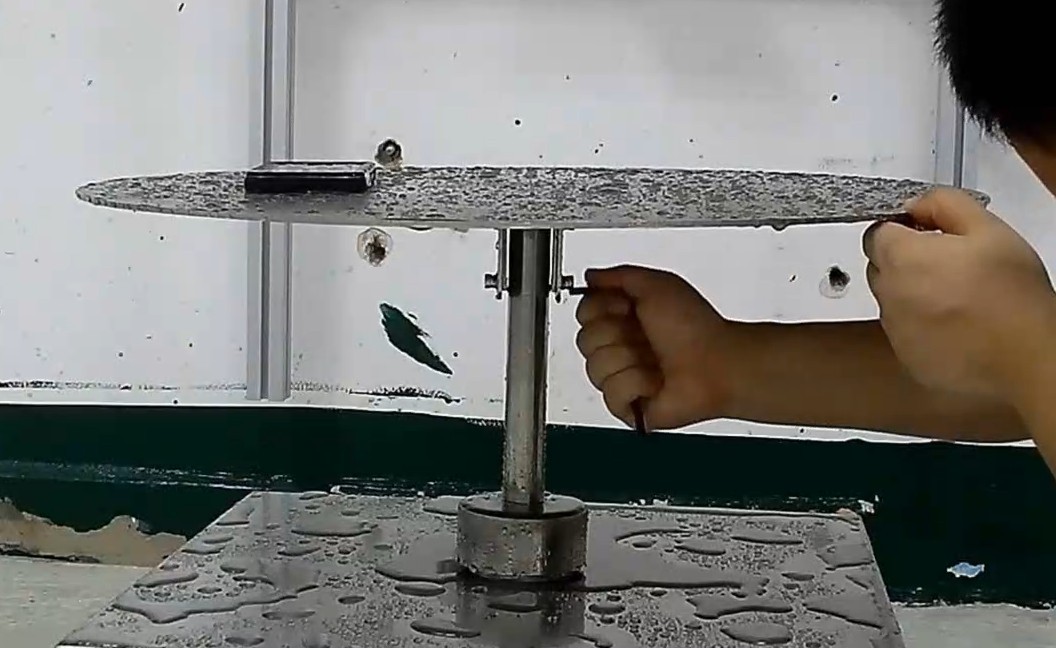
الشكل 22
Note 2: Formula for converting water flow rate to rainfall: Water flow rate (L/min) = Rainfall (mm/min) × 0.001 × Rainfall area (m²) × 1000 (1 millimeter = 0.001 meter; 1 cubic meter = 1000 liters)
5.1.2 توصيل سلك الطاقة الخاص بالعينة
If the sample requires testing under power, use the standard waterproof plug and socket to make the connection, and check that the connection is secure and free of looseness.
| رقم | ملاحظات |
| ① | Connect the sample power cord to the waterproof plug labeled ④, then ensure the waterproof plug remains inserted into the waterproof socket. |
| ② | Connect the power cord of the waterproof plug and receptacle to power outlet ③ on the turntable. |
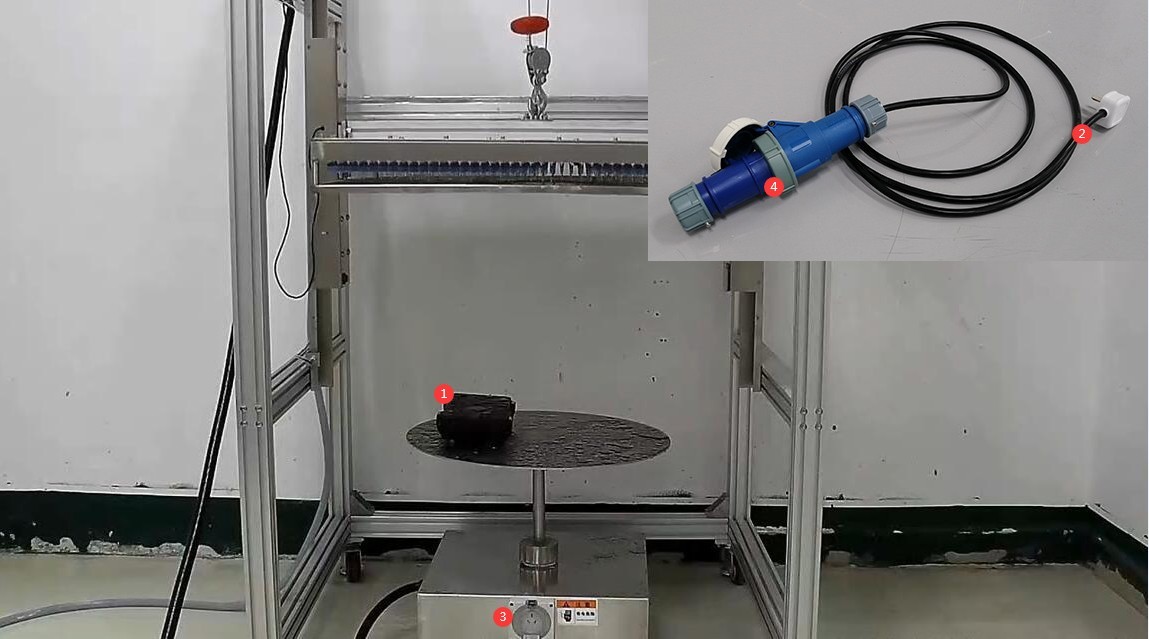
الشكل 23
5.2 اختبار بدء التشغيل
5.2.1 Selection of Levels and Parameters
On the main touchscreen interface, tap the IPX1 or IPX2 water resistance rating selection button, and the program will automatically apply the standard parameters; tap the “Test Parameters” button to confirm that all test parameters meet the standard requirements, and then tap “Back” once the settings are complete.
5.2.2 Adjusting the Drip Tray Position
Click the “Lower Drip Tray” button on the work interface; the drip tray will lower automatically until it hits the limit switch and stops. At this point, the distance between the drip tray and the top of the sample is 200 mm (as required by the standard), and no manual adjustment is necessary.
5.2.3 Water Flow Regulation
Make sure the tap at the water inlet is turned on, then click “Start Test” to open the inlet solenoid valve. Tap water will slowly flow into the water circuit until water begins to drip from the needle on the drip tray;
Observe the standard flow rate display area on the touchscreen interface. Assuming a standard drip tray size of 800 × 800 mm, the standard water flow rate for IPX1 should be 0.64 L to 0.96 L/min, and the standard water flow rate for IPX2 should be 1.92 L to 2.24 L/min;
Turn the black knob on the flow meter in the control cabinet (turn counterclockwise to increase flow, clockwise to decrease flow). Observe the top surface of the float inside the flow meter; the water flow should remain stable within the standard range. Once adjustment is complete, keep the knob in that position.
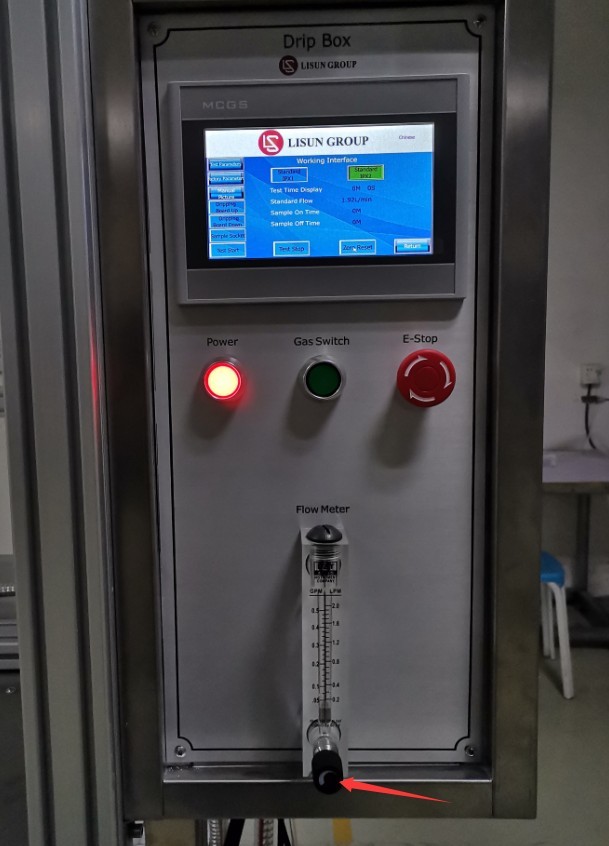
الشكل 24
5.3 مراقبة عملية الاختبار
Real-time monitoring during the test: The IPX1 turntable speed is maintained at 1 r/min; for IPX2, after 2.5 minutes of testing at each position, the turntable automatically rotates to the next position until the test is complete; water drips evenly from the needle; the sample does not wobble or shift; and there are no water leaks at any interfaces;
If the sample is powered on for testing, monitor its operating status to ensure there are no abnormalities such as short circuits or tripped circuit breakers; if any problems occur, immediately click “Stop Test” or press the emergency stop button, restore the equipment and sample to normal operation, and then restart the test.
6. إجراءات ما بعد الاختبار
6.1 الإجراءات الفورية عند الانتهاء من الاختبار
6.1.1 Drip Tray and Sample
Press the “Stop Test” button, or wait for the test to end automatically; the water inlet solenoid valve will then close automatically. However, water will still remain in the drip tray, and dripping will continue for a short time. You may remove the sample directly from the turntable.
6.1.2 شاشة تعمل باللمس
تحقق مما إذا كان عرض وقت الاختبار على واجهة العمل يعمل بشكل صحيح، ثم انقر فوق "مسح وإعادة ضبط" للاستعداد للاختبار التالي.
6.2 إعادة ضبط الجهاز
6.2.1 Drip Pan Reset
If the next test will not be performed in the near future, drain the accumulated water from the drip tray to prevent the needle from clogging.
If an air compressor is connected, first remove 2–3 pins from the drip tray (Important!), then press the air-release switch on the control cabinet to quickly expel the accumulated water using compressed air.
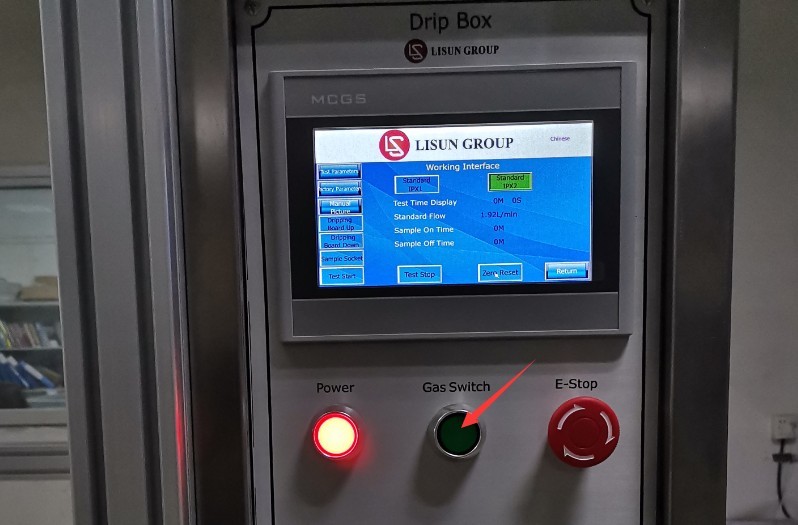
الشكل 25
After draining the accumulated water, press the “Air On” switch again to cut off the air supply to the air compressor, then reinstall the removed needle.
If there is no air compressor available, remove a few needles to allow the accumulated water to drain out naturally. Once the water has drained completely, reinstall the needles.
Then tap the “Raise Drip Tray” button on the touchscreen to raise the drip tray to its highest position, preparing it for the next test.
أبدا الاغلاق
After all tests for the day are completed, close the water inlet valve and turn off the equipment’s circuit breaker and power switch.
6.3 تقييم نتائج الاختبار
Use a dry cloth to wipe away any water droplets from the outer surface of the sample, and then test the sample. Determine whether the sample has passed the test based on the following criteria.
| معيار التقييم | متطلبات محددة |
| سلامة | لا يؤثر نقص إمدادات المياه على التشغيل الطبيعي للمعدات أو على السلامة. |
| حماية العزل | لا يتراكم الماء على المكونات المعزولة حيث يمكن أن يتسبب في حدوث تسرب على طول مسافة الزحف. |
| حماية المكونات الكهربائية | يجب عدم دخول الماء إلى الأجزاء الحية أو الملفات التي لم يتم تصميمها للعمل في ظروف رطبة. |
| حماية الكابلات | لا يتراكم الماء بالقرب من نهايات الكابلات ولا يدخل إلى الكابل نفسه. |
| فعالية فتحات التصريف | If there is a drain hole, it must be verified that incoming water will not accumulate and can be drained without damaging the equipment. |
| معدات بدون فتحة تصريف | في حالة تراكم الماء وتهديده للأجزاء الحية، اتبع معايير القبول المحددة في معايير المنتج ذات الصلة. |
7. الصيانة اليومية للمعدات والعناية بها
7.1 التنظيف اليومي
Wipe away water spots and dust from the surface of the equipment, paying special attention to the turntable and drip tray areas to prevent water spots from forming limescale;
امسح شاشة اللمس ولوحة التحكم بقطعة قماش جافة لمنع دخول الماء والغبار إلى الدوائر الداخلية.
Thoroughly clean the inside of the drip tray at least once a week. Empty any accumulated water, open the drip tray, and wipe it dry with a clean, dry cloth. After cleaning, check the inner walls for rust or scale. If there is slight rust, gently wipe it with a rust remover, then rinse thoroughly with clean water.
7.2 عمليات الفحص والاستبدال الدورية
Nozzles: Check that the nozzles on the drip tray are not clogged, loose, or deformed, and verify that the drips are uniform. If a nozzle is clogged, use a needle cleaner to clear it.
Connections: Check all water, air, and electrical connections to ensure there are no leaks or loose connections.
Filter Cartridge: Check the filter cartridge inside the filter. If the cartridge has turned brown (indicating it is saturated with adsorbed impurities), replace it immediately with a new one.
7.3 صيانة المعدات غير المستخدمة
7.3.1 الخمول قصير الأجل (خلال شهر واحد)
Drain all standing water from the drip tray and the water lines to prevent scale buildup on the needles and tubing;
قم بتغطية الوحدة بأكملها بقطعة قماش مقاومة للغبار لمنع دخول الغبار؛
احتفظ بالمعدات في منطقة جافة وجيدة التهوية.
7.3.2 عدم النشاط لفترة طويلة (أكثر من شهر واحد)
Complete all maintenance procedures for short-term storage; disconnect all electrical, pneumatic, and water connections from the equipment; remove the air and water hoses, let them air dry, and store them properly;
Apply a layer of rust-preventive oil to the inner walls of the drip tray and the surfaces of metal parts to prevent rust; store the equipment in a cool, dry place away from direct sunlight;
Apply a small amount of industrial lubricant to moving parts such as the turntable bearings and the lifting guide rails of the drip tray to prevent rust and jamming;
يجب تشغيل الجهاز مرة واحدة شهرياً. ادخل إلى شاشة الدليل لاختبار جميع الوظائف، ثم أوقف تشغيله بعد 5 إلى 10 دقائق من التشغيل لمنع تلف الدائرة الكهربائية.
8. استكشاف الأخطاء وإصلاحها وحل المشكلات الشائعة
| أعراض الخلل | الأسباب المحتملة | العملية |
| منبه بشاشة لمس | انظر 4.2 | |
| The touchscreen is lit, but the buttons do not respond when tapped. | تجمّد شاشة اللمس، أو ظهور بقع أو علامات مائية على سطحها، أو عطل في وحدة اللمس الداخلية. | Turn off the device, let it sit for 5 minutes, and then restart it; wipe the touchscreen with a dry cloth to remove any stains or water marks; if it still does not respond, contact us for repair. |
| The drip tray gets stuck when raising or lowering it | The drip tray is tilted, and there is debris on the cord between the lifting motor and the drip tray. | Please use a level to make sure the drip rack is vertical and not tilted; try again after clearing away any debris. |
| The water drips unevenly from the needle | The drip stand is tilted, the needle is clogged, or the water flow is insufficient | Use a level to ensure the drip tray is vertical and not tilted; use a cleaning needle to unclog any nozzles that are not dispensing water; ensure there is sufficient water flow, and adjust the flow meter to the standard flow rate. |