
 الإنجليزية
 中文简体
中文简体 Русский
 Español
 Português
 Türkçe
 العربية
 Deutsch
 Polski
 Italiano
 Français
 한국어
한국어 ไทย
ไทย Tiếng Việt
 日本語
日本語





























محاكيات HBM / MM ESD لاختبار IC
مستخدم المالكين
قابل للتطبيق LISUN الموديلات: ESD-883D
1. فهم أساسي للمعدات
1.1 نظرة عامة على المنتج
استخدم ESD-883D Semiconductor Electrostatic Discharge Simulator , also known as a Semiconductor ESD Immunity Tester, is a high-precision electrostatic discharge (ESD) immunity testing device designed by LISUN specifically for semiconductor devices (such as chips, diodes, transistors, and IC modules). The device can replicate electrostatic discharge phenomena caused by a charged human body or equipment. By injecting standardized high-voltage pulses, it evaluates the tolerance limits of semiconductor devices to electrostatic shocks, It proactively identifies latent faults in devices caused by static electricity, such as gate breakdown and PN junction damage, providing critical test data for the reliability design and factory quality inspection of semiconductor devices.
1.2 Applicable Standards and Test Models
1.2.1 نموذج جسم الإنسان (HBM)
Simulates the electrostatic discharge generated when a human body comes into contact with a semiconductor device. Applicable standards include:
ANSI/ESD STM5.1-2007, ANSI/ESDA/JEDEC JS-001-2024, IEC 60749-26:2018, EIA/JESD22-A114-B, MIL-STD-883 Method 3015, AEC-Q100-002, GB/T 4937.26-2023.
1.2.2 Machine Discharge Model (MM)
Electrostatic discharge (ESD) that occurs when automated equipment (such as surface-mount machines and probe stations) comes into contact with chips; applicable standards include:
ANSI/ESD STM5.2-2013, IEC 60749-27:2012, EIA/JESD22-A115-A, AEC-Q100-003, GB/T 4937.27-2023.
1.3 المواصفات الفنية الرئيسية
| مشروع | نموذج جسم الإنسان (HBM) | وضع تفريغ الماكينة (مم) |
|---|---|---|
| نطاق الجهد الناتج | 50 V–8 kV ±5% | 50 V to 2 kV ±5% |
| قطبية الإخراج | إيجابي، سلبي، متبادل إيجابي وسلبي | إيجابي، سلبي، متبادل إيجابي وسلبي |
| مكثف التفريغ | 100 بيكوفاراد ±10% | 200 بيكوفاراد ±10% |
| تفريغ المقاوم | 1500 Ω ± 10٪ | شنومك Ω |
| الفاصل الزمني للتصريف | 1-99 ثانية | 1-99 ثانية |
| عدد التفريغات | 1 - 999 مرة | 1 - 999 مرة |
| وضع الزناد | Single, Count, Host-Triggered | Single, Count, Host Self-Trigger |
1.4 مجالات التطبيق النموذجية
Semiconductor Design and R& D: Chip reliability verification, electrostatic sensitivity testing of new materials; Semiconductor Packaging and Manufacturing: Post-packaging final inspection; Automotive Electronics Semiconductors: Electrostatic testing of automotive chips, IGBT module testing; Military and High-Reliability Semiconductors: Testing of military chips and aerospace semiconductors; Third-Party Testing and Certification: Compliance certification testing, verification of compliance with standards; Consumer Electronics Semiconductors: Testing of consumer-grade chips and semiconductor components.
2. احتياطات السلامة
2.1 متطلبات بيئة العمل
درجة حرارة التشغيل: من 15 درجة مئوية إلى 35 درجة مئوية؛ الرطوبة النسبية للتشغيل: من 30% إلى 60%. لا يُستخدم في بيئات ذات رطوبة عالية أو تكثف لتجنب حدوث شرارة كهربائية عالية الجهد.
يجب ألا يكون هناك تداخل كهرومغناطيسي قوي، ولا مصادر للاهتزاز، ولا مواد قابلة للاشتعال أو الانفجار، ولا غازات أكالة في المنطقة المحيطة.
ضعه على سطح عمل ثابت؛ تجنب إمالته أو قلبه رأساً على عقب، وأبقه بعيداً عن مصادر الاهتزاز.
The equipment must be placed at least 500 mm away from walls and surrounding structures (such as other test equipment and shelving) to facilitate maintenance; ما لا يقل عن 1000 مم من space must be left in front of the equipment to ensure smooth operation, and there must be no obstructions in the surrounding area.
2.2 معايير السلامة للجهد العالي
2.2.1 فحص الأمان
تحقق من توافق مصدر الطاقة مع الجهاز، وتأكد من تأريض مصدر الطاقة بشكل صحيح، وتحقق من خلو سلك التأريض من التلف أو الارتخاء؛
Grounding Requirements: The host unit’s protective grounding terminal (PGND) must be connected to ground using a grounding conductor. The grounding resistance must be ≤4Ω, and the grounding cable must be securely connected without any looseness or breaks.
2.2.2 متطلبات السلامة لإجراءات التشغيل
يجب أن يخضع المشغلون لتدريب احترافي وأن يكونوا على دراية بهذا الدليل والمعايير ذات الصلة. يُمنع غير المتخصصين من تشغيل الجهاز أو تفكيكه. يحتوي الجهاز على دوائر كهربائية عالية الجهد؛ وقد يُشكل فتح الغطاء خطرًا للصعق الكهربائي. يُرجى الاتصال بالفريق الفني للشركة المصنعة لإجراء الإصلاحات.
After the equipment is powered on, do not touch the test bench, high-voltage cables, test leads, or other related components to prevent electric shock;
Operators should ensure their hands are dry and free of metal jewelry; it is recommended that they wear insulated gloves while operating the equipment;
لا تأكل أو تشرب أثناء الاختبار لتجنب الحوادث الناجمة عن الصدمة الكهربائية؛
عندما يشارك عدة أشخاص، يجب تحديد الأدوار والمسؤوليات بوضوح، والتأكد منها مع بعضهم البعض قبل بدء الاختبار لتجنب الأخطاء.
2.3 معايير سلامة المعدات
قبل توصيل أو فصل كابلات الجهد العالي، يجب عليك إيقاف تشغيل الطاقة الخاصة بالوحدة الرئيسية والانتظار لمدة 5 دقائق على الأقل للتأكد من تفريغ المكثفات الداخلية بالكامل؛
عند إدخال قابس عالي الجهد في مقبس كهربائي، قم بمحاذاته مع دبابيس التثبيت. لا تقم أبدًا بدفع القابس في المقبس إذا لم يكن محاذيًا بشكل صحيح، لتجنب إتلاف دبابيس النحاس الداخلية؛
If you discover damage to the high-voltage cable or loose connectors, stop using it immediately and contact customer service to have it replaced;
Do not suddenly disconnect the power or plug or unplug high-voltage connectors while the equipment is running, to avoid damaging the high-voltage modules;
لا تخدش الشاشة اللمسية بأشياء صلبة، ولا تضغط على الشاشة بأشياء حادة؛
Avoid bumping the equipment during testing to prevent the device under test from shifting, which could cause test failures or probe damage.
2.4 خدمات أخرى
بالنسبة للأمور غير المشمولة في هذا الدليل، يرجى توخي الحذر أو الاتصال بنا.
3. نظرة عامة على المعدات والأسلاك
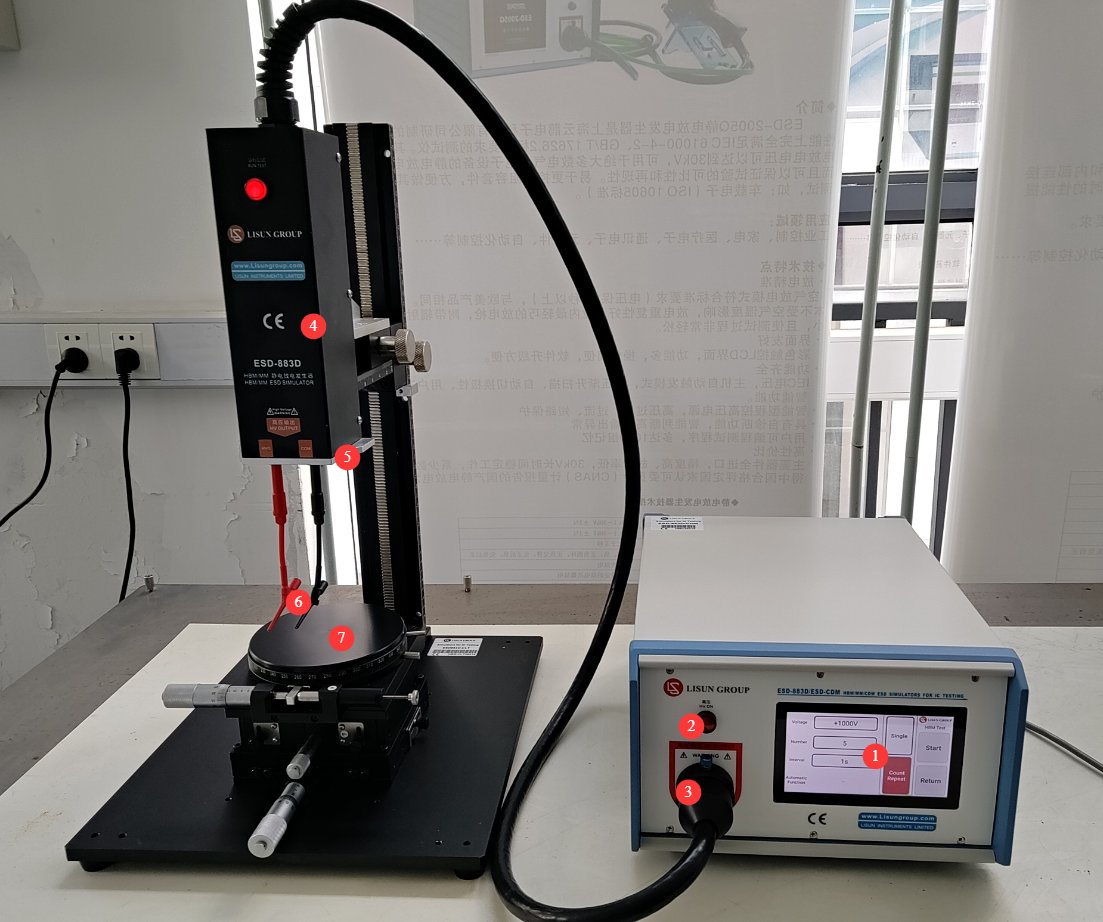
3.1 الجبهة مشاهدة
انظر الشكل 3-1.
| رقم الهاتف | ملاحظات |
|---|---|
| كهرباء تفريغ محاكي | |
| ① | الشاشة التي تعمل باللمس |
| ② | ضوء مؤشر الجهد العالي |
| ③ | توصيل الجهد العالي. ارفع دبوس التثبيت، وقم بمحاذاة الأخدود الموجود في قابس الجهد العالي لبرج التفريغ مع دبوس التثبيت، ثم أدخله ببطء حتى يصل إلى الأسفل. بعد ذلك، اخفض دبوس التثبيت لتثبيت قابس الجهد العالي في مكانه. |
| HBM/MM Electrostatic Discharge Tower | |
| ④ | Adjustable-height stand |
| ⑤ | Discharge module: Simply unplug or plug it in to replace the HBM or MM discharge module. |
| ⑥ | A standard-length test lead with the banana plug end inserted into the discharge module and the small clip end clamped onto the device under test |
| ⑦ | Standard test stand, with adjustable position and height |
3.2 رؤية خلفية
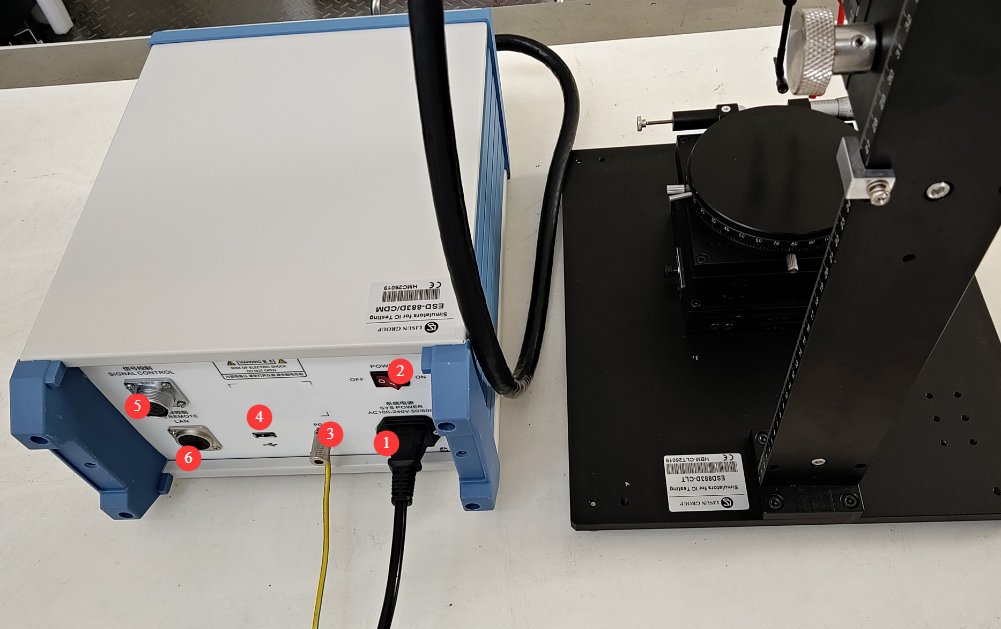
انظر الشكل 3-2.
| رقم الهاتف | ملاحظات |
|---|---|
| ① | مقبس سلك الطاقة (مزود بفيوز) لتوصيل الجهاز بمصدر طاقة مناسب |
| ② | مفتاح الطاقة |
| ③ | PGND: طرف التأريض الوقائي؛ يتم توصيله بالأرض باستخدام سلك التأريض. |
| ④ | منفذ USB: يمكن استخدامه لتوصيل فأرة USB للتحكم في شاشة اللمس، أو لتوصيل محرك أقراص فلاش USB لتحديث البرنامج. |
| ⑤ | Signal cable used to connect the CDM electrostatic discharge tower; do not connect when the CDM electrostatic discharge tower is not in use. |
| ⑥ | منفذ LAN احتياطي |
3.3 المكونات الرئيسية
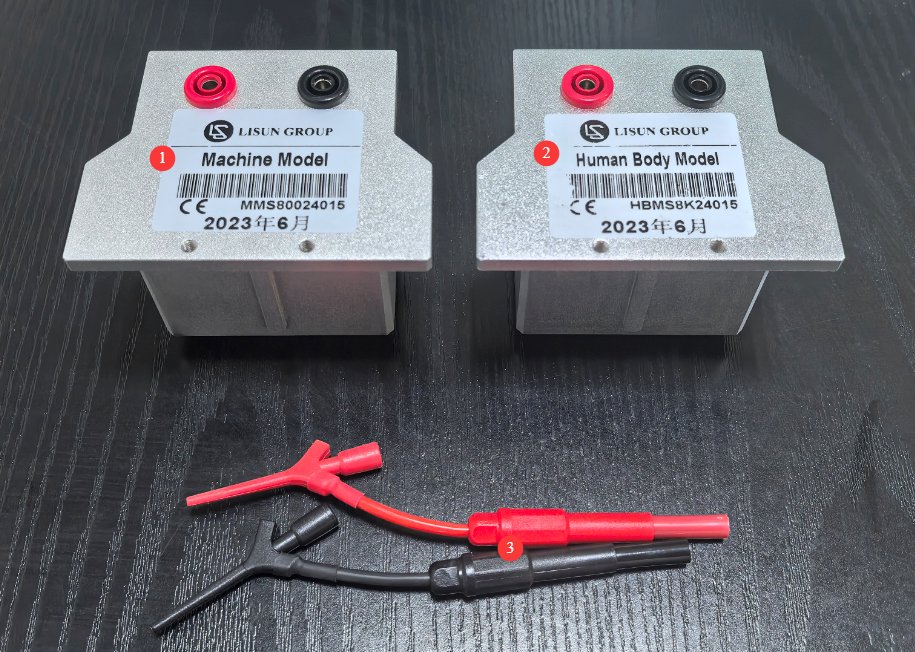
انظر الشكل 3-3.
| رقم الهاتف | ملاحظات |
|---|---|
| ① | MM Discharge Module |
| ② | HBM Discharge Module |
| ③ | Standard Test Line |
3.4 Replacing the Discharge Module and Discharge Tower
The HBM/MM discharge tower can accommodate only one discharge module, which can be replaced manually. The Electrostatic Discharge Simulator can be connected to discharge towers designed for different tests. If you need to replace the discharge tower for testing, please strictly follow the operating procedures below.
| ① | ② | ③ |
|---|---|---|
| تحقق من أن جهاز محاكاة التفريغ الكهروستاتيكي في حالة "إيقاف الاختبار"، ثم قم بإيقاف تشغيله. | If you need to replace the discharge module, refer to Section 3.1 for replacement instructions. | After replacing it, turn on the device and run the new test. |
| If you need to replace the discharge tower, disconnect all cables between the original discharge tower and the Electrostatic Discharge Simulator, and then reconnect all cables between the new discharge tower and the Electrostatic Discharge Simulator. |
4. مقدمة لبرنامج الشاشة اللمسية
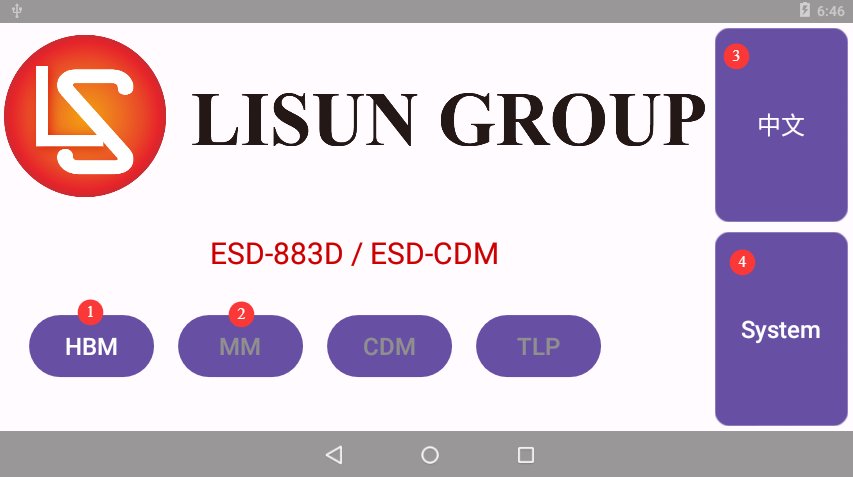
4.1 الشاشة الأولي
انظر الشكل 4-1.
| رقم الهاتف | ملاحظات |
|---|---|
| ①② | Depending on the discharge module you have installed, either “HBM” or “MM” will automatically appear here; click on it to access the corresponding test interface. Note: The device displays “MM” by default; that is, even if no discharge module is installed, “MM” will still appear as available. |
| ③ | التبديل بين اللغتين الصينية والإنجليزية |
| ④ | صفحة معلومات المنتج |
4.2 HBM/MM Test Interface
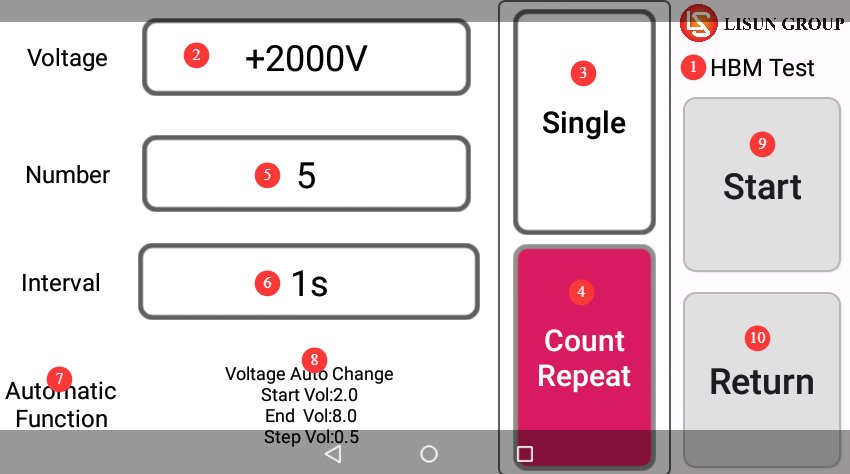
انظر الشكل 4-2.
| رقم الهاتف | ملاحظات |
|---|---|
| ① | Displays the currently used discharge module: HBM or MM |
| ② | يمكن ضبط جهد الاختبار والقطبية |
| ③ | إذا كنت ترغب في إجراء اختبار واحد، فحدد "اختبار واحد". |
| ④ | If you want to perform continuous testing, select “Continuous Testing.” |
| ⑤ | You can set the number of tests; this is limited to consecutive tests only. |
| ⑥ | The interval time can be set; this feature is available only for continuous testing. |
| ⑦ | Automatic feature options—click to configure them if needed |
| ⑧ | The current automatic setting is configured such that, after clicking to start the test, the test begins at 2 kV. Once the test is complete, the system automatically advances to 2.5 kV in 0.5 kV increments as set. After charging is complete, you must manually click to continue the test until all tests are finished. |
| ⑨ | بدء/إيقاف الاختبار |
| ⑩ | ارجع إلى الشاشة الرئيسية |
5. HBM/MM Electrostatic Discharge Testing
5.1 Pre-commissioning of the Discharge Tower
5.1.1 Installation of the HBM/MM Discharge Module
Install the correct discharge module according to the test requirements.
5.1.2 متطلبات وضع الجهاز قيد الاختبار
Operators must wear antistatic wristbands and antistatic clothing to prevent static electricity from their bodies from damaging the devices under test.
Based on the actual locations of the device under test and the test cables, adjust the height and horizontal position of the test bench so that, once the cables are connected to the test points on the device under test, the device sits securely on the test bench.
5.2 معايير الاختبار القياسية الموصى بها
| مستوى الاختبار | HBM Voltage | حالات الاستخدام النموذجية |
|---|---|---|
| مستوى 1 | 500 الخامس | High-Sensitivity Devices |
| مستوى 2 | 1 كيلو فولت | General-Purpose Sensors |
| مستوى 3 | 2 كيلو فولت | المكونات القياسية |
| مستوى 4 | 4 كيلو فولت | Anti-static Devices |
| مستوى 5 | 8 كيلو فولت | Highly Electrostatic-Resistant Components |
| مستوى الاختبار | MM Voltage | حالات الاستخدام النموذجية |
|---|---|---|
| مستوى منخفض | 100V | High-Sensitivity Devices |
| متوسط | 200 الخامس | المكونات القياسية |
| مستوى عال | 500 الخامس | Anti-static Components |
5.3 Starting/Stopping the Test
Set the test parameters according to Sections 4.2 and 5.2, and start the test. If any abnormalities occur during the test, press the stop button to halt the test, make the necessary adjustments, and retry. After the test is complete, ensure that any internal residual charge is completely discharged, and remove the device under test. If the equipment will not be used again that day, turn it off.
5.4 تفسير نتائج الاختبار
تتبع جميع المعايير منطقًا موحدًا للاختبار والتقييم:
| رقم الهاتف | ملاحظات |
|---|---|
| المقارنة | Before HBM/MM discharge, complete measurements of all parameters under the conditions specified in the standard and record the reference values. |
| اختبار التفريغ | Complete the discharge cycle with the specified voltage, polarity, and number of cycles as required by the standard |
| Comparison of Retests | After discharge, remeasure all parameters under conditions identical to those of the baseline. |
| تحديد الفشل | إذا تجاوز أي معيار المواصفات، أو تعطل الجهاز، أو حدث تلف مادي، فإن الجهاز قيد الاختبار يعتبر فاشلاً. |
| تأكيد المستوى | The highest voltage at which none of the samples failed shall be used as the final HBM/MM withstand rating for the device under test. |
6. الصيانة اليومية للمعدات والعناية بها
6.1 التنظيف والصيانة اليومية
After each test, wipe dust from the main unit housing, touchscreen, and discharge tower surface with a clean, soft cloth to keep the equipment clean; use a dedicated screen-cleaning cloth to clean the touchscreen. Do not use organic solvents such as acetone, and do not spray water directly onto the screen to clean it; Clean dust and foreign objects from the test bench surface weekly; if test cable connectors are soiled, gently wipe them with a lint-free cotton swab dipped in a small amount of anhydrous ethanol, and allow them to air dry before use.
6.2 بنود للفحص الدوري
6.2.1 فحص التوصيلات الكهربائية
Inspection Frequency: Once a month; Inspection Items: Check whether the power cords, high-voltage cables, and grounding cable connectors are loose, oxidized, or damaged; Remedial Actions: Tighten any loose connectors immediately; gently sand off any oxidation with fine-grit sandpaper; and replace any damaged cables immediately.
6.2.2 فحص الهيكل الميكانيكي
Inspection Frequency: Once a month; Inspection Items: Check whether the test bench adjustment knobs turn smoothly and whether the limit blocks on the height-adjustable stand are secure; Check the discharge module for visible damage and inspect the contact points for dirt; Remedial Actions: Apply a small amount of silicone grease to lubricate the adjustment mechanism; if the contact points on the discharge module are dirty, gently wipe them with a clean, soft cloth or a lint-free cotton swab dipped in a small amount of anhydrous ethanol, then allow them to air dry before use.
6.3 متطلبات التخزين طويل الأمد
Before long-term storage, clean the entire surface of the unit and unplug all external cables; cover the unit with a dust cover and store it in a dry, well-ventilated environment free of corrosive gases; the storage environment should have a temperature of 0°C to 40°C and a relative humidity of ≤70%; avoid direct sunlight; Every 3 months, power on the device and leave it in standby mode for 30 minutes to remove moisture and protect the high-voltage modules.
6.4 متطلبات فترة المعايرة
لضمان دقة القياس وموثوقية تشغيل الجهاز، يُوصى بإرساله دوريًا إلى مختبر قياسات معتمد تابع لجهة خارجية لإجراء المعايرة. يُوصى بإجراء المعايرة كل 12 شهرًا. ويمكن للمستخدمين تحديد فترة المعايرة المناسبة بناءً على وتيرة الاستخدام والظروف البيئية ومتطلبات نظام الجودة.
7. استكشاف الأخطاء وإصلاحها وحل المشكلات الشائعة
7.1 الأعطال المتعلقة بالطاقة
| أعراض الخلل | الأسباب المحتملة | العملية |
|---|---|---|
| No display when powered on; the power indicator light does not come on | سلك الطاقة غير موصول بإحكام؛ لقد احترق الفيوز. | Check the power cord connections; after turning off the power, replace the fuse with one of the same rating. |
| شاشة اللمس لا تستجيب | توجد بقع على الشاشة، والنظام معطل. | نظف سطح الشاشة؛ أعد تشغيل الجهاز |
7.2 أعطال الجهد العالي
| أعراض الخلل | الأسباب المحتملة | العملية |
|---|---|---|
| High voltage cannot be loaded after clicking “Start” | High-voltage cables are not properly connected, discharge modules are not properly installed, or there is poor contact | After the power is turned off, unplug and replug the high-voltage cable, then tighten it; ensure that the discharge module contacts are making good contact, and reinstall the discharge module. |
7.3 أعطال تشغيلية
| أعراض الخلل | الأسباب المحتملة | العملية |
|---|---|---|
| When installing the HBM discharge module, the test interface displays “MM Test.” | HBM module not installed properly, HBM module malfunction | Please clean the HBM contacts again and reinstall the HBM discharge module. |